Dispatch System
- Log in to post comments
- Tiếng Việt
- 繁體中文
Dispatch Shipping
1. Purpose
- Allows users to create a delivery order according to a predetermined route, the order can be from point A to point B, C, D... according to customer's request. At the same time, assign a driver to receive the delivery order.
2. Implementation conditions
- The user is granted permission for the Dispatch Shipping function on the CRM system.
3. Implementation instructions
- Go to the menu Dispatch System»Dispatch Shipping.

- The function screen displays 3 parts including:
1. Search section allows searching for delivery orders;
2. Add multiple orders, sample files, download data, add, product types section allows users to create orders, add multiple orders at the same time and import orders from excel files;
3. List of searched delivery orders
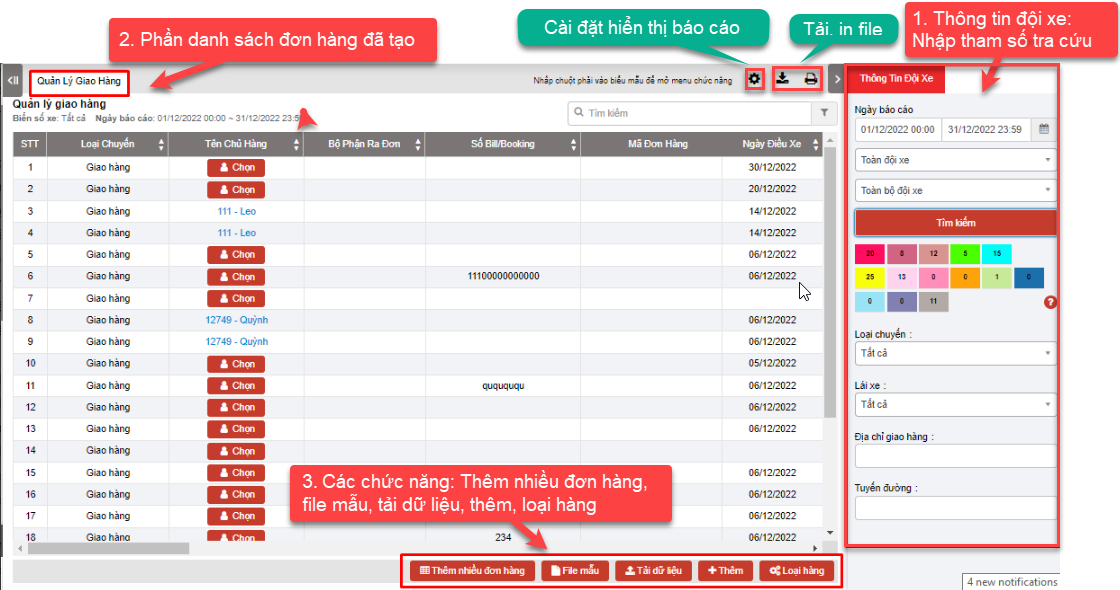
+ Search section: Allows users to search for delivery orders according to criteria such as time, license plate, delivery status...
-
From - To: Users enter the time period to search for delivery orders
-
Select Team
-
Plate number: plate number of the vehicle performing the dispatch
-
Click Search button to search for delivery orders
-
Filter by Status: The status of the delivery trip by color, users can choose to set up the types of delivery trip statuses on the dispatch_setting page. Statuses that users can choose to view the report:
-
-
Departure
-
Arrived at the starting point
-
Arrived at the ending point
-
Completed
-
Abnormal
-
- Filter by Trip Type, Driver, Delivery Address, Route

+ Add multiple orders, sample files, download data, add, product types: Allows users to set up delivery orders according to the company's form and dispatch vehicles to make deliveries.
-
Add multiple orders: Allows users to add multiple orders at the same time
-
Import Example: Allows users to download a sample excel file to enter order information into the file and import multiple orders at the same time using an excel file.
-
Download data: Allows users to import orders from an excel file. In the case of customers already on the system, if there is a delivery and receiving address, just enter the customer name and the address will automatically be retrieved according to the customer. For orders with multiple delivery points, when importing an excel file, the system will understand that the same order code and delivery number are the same delivery order.
Note: Information about vehicle, driver, customer can be entered by the user or when entering, the user must enter the correct information previously saved in the system.

-
Add order: User selects Add to add a new delivery order. The delivery order detail screen is as follows:

-
In case the order has multiple delivery points, the user selects the symbol
 to enter additional delivery points.
 -
Order information includes:
-
-
Order number: Order number
-
Delivery number: Order number
-
Order detail number: In case the order has multiple points, each point can have a different order detail number
-
Customer name: The user selects the customer in the customer contact list saved in the system
-
Plate number: The user selects from the license plate list, the list is displayed in order of priority for the nearest vehicle and if it is empty, it will be displayed first
-
Driver: The user selects the driver corresponding to the license plate
-
Fee: Vehicle dispatch fee
-
Pickup Address: Address to receive the goods for take-away
-
Expected Pickup Time: Time to receive the goods for take-away
-
Receipt phone number: Contact phone number of the delivery person for take-away
-
Delivery address: Delivery address after receiving the goods at the starting point
-
Estimated delivery time: Time to deliver the goods
-
Delivery phone number: Phone number of the recipient row
-
-
Press Add to complete adding a new order
-
Press Cancel to cancel adding the order just entered
-
After completing the order creation, the order will be sent to the Edriver driver app, see the instructions for using the Edriver app at EDRIVER APP USER GUIDE https://eup-wiki.gps247.vn/node/215
Note: Users can set up delivery orders as desired, can go to Dispach_setting.html (https://fms.ctms.vn/#dispatch_setting.html) to set up delivery orders

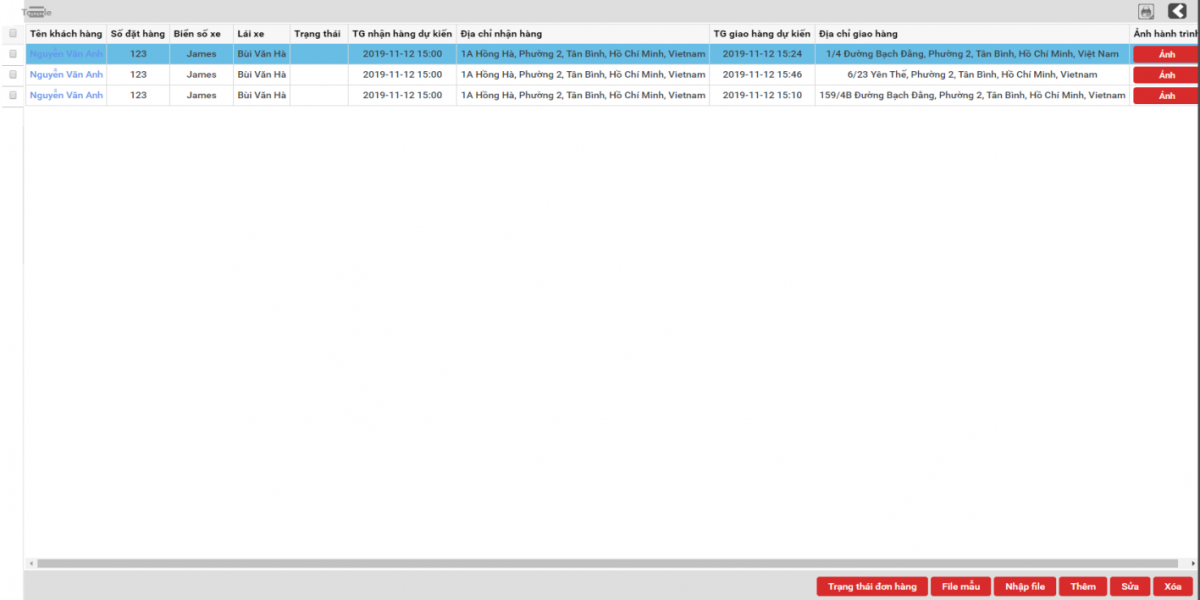
- After the user successfully adds an order, the function screen displays the delivery order that the user has added.
For example: The delivery order is to pick up goods from the agent's warehouse at 1A Hong Ha, Ward 2, Tan Binh, Ho Chi Minh City and deliver to the agents at the following addresses: 1/4 Bach Dang Street, Tan Binh, HCM; 6/23 Yen The, Ward 2, Tan Binh, HCM and 159/4B Bach Dang Street, Tan Binh, HCM. After successfully adding the order, the system will display 3 lines corresponding to 3 delivery points (refer to the photo)
-
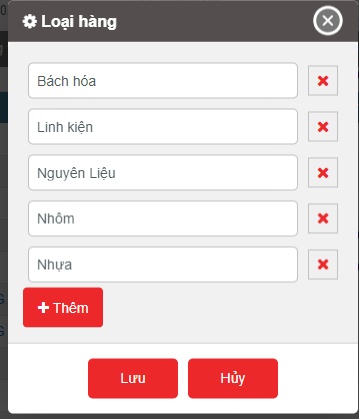
Product Type: Enter a list of product types
+ List Display Section: Displays all the metrics entered in the delivery order form, along with the delivery order status updated by the driver.
- Order Images:
-
If the user wants to download trip photos or invoice photos at a specific delivery point, they can navigate to the Trip Photos or Abnormalities (if any) section to download the photos.
-
Users can download all photos of an order at once: To download all photos for a single delivery order, the user can select the photo download feature to retrieve all photos associated with the delivery order.
-
Monthly Photo Archiving: The system will package the order photos monthly and update a link on the system for users to download and store the photos. (This feature will be updated later.)
-
-
Edit, Cancel, Status manage, Join order to this trip: User right-clicks on the line to be edited

- Edit delivery order: To edit a delivery order, the user selects the line that needs to be edited and then clicks Edit to edit the information in the delivery order
- Cancel: The user selects the line that needs to be deleted and clicks Delete to delete the delivery order
- Status Manage: Allows the user to edit the time corresponding to each status, or update the abnormal status of the order. The order status will be updated in detail for each delivery point: In case the driver completes the delivery at the first point and starts delivering at the second point, the delivery status at the first point will be Completed and at the second point will be Departure

- Log in to post comments
- Tiếng Việt
- 繁體中文
Dispatch Monitor
1. Purpose
- Allows users to check order reports by vehicle and by brand.
2. Implementation conditions
- The user is granted permission for the Dispatch Monitor function on the CRM system.
3. Implementation instructions
- Go to the menu Dispatch System»Dispatch Monitor.

- The display function screen consists of 3 parts:
1. Fleet Queries section allows users to select information about the vehicle and fuel reporting time
2. Trip statistics by cars section allows users to view statistical order reports by vehicle
3. Trip statistics by label section allows users to view statistical order reports by brand

+ Fleet Queries section: the user selects the following information:
- From: Select the first date and time that users want to view
- To: Select the last date and time that users want to view
- Team: Default is All team. Select the icon
 to select the team
 - Car: Default is 1 vehicle in the list, users select the icon to select the vehicle to look up
- Order type
- Click Search button to display detailed report information in the Statistics report section by vehicle and by brand
+ Trip statistics by cars: allows to display the following information:
-
Plate Number:
-
PayLoad: Set in Settings/ Basic Info/ Vehicle Info
-
Load Weight (Tons): Set in Settings/ Basic Info/ Vehicle Info
-
Total of planned trip: Planned Trips
-
Total of working trip: Number of Trips Performed
-
Current Address: Shows the current location of the vehicle (updated by online monitoring)
+ Trip statistics by label: After the user searches for a delivery order, the results will be displayed here. Including the following specific information:
-
Tên chủ hàng: Settings in Dispatch System»Customer Management
-
Total of planned trip: Planned trip
-
Total of working trip: Number of trips executed
-
% working trip: Percentage of executed trip/planned trip
- Log in to post comments
- Tiếng Việt
- 繁體中文
Map Monitor
1. Purpose
- Allows users to monitor orders and vehicle operating status on the map and detailed information of each vehicle updated at the current time.
2. Implementation conditions
- The user is granted permission for the Map Monitor function on the CRM system.
3. Implementation instructions
- Go to the menu Dispatch System»Map Monitor.

- The display function screen consists of 4 parts:
+ Fleet Queries section displays information about the fleet, nearby vehicles, landmarks and restricted areas and allows users to select the vehicle they want to view
+ Add, Edit, Delete section allows users to create, edit or delete delivery orders
+ Map section displays vehicles on the map including vehicle status, current vehicle location and redrawing the vehicle's route
+ Order section allows users to track orders

+ Fleet Queries section: the user selects the following information
-
Fleet Queries: Cho phép chọn xem thông tin của tất cả các đội xe hoặc từng đội xe. Thông tin đội xe bao gồm các thông tin sau:

-
Report current vehicle status::
-
Status: Display vehicle by color;
-
Speed: Update current vehicle speed;
-
Plate number;
-
Fuel level: Update remaining oil level of each vehicle;
-
Name: Driver name;
-
Address/Landmark: Location where speed is updated;
-
Speed update time;
-
Driver's contact phone number.
-
-
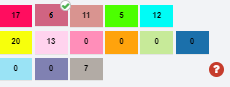
The support toolbar displays the total number of vehicles according to each status:

-
 : Total Cars
 -
 : Carrying Goods
 -
 : Not Carrying Goods
 -
 Green: Normal
 -
 Red: Over Speeding
 -
 Dark Blue: Idling
 -
 Gray: Engine Off
 -
 White: No Signal
 -
 Purple: In operation
 -
 Orange: Abnormal temperature
 -
 Blue: Geofence
 -
 Gray: Remove Container
-
-
Click Print to print the current status report;
-
Click Select the fields to be shown to display to set the fields of the current status report to be hidden;

-
Ấn chuột phải vào xe để xem nhanh Lịch sử hành trình và Chia sẻ xe
-
Right click on the vehicle to quickly view History Journey and Share this car

-
History Journey: Quickly view trip history by Hour/Minute/Day or Optional
-
Share this car: Send a link to others to track the car's online journey within a specified period

+ Add, edit, delete: Allows users to set up delivery orders according to the company's form and dispatch vehicles to make deliveries.

-
Add order: User selects Add to add a new delivery order. The delivery order detail screen is as follows:

-
In case the order has multiple delivery points, the user selects the check mark icon
 to enter additional delivery points.
 -
Order information includes:
-
Số đặt hàng: Order number
-
Số giao hàng: Order number
-
Số chi tiết đặt hàng: In case the order has multiple points, each point can have a different order detail number
-
Tên khách hàng: The user selects the customer in the customer contact list saved in the system
-
Biển số xe: The user selects from the license plate list, the list is displayed in order of priority for the nearest vehicle and if it is empty, it will be displayed first
-
Lái xe: The user selects the driver corresponding to the license plate
-
Phí: Vehicle dispatch fee
-
Địa chỉ nhận hàng: Address to receive the goods for pick-up
-
Thời gian nhận hàng dự kiến: Time to receive the goods for pick-up
-
Số điện thoại nhận hàng: Contact phone number of the delivery person for pick-up
-
Địa chỉ giao hàng: Delivery address after receiving the goods at the starting point
-
Thời gian giao hàng dự kiến: Time to deliver the goods
-
SĐT giao hàng: Phone number of the recipient
-
-
Click Save to complete adding a new order
-
Click Cancel to cancel adding the order you just entered

-
Edit: Edit the created order
-
Delete: Delete the created order
Note: Users can set up delivery orders as desired. They can go to Dispach_setting.html to set up delivery orders: https://fms.ctms.vn/#dispatch_setting.html

-
After the user successfully adds an order, the function screen displays the delivery order that the user has added.
For example: The delivery order is to pick up goods from the agent's warehouse at 1A Hong Ha, Ward 2, Tan Binh, Ho Chi Minh and deliver to the agents at the following addresses: 1/4 Bach Dang Street, Tan Binh, HCM; 6/23 Yen The, Ward 2, Tan Binh, HCM and 159/4B Bach Dang Street, Tan Binh, HCM. After successfully adding the order, the system will display 3 lines corresponding to 3 delivery points (refer to photo)

+ Map section displays the vehicle on the map including the vehicle status, current vehicle location, redrawing the vehicle's journey and statistics on the number of orders according to Received/Delivered/Completed

+ Order section displays all the entered criteria on the delivery order form (Dispatch/Delivery management or Dispatch/Monitor dispatch/Add as above), along with the delivery order status as updated by the driver.

-
Order Images:
-
In case the user wants to download the journey photos or invoice photos at any delivery point, select the Journey or unusual photos (if any) to download the photos
-
The user can download all photos of the order at once: To download all photos of the same order, the user can select the photo download feature to download all photos in the delivery order
-
Every month, the system will package the order photo file and update the link to the system so that the user can download the photos for storage. (The feature will be updated later)
-
+ Làdmark: Display pre-set milestones for fleets to track fixed counting points that the set vehicles must pass through;
 \
\
+ Fencing Area: Displays pre-set restricted zones for each vehicle, to monitor vehicles that are only allowed to run within the restricted zone.

- Log in to post comments
- Tiếng Việt
- 繁體中文
Dispatch History
1. Purpose
- Allows users to track delivery order status, vehicle arrival time, and provides map support so users have a visual view of delivery landmarks.
2. Implementation conditions
- The user is granted permission for the Dispatch History function on the CRM system.
3. Implementation instructions
- Go to the menu Dispatch System»Dispatch History.
1. Search section allows users to search for delivery orders within a time period
2. Map section displays delivery milestones;
3. Delivery Order Status section allows users to view detailed delivery order status.
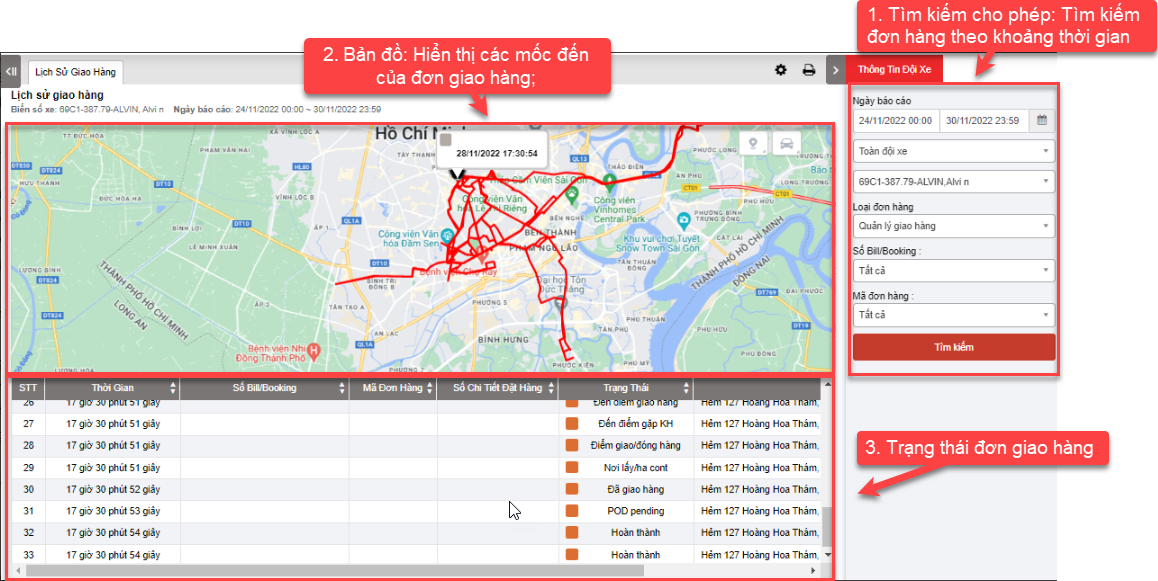
+ Search section: User can search for delivery orders by vehicle within the time period from, to:
-
Team: Default display system, user can select the fleet to search
-
Select the icon
 to select the license plate number you want to search
 -
From: User selects the first day they want to search for delivery orders
-
To: User selects the last day they want to search for orders
-
Order Type
-
Số bill/ Booking
-
Mã đơn hàng
-
Click Search button to display the report
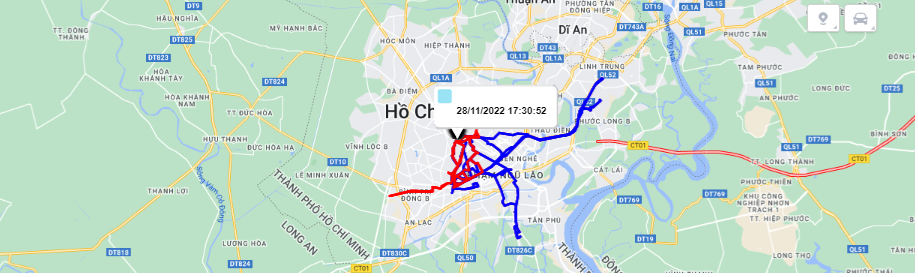
+ Map section: shows the vehicle's route and delivery destination.
+ Delivery Order Status Section: After the user searches for a delivery order, the results will be displayed here. Including the following specific information:
-
Time
-
Số Bill/ Booking
-
Mã đơn hàng
-
Số chi tiết đặt hàng
-
Status
-
Address
+ Select the icon  to print the report
+ Select the icon  to Custom Field, Plate number field settings, Print signature settings
- Log in to post comments
- Tiếng Việt
- 繁體中文
Dispatch Status Report
1. Purpose
- Allows users to track detailed address and time of vehicle dispatch statuses including Departure, Received, Arrived at delivery point, Delivered, POD pending, Completed
2. Implementation conditions
- The user is granted permission for the Dispatch Status Report function on the CRM system.
3. Implementation instructions
- Go to the menu Dispatch System»Dispatch Status Report.

- The display function screen consists of 2 parts:
+ Fleet Queries section allows users to search for reports within a period of time;
+ Dispatch Status Report section allows users to view detailed order status including time and address.

+ Search section: User can search for delivery orders by vehicle within the time period from, to:
-
Team: Default display system, user can select the fleet to search
-
Select the icon
 to select the license plate number you want to search
 -
From: User selects the first day they want to search for delivery orders
-
To: User selects the last day they want to search for orders
-
Order Type
-
Số bill/ Booking
-
Mã đơn hàng
-
Click Search button to display the report
+ Dispatch Status Report Allows users to view order status details including time and address:
-
Tên chủ hàng
-
Số Bill/ Booking
-
Mã đơn hàng
-
Số chi tiết đặt hàng
-
Biển số xe
-
Địa chỉ nhận hàng
-
Địa chỉ giao hàng
-
Time and address of status Khởi hành, Đã nhận hàng, Đến điểm giao hàng, Đã giao hàng, POD pending, Hoàn thành
+ Select the icon to print the report
+ Select the icon  to download the report as excel
+ Select the icon to Custom Field, Plate number field settings, Print signature settings
- Log in to post comments
- Tiếng Việt
- 繁體中文
Customer Management
1. Purpose
- Allows users to manage customer lists and save familiar delivery address information to support delivery order creation.
2. Implementation conditions
- The user is granted permission for the Customer Management function on the CRM system.
3. Implementation instructions
- Go to the menu Dispatch System»Customer Management.

- The display function screen consists of 3 parts:
+ Customer Management displays all customers saved in the system;
+ Import Example, Batch import, Add, edit, delete customer information;
+ Customer Queries
 + Customer Management: allows users to search for customers by Customer Code or Customer Name. If the user does not enter the Customer Code and Customer Name, the application will search the entire customer list on the system by default.
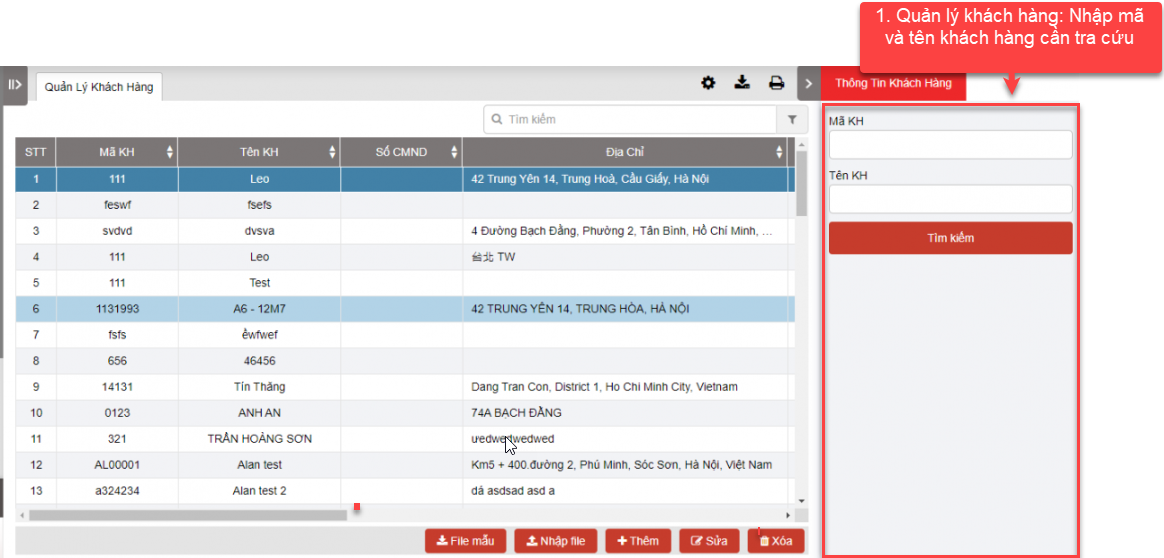 + Import Example, Batch import, Add, edit, delete
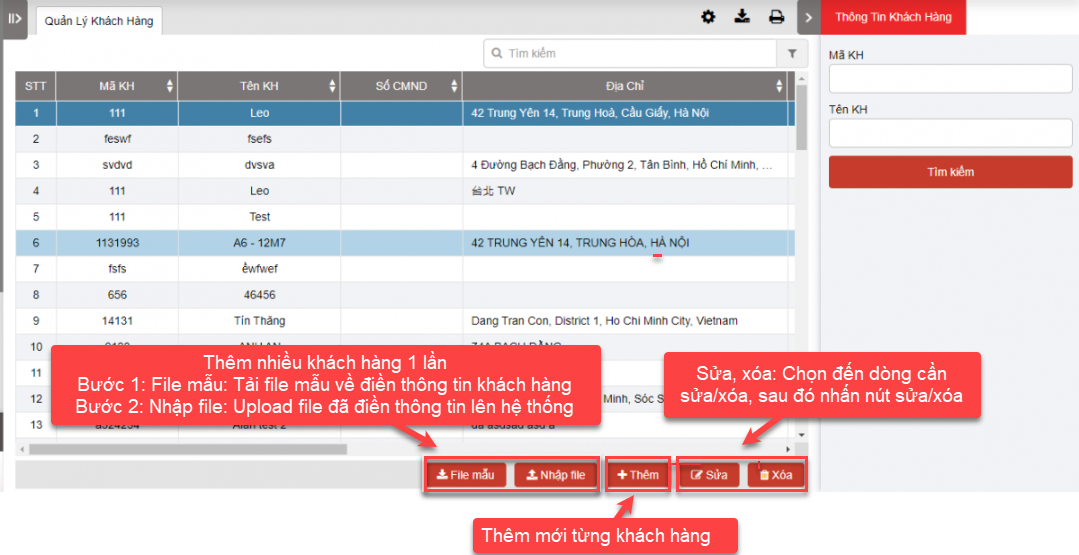
-
Add customer list in 2 ways:
+ Add many customers at once
+ Add each customer
- Add many customers at once in 2 steps:
-
Step 1: User selects the sample file to support user to download the sample file to enter new customers according to the list. When clicking on the sample file, the application supports the file according to the sample as follows:
-
Step 2: After entering the customer list according to the downloaded sample file, the user selects Import file. The application allows the user to select the customer file to import. After importing the file, the application will notify the user accordingly.
-

-
Add User selects Add to add new customer to the system. The new customer input form displays as follows:
-
User fills in all information on the input form and presses Add to complete adding new customer
-
Press Cancel to cancel adding new customer
-
-
To delete a customer from the list, User selects the line to be deleted and presses Delete
-
In case the customer information changes or the User enters incorrect customer information, User selects Edit to the line that the customer needs to edit to edit the information

+ Customer Management: When entering the customer management function, the system will display the entire list of customers in the system and customer information such as Customer code, name, phone number, address... entered in the new customer addition form.
+ Select the icon to print the report
+ Select the icon to download the report as excel
+ Select the icon to Custom Field, Plate number field settings, Print signature settings
- Log in to post comments
- Tiếng Việt
- 繁體中文
Dispatch report
1. Purpose
- Allows users to manage and evaluate drivers on on-time, completed, and irregular delivery rates
2. Implementation conditions
- The user is granted permission for the Dispatch report function on the CRM system.
3. Implementation instructions
- Go to the menu Dispatch System»Dispatch report

- The display function screen consists of 2 parts:
+ Fleet Queries section is where the user sets up information to create a report (allows searching for reports by each fleet or multiple fleets, searching by the name of each driver or multiple drivers, searching by order type),
+ Dispatch report section is the section that displays statistics on the on-time rate, completion rate, and abnormal rate of each driver in the corresponding period of time.

 + Fleet Queries section: User can search for delivery orders by vehicle within the period from, to:
-
From: User selects the first day to search for delivery orders
-
To: User selects the last day to search for orders
-
Team: The system displays by default, User can select the fleet to search
-
Select the icon
to select the driver name to search -
Select the icon
to select the order type
+ Dispatch report section: After the user searches for vehicle dispatch reports, the results will be displayed here. Including the following specific information:
-
Date
-
Lái xe: Driver name
-
Punctuality Rate
-
Completion Rate
-
Abnormal Rate
+ Select the icon to print the report
+ Select the icon to download the report as excel
+ Select the icon to Custom Field, Plate number field settings, Print signature settings
- Log in to post comments
- Tiếng Việt
- 繁體中文
Driver Report
1. Purpose
- Allows users to manage and evaluate how many trips a driver has made, how many points he has traveled, and how many kilometers he has traveled over a period of time.
2. Implementation conditions
- The user is granted permission for the Driver Report function on the CRM system.
3. Implementation instructions
- Go to the menu Dispatch System»Driver Report.
- The display function screen consists of 2 parts:
1. Fleet Queries section is the part where the user sets up information to create a report (allows searching for reports by each fleet or multiple fleets, searching by the name of each driver or multiple drivers)
2. Driver Report section is the section that displays statistics on the total number of pick-up and delivery points, number of trips, and number of kilometers by each vehicle and corresponding driver.
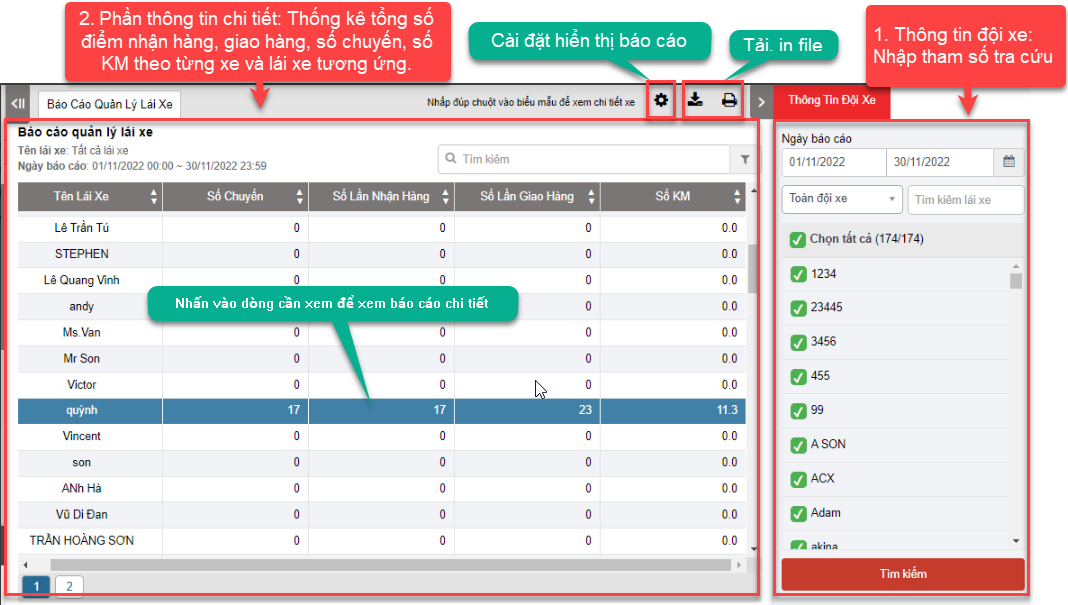
+ Driver Report section: Driver management report is displayed in 3 levels:
-
Level 1: Summary report, statistics of total pick-up and delivery points, number of trips, number of kilometers for each vehicle and driver respectively. From there, the manager can evaluate whether the allocation of trips to drivers is balanced or not and is also the basis for calculating the driver's salary. Detailed functions are as follows:

In which:
-
Số chuyến: Is the number of dispatch orders that the driver is assigned during the search period
-
Số lần nhận hàng: Corresponding to the number of pickup points on the dispatch orders that the driver receives during the search period
-
Số lần giao hàng: Corresponding to the number of delivery points (delivery points, agent points) on the dispatch orders that the driver receives during the search period
-
Số Km: Is the number of kilometers calculated from the pickup point until the vehicle reaches the final agent point; Will be taken according to the number of kilometers according to GPS (actual kilometers measured by the device)
-
Level 2: To view the delivery details of the drivers by each day, the user selects the line of the driver to view details and clicks. The detailed report of level 2 is displayed as follows:
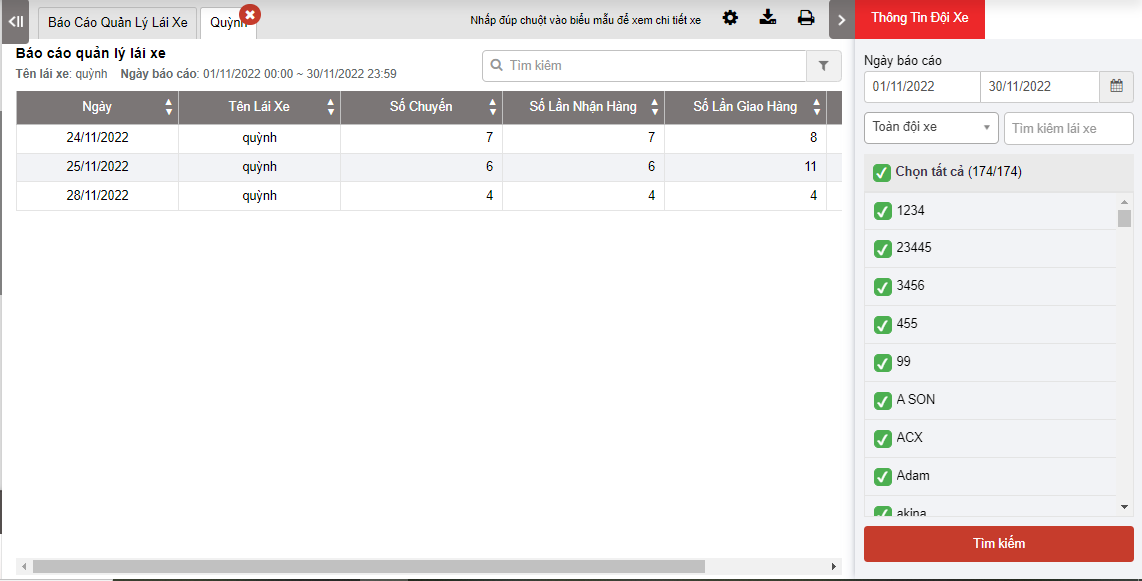
The indicators on the report are similar to the level 1 report but with additional information:
-
Date: Date of vehicle dispatch
-
Driver name: Name of the driver performing the vehicle dispatch
-
Level 3: Allows users to view details of each delivery day, users select the date they want to view details and click, the level 3 detailed report screen displays as follows
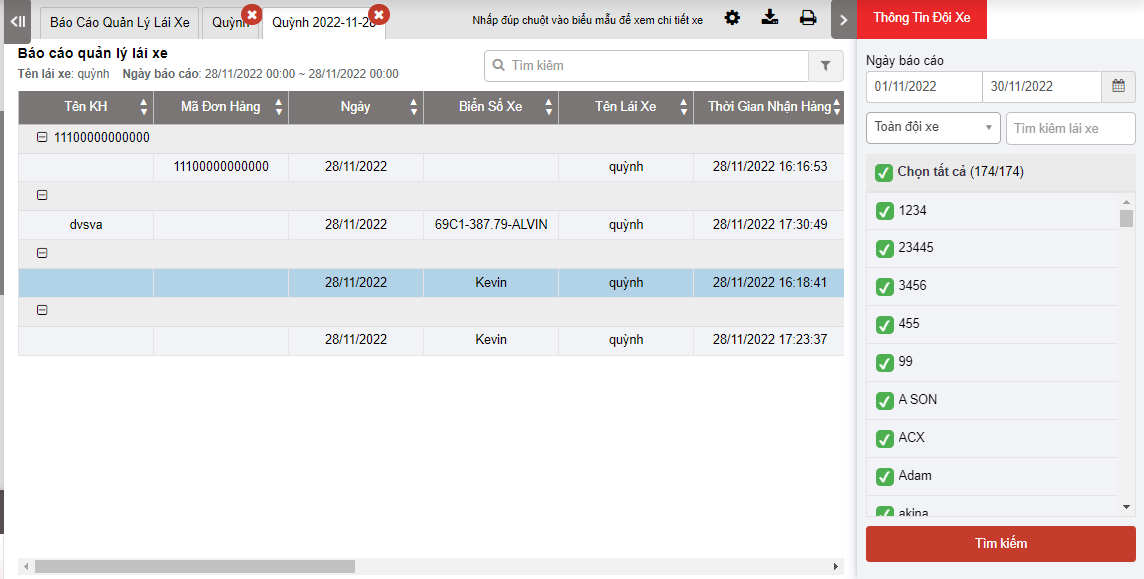
In which:
-
Tên khách hàng: Customer name of the dispatch order
-
Mã đơn hàng:
-
Ngày: Date of dispatch order execution
-
Biển số xe: plate number of the order execution
-
Tên lái xe: Name of the driver executing the order
-
Thời gian nhận hàng: Name of the driver executing the order
-
Điểm nhận hàng: Name of the driver executing the order
-
Thứ tự các điểm giao hàng: Name of the driver executing the order
-
Thời gian giao hàng: Time to deliver to the delivery address
-
Địa chỉ giao: Delivery address
-
Số KM tích lũy: The total actual Km the vehicle has traveled from the start to the end of the trip. Km calculation milestones can be set according to the status in the dispatch setting section:
As shown below, for example, select BD in the departure status and KT in the completed status. The accumulated Km is calculated from when the driver updates the departure status until the driver updates the Complete status

Note: For driver management reports, vehicle dispatch orders will only be reported when the order has a Completed status and the date recorded on the report is the order completion date.
- Log in to post comments
- Tiếng Việt
- 繁體中文
Customer Report
1. Purpose
- Allows users to count the number of points and trips for each customer, thereby determining the level of order generation for each customer.
2. Implementation conditions
- The user is granted permission for the Customer Report function on the CRM system.
3. Implementation instructions
- Go to the menu Dispatch System»Customer Report.

- The display function screen consists of 2 parts:
1. Fleet Queries section is the part where the user sets up information to create a report (allows searching for reports by each customer or multiple customers)
2. Customer Report section is the part that displays statistics on the number of points and trips for each corresponding customer

+ Fleet Queries section Select the time period and customer name to look up
+ Customer Report section: Customer management report is displayed in 2 levels:
-
Level 1: Summary report of statistics on points and trips for each customer, from which the user can determine the level of order generation for each customer.

In which:
-
Date: The date the order is generated within the search period
-
Customer Name: The name of the customer with the order generated
-
Total: The number of dispatch orders of the corresponding customer within the search period
-
Receive Times: Corresponding to the number of pickup points on the dispatch orders that the customer receives within the search period
-
Delivery Times: Corresponding to the number of deliveries (delivery points, dealer points) on the dispatch orders that the customer receives within the search period
-
Mileage(km): The number of kilometers from the pickup point until the vehicle arrives at the final dealer point; Will be taken according to the number of kilometers according to GPS (actual kilometers measured by the device)
-
Level 2: To view detailed reports by each day, the user selects the line of the customer to view details and clicks. The detailed level 2 report is displayed as follows:

In which:
-
Customer name: Name of the customer with the order
-
Order Number: Customer order code generated during the day
-
Date: Date of order generation within the search period
-
Plate number: License plate of the order execution
-
Driver: Name of the driver executing the order
-
Receive Time: Time the customer receives the goods
-
Receive Address: Delivery address
-
Order: Order of delivery points in the order (in case 1 order has multiple delivery points)
-
Delivery address: Delivery address
-
Accumulation Distance: Similar to the accumulated mileage in the driver management report section.
Note: When entering an order, if the user does not select the customer name, when viewing the customer management report, the order will not be included in the report.
- Log in to post comments
- Tiếng Việt
- 繁體中文
Dispatch Route Manage
1. Purpose
- Allows users to create fixed routes;
- Allows users to quickly select a list of customer points (corresponding to landmarks) to assign to the vehicle;
- Displays the entire list of routes created by users and allows filtering the route list by route name, starting point, and ending point.
2. Implementation conditions
- The user is granted permission for theDispatch Route Manage function on the CRM system.
3. Implementation instructions
- Go to the menu Dispatch System»Dispatch Route Manage.

- The display function screen consists of 3 parts:
1. Fleet Queries section allows users to select search parameters;
2. Dispatch Route Manage section displays route information;
3. Import Example, Import, Add, Edit, Delete.

+ Fleet Queries section: Users can search by the following information:
-
Route Name: Enter the route name to search
-
Starting Point: Enter the starting point to search
-
Ending Point: Enter the ending point to search
-
Click Search button to display the report
+ Dispatch Route Manage section: displays information about the route name
-
Route name: The name of the route the user has selected to look up
-
Route code: Automatically displayed by the system
-
Estimated total mile : Total distance the vehicle passes through the milestones created for the route (displayed according to estimates on the map);
-
Starting point: Location of the first milestone of the route;
-
Middle points: Locations of the milestones on the route that the vehicle passes through;
-
Ending point: Location of the last milestone of the route
-
Share Checkbox
+ Import Example, Import, Add, Edit, Delete: allows users to perform the following operations:
There are 2 ways to create routes: To create multiple routes at once and create one route at a time
- To create multiple routes at once::
-
Users select Import button to add a file including the following information: Route name, Route code, Starting point, Intermediate point, End point, Estimated total km, Share;
-
Users select Import Example the sample file and fill in the information: Route name, Route code, Starting point, Intermediate point, End point, Estimated total km, Share. Then select Upload data to upload data to the system;
-
-
To create one route at a time: Select the Add button. The Add a new route screen is as follows:

-
Route name: User enters the name of the route to be created;
-
Starting point: User clicks
 to determine the starting point for the route, when clicking a popup will appear:

-
Click search to select the starting point as one of the previously created landmarks, or right-click on a location on the map to create a new landmark for the route.
-
End point: User clicks
to determine the end point for the route (similar to selecting the starting point) -
List of Middle points: User clicks
to determine intermediate points for the route (similar to selecting start and end points)

-
Save: Click save to save the newly created route
-
Cancel: Click cancel to cancel the newly created route.
-
Edit: User selects the route to be edited and clicks Edit to edit the route (similar to adding a route):

-
Delete: User selects the route to be deleted and presses Delete to delete the route. After pressing delete, a popup will appear:

-
OK: Click Yes to delete the route;
-
No: Click No to cancel deleting the route.
+ Select the icon to print the report
+ Select the icon to download the report as excel
- Log in to post comments
- Tiếng Việt
- 繁體中文
Báo cáo tuyến đườngENU
1. Purpose
- Allows users to check report information on total kilometers and fuel consumption by route.
2. Implementation conditions
- The user is granted permission for the Báo cáo tuyến đườngENU function on the CRM system.
3. Implementation instructions
- Go to the menu Dispatch System»Báo cáo tuyến đườngENU.

- The display function screen consists of 2 parts:
1. Fleet Queries section allows users to select search parameters;
2. Detail Report section displays detailed reports according to search criteria.
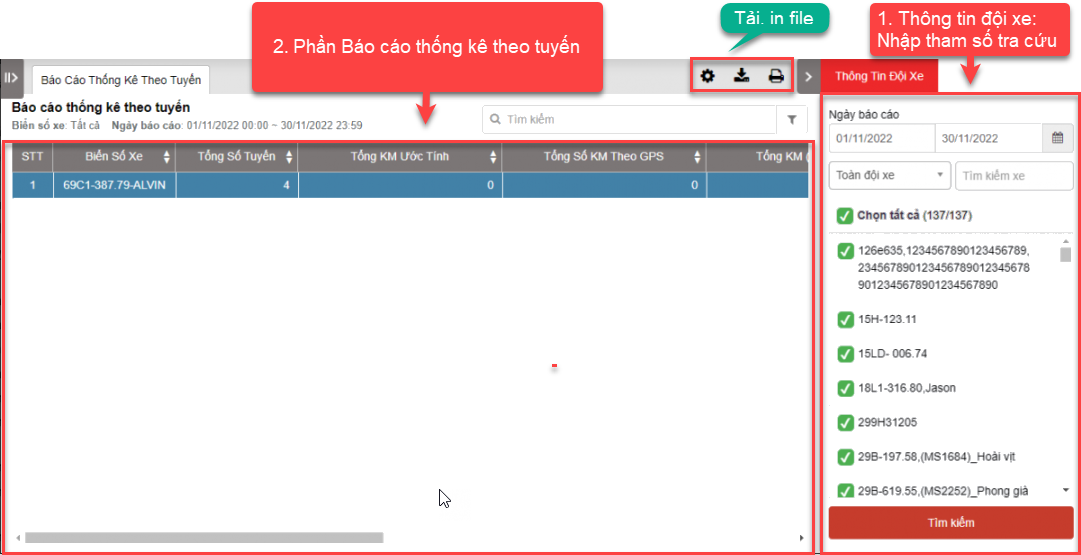
+Fleet Queries section: Users can search for delivery orders by vehicle within the period from, to:
-
From: Users select the first day they want to search for delivery orders;
-
To: Users select the last day they want to search for orders;
-
Team: The system displays by default, users can select the fleet they want to search for;
-
Users select the icon
to select the fleet they want to search for; -
Users select all or any license plate number;
-
Click Search button to display the report
+ Detail Report Section: After the user searches for the dispatch report, the results will be displayed here. Including the following specific information:
-
Plate number
-
Tổng số tuyếnENU: Number of routes performed during the search period
-
Estimate total mile: Estimated total km before performing the route
-
Tổng số KM theo GPSENU: Total km by positioning
-
TotalMileByGPSLoaded: Total km when the vehicle is carrying goods
-
TotalMileByGPSUnloaded: Total km when the vehicle is not carrying goods
-
TotalOilConsumptionLoaded: Fuel consumed when carrying goods
-
TotalOilConsumptionUnloaded: Fuel consumed when not carrying goods
+ Select the icon to print the report
+ Select the icon to download the report as excel
+ Select the icon to Custom Field, Plate number field settings, Print signature settings
- Log in to post comments
- Tiếng Việt
- 繁體中文
Dispatch Orders Log
1. Purpose
- Allow users to check report information on the order update history: Add/Edit/Delete in Delivery Management.
2. Implementation conditions
- Users are authorized to perform the function of Dispatch Orders Log.
3. Implementation instructions
- Go to the Dispatch System»Dispatch Orders Log.

- The display function screen consists of 2 parts:
+ Fleet Queries section allows users to set up time parameters and vehicles to view the report;
+ Driver total time report section display report details according to search criteria

+ Fleet Queries section: the user selects the following information:
-
From: The user enters the first day to create the report;
-
To: The user selects the last day to create the report;
-
Order Type: User selects the type of order to view;
-
Click Search button to display the report in the Report Details section.
-
Filter search by Account name: Primary account/ Authorized account
-
Filter search by Action type: Add/ Edit/ Delete
-
Filter search by Số đặt hàng
+ Dispatch Orders Log: After the user performs a search for the vehicle dispatch report, the results will be displayed here. The specific information includes the following:
-
Tên chủ hàng: Selected during order creation. Shipper name in Settings under Vehicle Dispatch/Customer Management.
-
Bộ phận ra đơn: Set during order creation.
-
Số Bill/ Booking
-
Mã đơn hàng;
-
Biển số xe ;
-
Lái xe;
-
TG nhận hàng dự kiến: The expected pickup time set during order creation.
-
Địa chỉ nhận hàng
-
Loại xe;
-
Action type: Add/Edit/Delete
-
Account name
-
Log time: Primary account/Authorized account
-
Select
 to view detailed order update information; the screen will display details including the Field Name (order information) and the order update time.

+ Select the icon to download the report as excel
- Log in to post comments
- Tiếng Việt
- 繁體中文
Cấu hình chi phí theo tuyếnENU
1. Purpose
- Allows users to set up route costs.
2. Implementation conditions
- The user is granted permission for the Cấu hình chi phí theo tuyếnENU function on the CRM system. (Option VN85B)
3. Implementation instructions
- Go to the menu Dispatch System»Cấu hình chi phí theo tuyếnENU.

- The display function screen consists of 2 parts:
1. Fleet Queries section allows users to choose to view reports by route or vehicle type
2. Route Cost Configuration section displays information about the route and the cost of each route
3. Add section to set the cost for each route within a period of time.

+ Fleet Queries section: To view the report, users select the following information:
-
Route Name: Select the icon
 to select the route you want to view;
 -
Vehicle type: Select the icon
to select the vehicle type you want to view;
+ Route Cost Configuration section: Allows users to view all detailed information, specifically:
-
Route Name
-
Route Code
-
Vehicle type
-
Cost
-
Apply from date
-
Apply to date
+ Add section  Allows users to set up route costs as follows:
-
Apply from date
-
Apply to date
-
Route
-
Vehicle type
-
Cost
+ Select the icon to print the report
+ Select the icon to download the report as excel
+ Select the icon to Custom Field, Plate number field settings, Print signature settings
- Log in to post comments
- Tiếng Việt
- 繁體中文
Record Bussiness Trip
1. Purpose
- Allows users to check how long it takes for a vehicle to make a business trip, how much fuel is consumed, fuel costs and road tolls on the route the vehicle travels.
2. Implementation conditions
- The user is granted permission for the Record Bussiness Trip function on the CRM system.
3. Implementation instructions
- Go to the menu Salary Management»Basic Salary Table.

- The function display screen consists of 2 parts:
+ Fleet Queries section allows users to select search parameters;
+ Record Bussiness Trip section displays detailed trip information.

+ Fleet Queries section: User can choose as follows
-
Select report date
-
From: Select the first day you want to check fuel costs
-
To: Select the last day you want to check fuel costs
-
-
Team: Default is All team. Select the icon
 to select the team
 -
Checkbox drive or select all
-
Click Search button to display the report
+ Record Bussiness Trip section: displays information including:
-
Plate number;
-
Route Name;
-
Route Code;
-
Vehicle type;
-
Quả khổ quá tảiENU;
-
Đơn giá trước VATENU;
-
VATENU;
-
Total money;
-
Start TimeStart Time: Journey start time;
-
End Time: Journey end time;
-
Operation Time: Vehicle travel time;
-
Mileage(km);
-
Fuel consumption (L): Amount of fuel consumed in one trip
-
Total fuel cost;
-
Toll Station Cost;
+ Select the icon to print the report
+ Select the icon to download the report as excel
+ Select the icon to Custom Field, Plate number field settings, Print signature settings
- Log in to post comments
- Tiếng Việt
- 繁體中文