Journey Management (TVC)
Xnk Route Listing
1. Purpose
- This function supports users to View/Edit/Delete/Render all existing routes in the system or create a route in advance including details of the points the vehicle will pass through and configure the time allowed to stop at the points.
2. Implementation conditions
- Users are authorized to options VN55, VN55D.
- Users are not authorized to option VN82 (turn off the leaflet map)
3. Implementation instructions
- Go to menu Journey Management/Xnk Route Listing

- Màn hình chức năng hiển thị gồm 3 phần:
+ Fleet Queries Section;
+ Xnk Route Listing Section;
+ Add, Edit, Delete Route Section.

+ Fleet Queries Section
- Route name;
- Start point;
- End point
+ Xnk Route Listing Section: Displays a list of all routes according to search criteria:
- Users select the Route line they want to view to see detailed route information on the right side of the screen;
- Select the icon
 to print the report;
 - Select the icon
 to download the report in excel/word format;
+ The Add, Edit, Delete section allows users to perform the following operations:
- Users select the route line they want to edit and click Edit if they want to edit the route

- The user selects the route line they want to delete and presses Delete to delete the route;

- User selects Add if they want to add a new route. The Add a new route screen is as follows:

- Route name: User enters the route name he wants to set (Required information);
- Email to receive trip report;
- Starting point: The first point of the route (Required information);
- End point: The last point of the route (Required information);
- List of intermediate points: Points the vehicle must pass through in a route;
- To enter the Starting/End/Intermediate Points, User selects the icon
 , the screen to enter the Starting/End/Intermediate Points information is as follows:

-
The user can select the check mark
 to select an address from the available list or the user can create a new point that is not yet in the system by ticking the map and selecting Create landmark. The screen displays:

- User can add multiple intermediate points, the system will automatically draw the route according to the created points. User can use the mouse to drag the route to change as desired.

- After confirming the creation of points, the user continues to classify the points and set the arrival time at the points.

- After adding points, user selects Save if they want to save the route they just created, user selects Cancel if they do not want to create the route.
Journey Information
1. Purpose
- Allows users to add, edit, delete, export and track vehicle journeys.
2. Implementation conditions
- Users are authorized to use options VN55, VN55D and VN27
3. Implementation instructions
- Go to menu Journey Management/Journey Information.

- The display function screen consists of 3 parts:
+ Fleet Queries section: Set up journey search parameters;
+ Journey Information section: Display journey information including route, vehicle information;
+ Import/Import example/Add/Update/Stop journey report section: Support adding new, editing journey or stopping journey report in case you want to end the journey early.

+ The Fleet Queries section includes the following information:
- Trip name: User enters the name of the trip to be searched;
- Report type: Select to search by start or end date;
- From date, to date: User selects the first and last date to search for the trip;
- Click Search to display the results;
- User can select the Hide journey completed checkbox so that the search results do not show information of completed trips.
+ Import/Import example/Add/Update/Stop journey journey section:
- Select Update if you want to save the latest information of the trip. The user will not be allowed to Update when the trip has started, the trip is considered to have started when the current Date/Month/Year >= Date/Month/Year in the Start Time of the trip that was set when creating the Trip and Current Time > Departure Time at the starting point that was set when creating the Route
- Select Stop journey: The user selects if they want to end the trip as desired and stop receiving reports of the trip;
- Select Delete: The user selects if he wants to delete the created trip.
- The user selects Add if they want to add a new trip. The new trip add screen displays as follows:
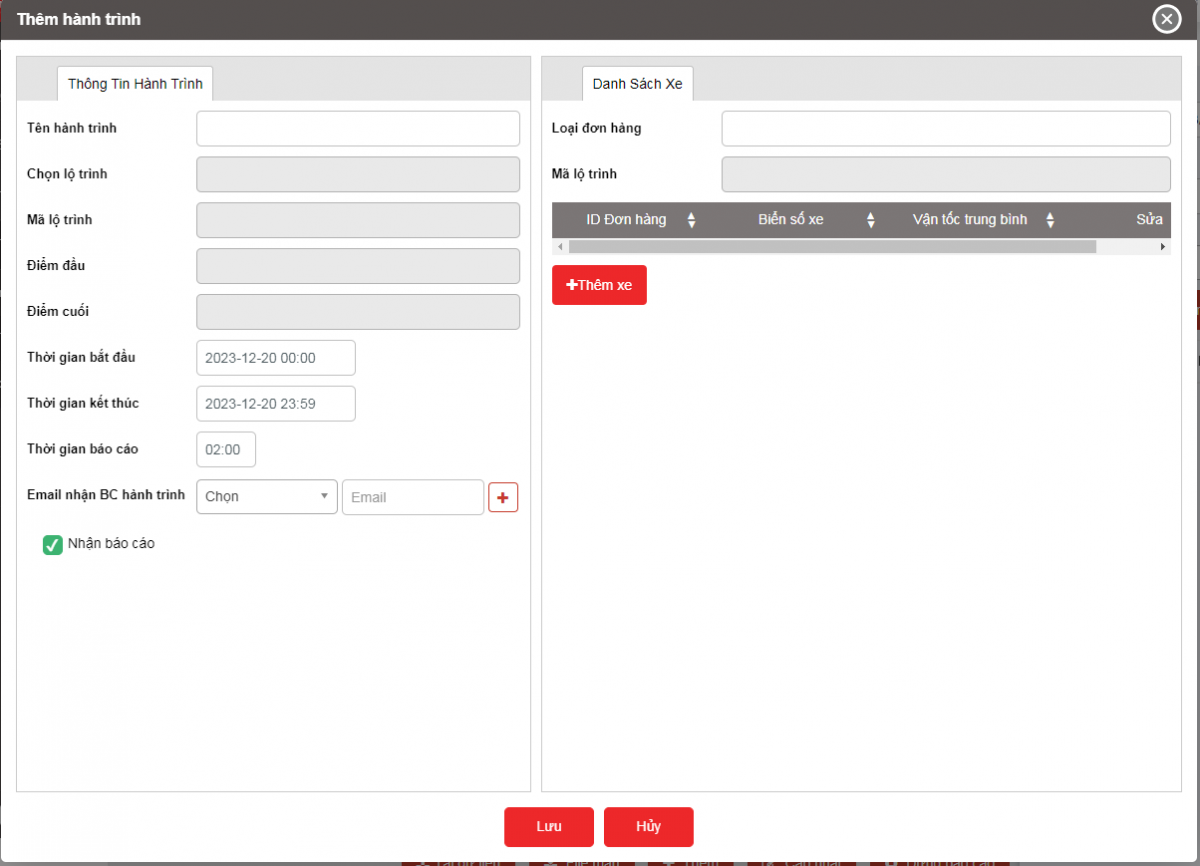
+ Journey Information section: Displays a list of trips and detailed information of each corresponding trip, including two main information: Journey and Car Information;
Journey

- Journey name: Journey name set by user
- Choose route: Allows user to select route from created list, when selecting route, system automatically displays Route code, starting point, ending point
- Start time: Estimated start time of journey
- End time: Estimated end time of journey. For journeys if the end time entered is less than the current time, the system will understand that the journey has ended
- Email to receive journey report: select according to customer list
Car Information
- Order ID: User enters Order ID
- Vehicle license plate: User selects
- Average speed: User enters
- To add a car to the journey, User selects the Add Car button and selects the license plate
- The user selects Confirm to complete adding the car to the journey.

- Select Save if you want to save the journey you just created, select Cancel if you want to cancel the operations that created the journey;
Select the icon to print the report;
Select the icon to download the report in excel/word format;
Select the icon  to set the display or change the sort order of the report columns