Driver Statistics
- Log in to post comments
- Tiếng Việt
- 繁體中文
Check in/out Record
1. Purpose
- Support users in generating driver attendance reports for a specified period to facilitate the management and monitoring of driver attendance for the enterprise.
2. Implementation conditions
- The user needs to be granted permission for option 4F
3. Implementation instructions
- The user performs attendance tracking on the driver app. Refer to the attendance tracking guide in section 2: Attendance Card in the Edriver app user manual (https://eup-wiki.gps247.vn/node/215).
- Navigate to the Driver Statistics»Check in/out Record
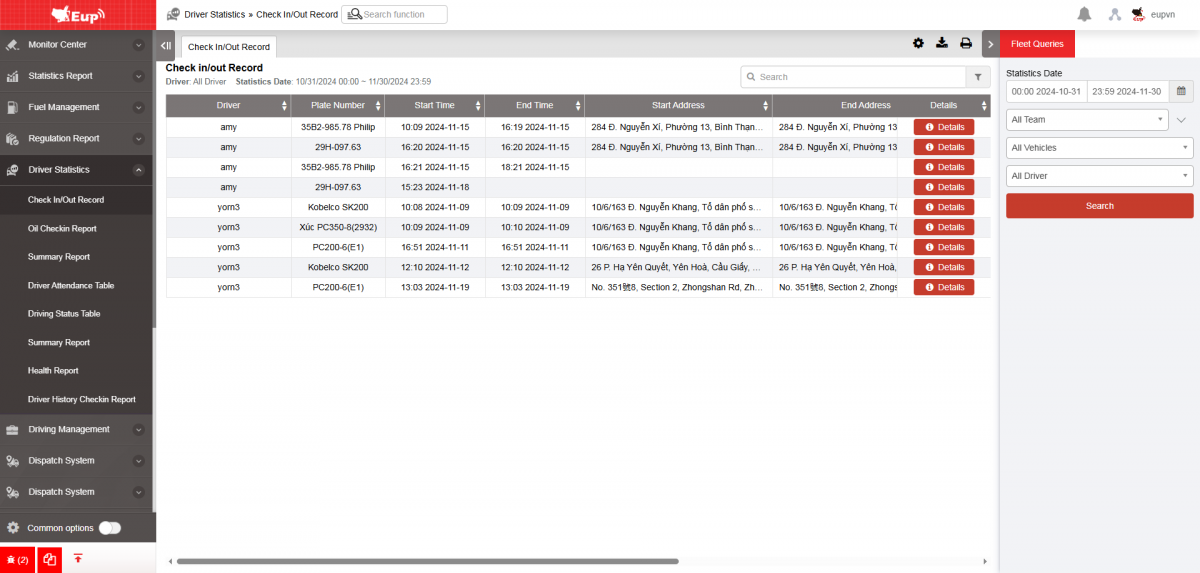
- Màn hình chức năng gồm 2 phần:
+ Fleet Queries section allows the user to input details such as the time period, fleet, and driver for generating the report;
+ Driver Attendance Report section
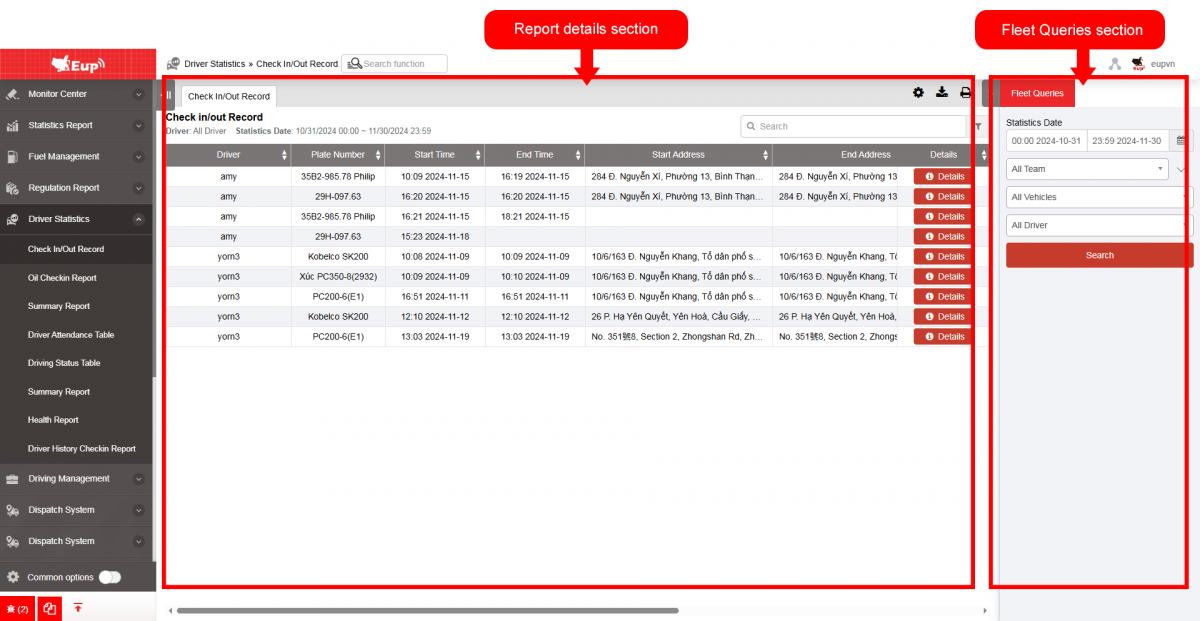
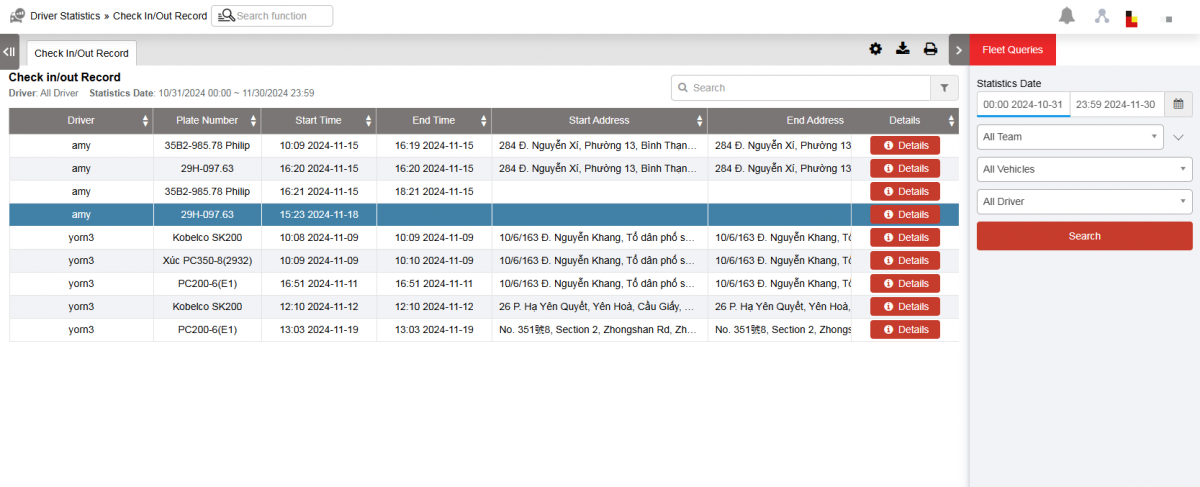
+ Fleet Queries section: the user selects the following information:
-
From: The user enters the first day to create the report;
-
To: The user selects the last day to create the report;
-
Select the icon
 to select the Team;
 -
In the vehicle list: Check the checkbox to select the vehicle to report;
-
Click Search button to display the report in the Report Details section.
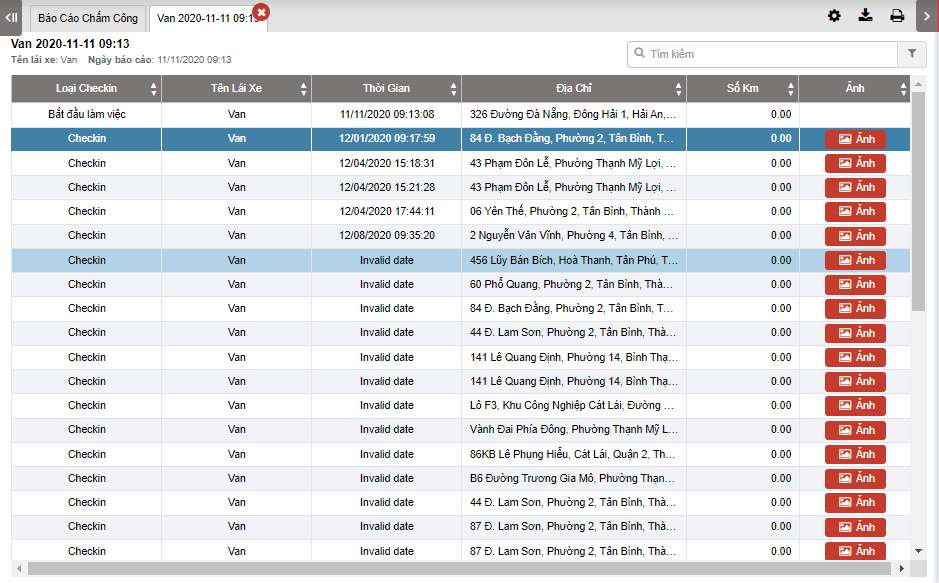
+ Check in/out Record Report section: displays the detailed results of the attendance report, including the following information:
-
Driver;
-
Plate number;
-
Start Time: The time the driver begins operating the vehicle;
-
End Time: The time the driver finishes operating the vehicle;
-
Starting Address: The location where the driver begins the trip;
-
Ending Address: The location where the driver ends the trip;
-
Actions: Allows the user to delete the driver's attendance record.
-
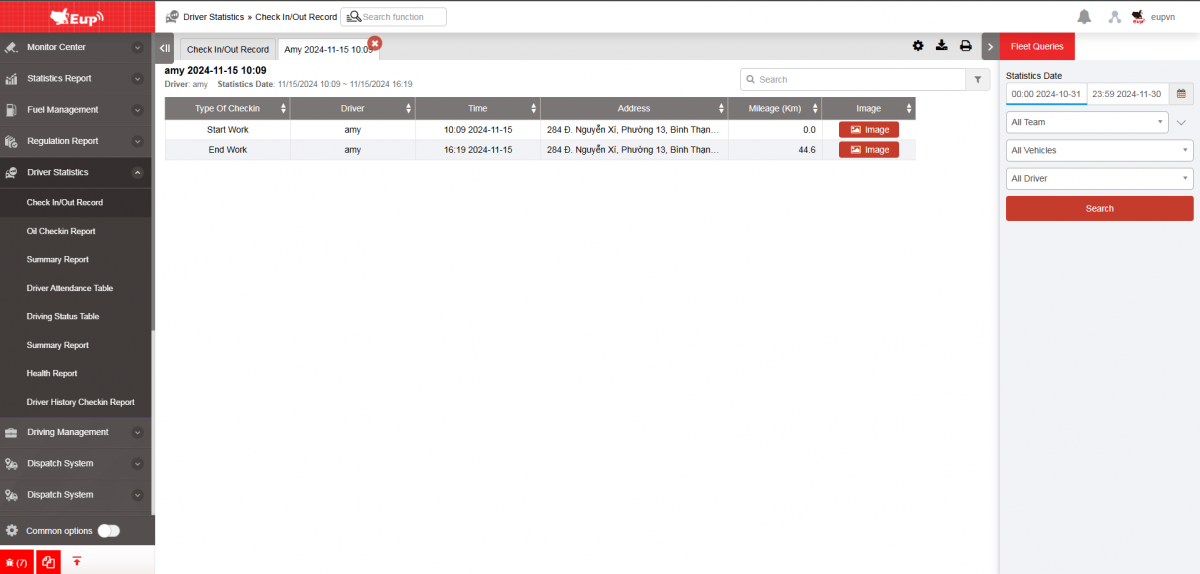
Start Image
-
End Image
-
Total mileage
-
Total of checkin
-
checkin Image
-
Details: Click on details to display detailed information table
+ Select the icon  to print the report
+ Select the icon  to download the report as excel
+ Select the icon  to Custom Field, Plate number field settings, Print signature settings
- Log in to post comments
- Tiếng Việt
- 繁體中文
Oil checkin report
1. Purpose
- Support users in generating a driver fuel check-in report for a specific time period (from date to date) to facilitate the management and monitoring of driver fuel check-in instances for the enterprise.
2. Implementation conditions
- The user is granted permission for the VN88C option
3. Implementation instructions
Step 1: Operations on the Edriver VN app (download from App Store or Google Play)
+ Log in to the driver's account, then go to the Fuel Check-in section.
+ The screen displays 2 sections: Check-in Point and History.
Check-in Point: For performing check-in at the location and taking photos to send to the system.
-
The user selects the vehicle and presses the Check-in Point button. At that time, the Edriver app allows the driver to take photos (can take 1 or multiple photos depending on the driver's needs) and send them to the system.
-
The driver must select a vehicle to be allowed to check in. If the driver has previously selected a vehicle, the driver app retains the previously selected vehicle until the driver performs an action to change to a different vehicle.
-
Data on photos, time, and check-in location will be sent to the FMS system and aggregated into the Oil checkin report by the date the driver checked in.
History: Displays the number of check-ins along with images by date.
Step 2: Go to the menu Driver Statistics»Oil checkin report. The function screen consists of 2 sections:
+ Fleet Queries section allows users to set up time parameters and vehicles to view the report;
+ Report details section driver fuel Check-in Report section;

+ Fleet Queries section: the user selects the following information:
-
From: The user enters the first day to create the report;
-
To: The user selects the last day to create the report;
-
Select the icon
 to select the Team;
 -
Click Search button to display the report in the Report Details section.
+ Report details section: Display detailed report information.
-
Plate number;
-
Driver;
-
Start Time: The time the driver starts operating the vehicle.
-
End Time: The time the driver finishes operating the vehicle.
-
Start Location: The location where the driver begins the trip.
-
End Location: The location where the driver ends the trip.
-
Action: Allows the user to delete the driver's attendance record.
-
Start Photo;
-
End Photo;
-
Total Kilometers;
-
Total Check-ins;
-
Check-in Photos;
-
Details: Click on Details to display a detailed information table
+ Select the icon to print the report
+ Select the icon to download the report as excel
+ Select the icon to Custom Field, Plate number field settings, Print signature settings
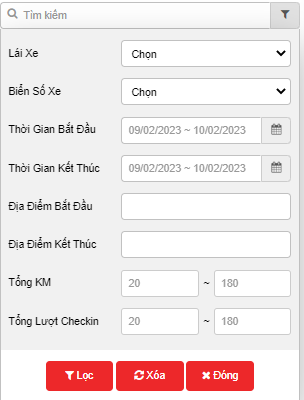
+ Select the icon  to filter search results
Summary Report
1. Purpose
- Support users in generating driver attendance reports for a specified period to facilitate the management and monitoring of driver attendance for the enterprise.
2. Implementation conditions
- Users are authorized to perform the function of Summary Report
3. Implementation instructions
- Go to the Regulation Report/Driver total time report.

 - The display function screen consists of 2 parts:
+ Fleet Queries section allows users to set up time parameters and vehicles to view the report;
+ Report details section display detailed search information.

+ Fleet Queries section: the user selects the following information:
-
From: The user enters the first day to create the report;
-
To: The user selects the last day to create the report;
-
Select the icon
to select the Team; -
Click Search button to display the report in the Report Details section.
+ Report details section: Display detailed report information.
-
Time: The current time when the vehicle's signal is received at a specific address.
-
Landmark: The milestone name corresponding to the address.
-
Address: The specific address of the vehicle.
-
Mileage (km): The distance the vehicle has traveled from point A to point B.
-
Duration: The time taken for the vehicle to travel from point A to point B.
-
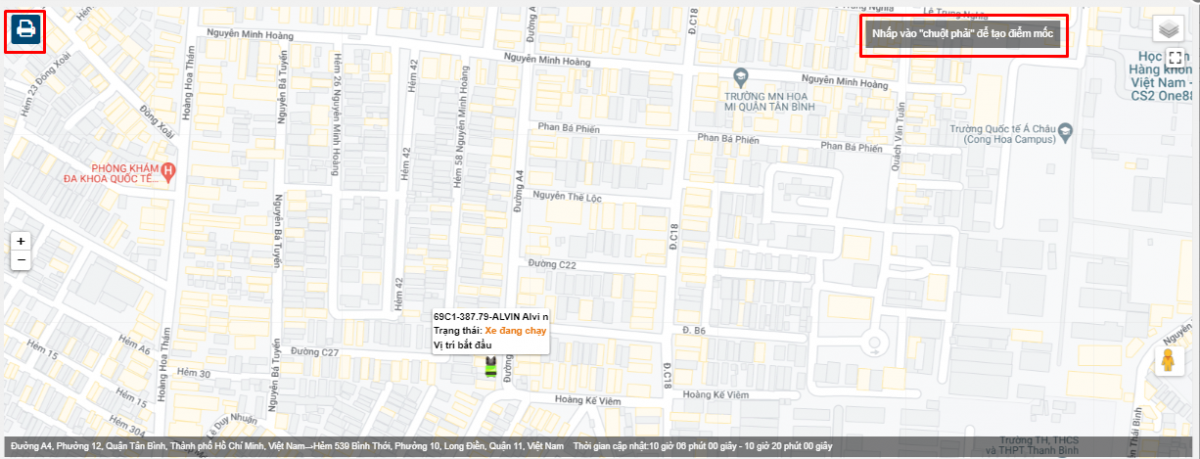
Status: The final status of the vehicle before moving to a new location.
-
Users can click on each row to view a detailed map: Right-click to create a milestone, and click the Print icon to print the map.
-
Chi tiết từng trạng thái hoạt động của xe

+ Select the icon to print the report
+ Select the icon to download the report as excel
+ Select the icon to Custom Field, Plate number field settings, Print signature settings
- Log in to post comments
- Tiếng Việt
- 繁體中文
Driver Attendance Table
1. Purpose
- Support users in generating statistics on vehicle speed and U-turn speed in the form of charts.
2. Implementation conditions
- The user is granted permission for the Driver Attendance Table function on the CRM system.
3. Implementation instructions
- Driver Statistics»Driver Attendance Table

- The function screen consists of 2 sections:
+ Fleet Queries Section: Allows users to select the time period, vehicle team, and driver for viewing the report.
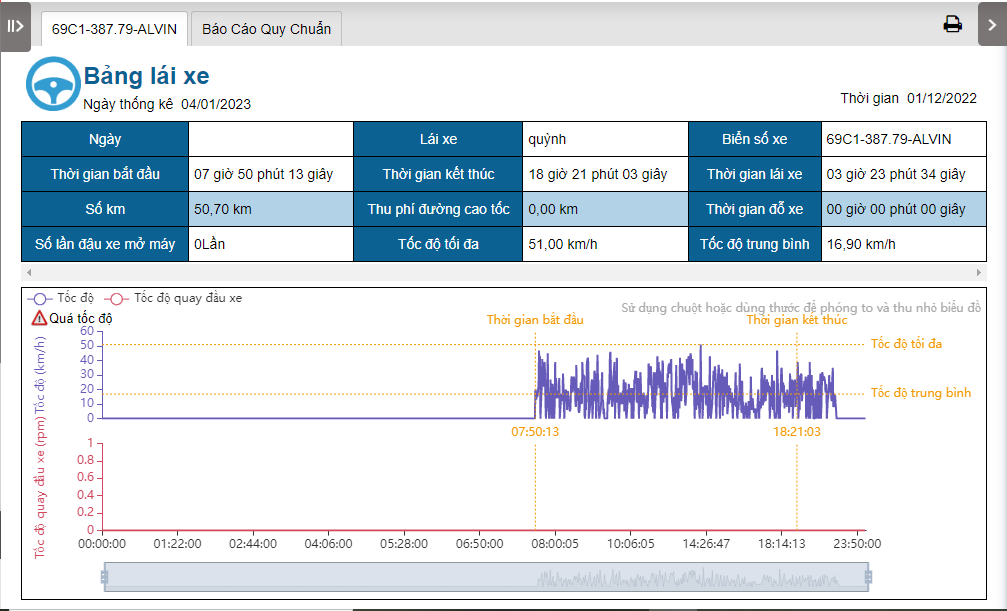
+ Driver Attendance TableSection: Allows users to view statistical reports including driving time, kilometers traveled, highway toll fees, parking time, number of idling instances, maximum speed, average speed, and charts for Speed and Vehicle U-Turn Speed.
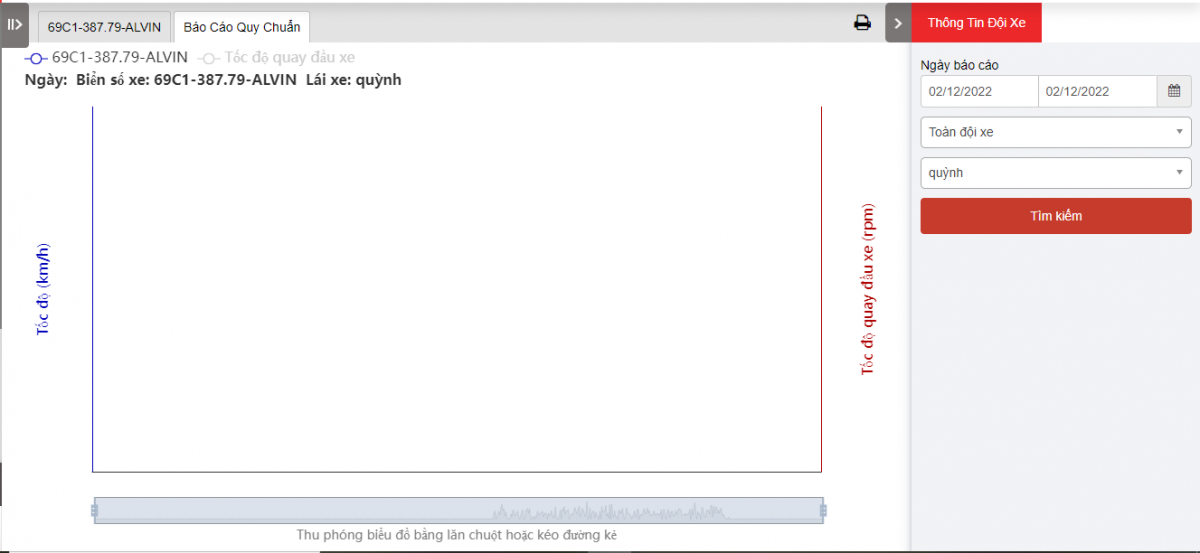
+ Regulation tachograph Section: Includes charts for Speed and Vehicle U-Turn Speed.

+ Fleet Queries section: the user selects the following information:
-
From: The user enters the first day to create the report;
-
To: The user selects the last day to create the report;
-
Select the icon
to select the Team; -
Click Search button to display the report in the Report Details section.
+ Report details section: Display detailed report information.
-
Date;
-
Driver;
-
Plate number;
-
Start Time: The time the driver begins driving.
-
End Time: The time the driver stops driving.
-
Driving Time: The duration from when the vehicle starts moving to when it stops.
-
Total Mileage: The distance traveled.
-
Highway toll mileage: Fees incurred for highway usage.
-
Stop time: The duration the vehicle is parked.
-
Turn off the number of stops: The number of times the vehicle is parked with the engine running.
-
Maximum Speed: The highest speed recorded.
-
Average Speed: The average speed during the trip.
-
Speed and Vehicle U-Turn Speed Statistical Chart: A chart displaying speed and U-turn speed statistics.
-
Speed Details: Overspeed instances, start time, end time, maximum speed, average speed.
-
Vehicle U-Turn Speed: The speed at which the vehicle performs U-turns.
-
Speed Details: Overspeed instances, start time, end time, maximum speed, average speed.
-
Vehicle U-Turn Speed: The speed at which the vehicle performs U-turns.
-
+ Standard Report Section: Charts
-
Speed
-
Vehicle U-Turn Speed
-
To zoom the map: Scroll the mouse wheel or drag the slider.

- Log in to post comments
- Tiếng Việt
- 繁體中文
Driving Status Table
1. Purpose
- Support users in checking the driving status of drivers in the same vehicle team at different time points, including statistics on the time the vehicle changes operational status, the number of kilometers driven, and the duration of speeding by the driver.
2. Implementation conditions
- The user is granted permission for the Driving Status Table function on the CRM system.
3. Implementation instructions
- Go to the Driver Statistics»Driving Status Table
- The display function screen consists of 2 parts:
+ Fleet Queries section allows users to set up time parameters and vehicles to view the report;
+ Report details section vehicle running time, stopping time, time exceeding speed, number of kilometers,...

+ Fleet Queries section: the user selects the following information:
-
From: The user enters the first day to create the report;
-
To: The user selects the last day to create the report;
-
Select the icon
 to select the team;
 -
Click Search button to display the report in the Report Details section.
-
Time: Drag the slider to select the time frame to view.
-
Continuous Driving Exceeding ... Hours: Set the duration for continuous driving greater than ... hours to review.
+ Report details section: Display a chart of the driver's status at each time milestone: Allows users to have a visual overview of the driver's route based on time milestones and driving status. Includes the following information:
-
Plate number/Driver;
-
Start Time: The time the first status of the day begins.
-
End Time: The time the last status of the day ends.
-
Total Mileage: The total distance traveled by the driver in a day.
-
Car usage duration: The total time the vehicle is operational.
-
Driving Time: The total time in a day when the vehicle is in a state other than parked or disconnected.
-
Idling Time: The total time the vehicle is stopped with the engine running.
-
Speeding report:
-
Turn-Off time:
-
Number of continuous car uses:
-
To view detailed information, the user can hover the mouse over specific intervals on the chart.
+ Select the icon to print the report
+ Select the icon to download the report as excel
+ Select the icon to Custom Field, Plate number field settings, Print signature settings
- Log in to post comments
- Tiếng Việt
- 繁體中文
Summary Report
1. Purpose
- Allow users to generate statistics on the status of all drivers for a specific time period.
2. Implementation conditions
- The user is granted permission for the Summary Report function on the CRM system.
3. Implementation instructions
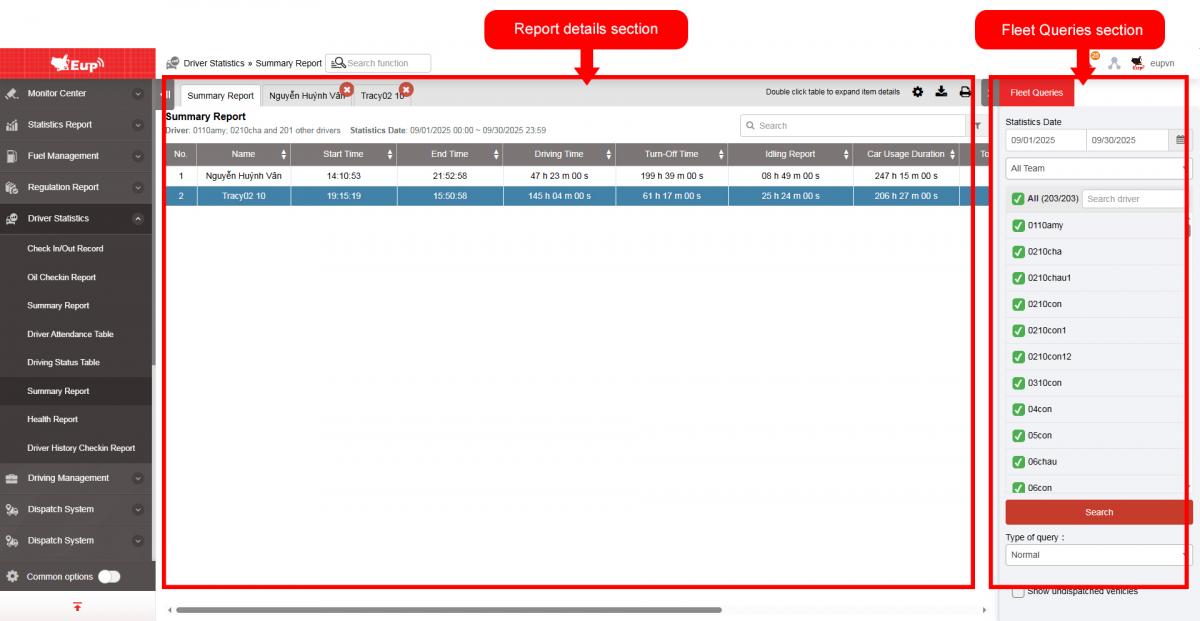
- Go to the Driver Statistics»Summary Report

- The display function screen consists of 2 parts:
+ Fleet Queries section allows users to set up time parameters and vehicles to view the report;
+ Report details section display information search results.
+ Fleet Queries section: the user selects the following information:
-
From: The user enters the first day to create the report;
-
To: The user selects the last day to create the report;
-
Select the icon to select the Team;
-
Click Search button to display the report in the Report Details section.
+ Report details section: Display the full list of drivers who performed driving activities within the search time period, based on the information in the Statistics section of the Driver Status function.
- Name;
- Start Time: The time the driver begins driving within the search time period.
- End Time: The time the driver stops driving within the search time period.
- Driving Time: The total driving time of the driver within the search time period.
- Turn-Off time: The total parking time of the driver within the search time period.
- Idling Time: The total time the vehicle is stopped with the engine running for the driver within the search time period.
- Active Status: The total time the vehicle is in an active state for the driver within the search time period.
- Car usage duration: The total vehicle usage time for the driver within the search time period.
- Total mileage: The total kilometers driven by the driver within the search time period.
- Freeway mileage: The total kilometers driven on the highway by the driver within the search time period.
- Freeway tolls:
- Overspeed times:
-
Users can click on each row to view detailed information for each driver by day.
-
Click to select Search Type: Query details in the Driver Information section to view the detailed report.

+ Select the icon to print the report
+ Select the icon to download the report as excel
+ Select the icon to Custom Field, Plate number field settings, Print signature settings
- Log in to post comments
- Tiếng Việt
- 繁體中文
Health report
1. Purpose
- Allow users to generate statistics on the status of all drivers for a specific time period.
2. Implementation conditions
- The user is granted permission for the Summary Report function on the CRM system.
3. Implementation instructions
- Step 1: The user performs alcohol testing using the Edriver driver app. Refer to the usage instructions in Section 3. Alcohol Concentration Check in the Edriver App Usage Guide (https://eup-wiki.gps247.vn/node/215).
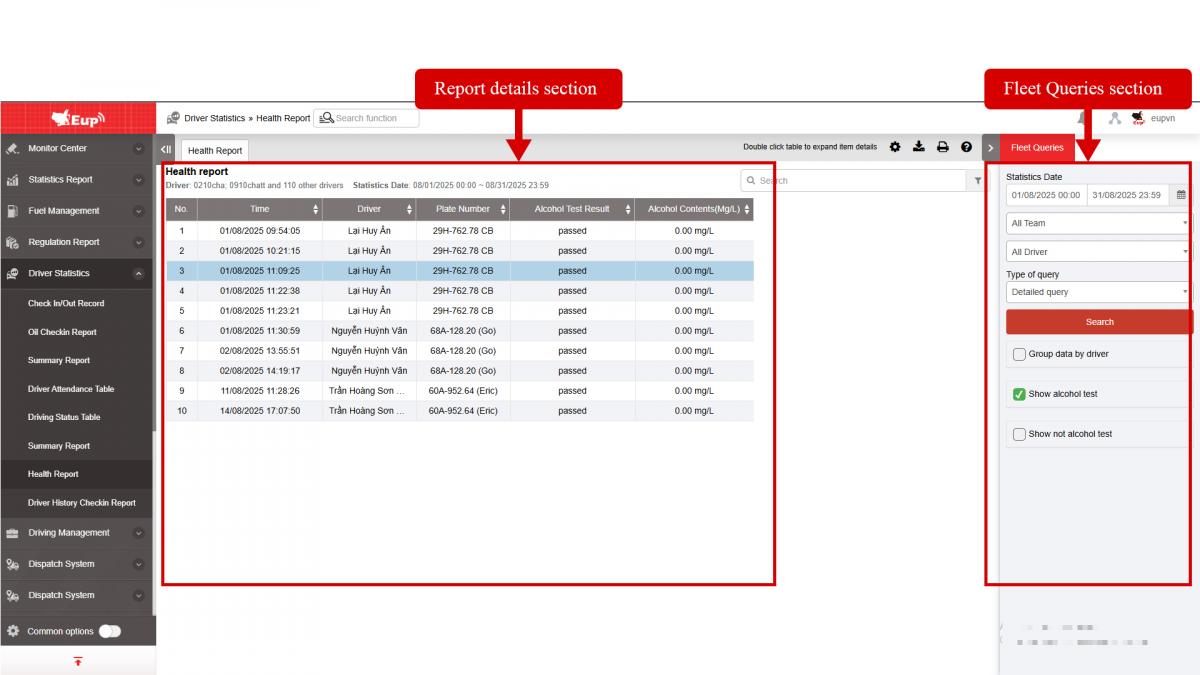
- Step 2: Go to the menu Driver Statistics»Health report

- The display function screen consists of 2 parts:
+ Fleet Queries section allows users to set up time parameters and vehicles to view the report;
+ Report details section display information search results.
+ Fleet Queries section: the user selects the following information:
-
From: The user enters the first day to create the report;
-
To: The user selects the last day to create the report;
-
Select the icon
 to select the Team;
 -
Click Search button to display the report in the Report Details section.
-
Checkbox Group data by driver
- Checkbox Show alcohol test
- Checkbox Show not alcohol test
+ Report details section: Display all alcohol concentration test instances along with the corresponding driver information, including the following details:
- Time: Date and time the driver conducted the alcohol concentration test.
-
Driver: Name of the driver.
-
Plate number: License plate of the vehicle.
-
Alcohol Test Result: Displays the result of the driver's alcohol concentration test.
-
Alcohol contents(mg/L): Displays the percentage of alcohol concentration in the driver's breath when the test is conducted (measured in mg/L).
+ Select the icon to print the report
+ Select the icon to download the report as excel
+ Select the icon to Custom Field, Plate number field settings, Print signature settings
+ Select the icon  to view the Standard Table for the Metrics
- Log in to post comments
- Tiếng Việt
- 繁體中文
Checklist Setting
1. Purpose
- Support users in setting up checklist groups and checklists to meet business requirements for tracking and inspecting all vehicle equipment, accessories, etc.
-
After setup, the checklist list will be displayed in the self-inspection function on the Edriver app, allowing drivers to confirm after inspecting accessories and equipment, with results recorded in Search Statistics report»Record checklist report.
2. Implementation conditions
- The user is granted permission for the Checklist Setting function on the CRM system.
3. Implementation instructions
- Go to the menu Driver Statistics»Checklist Setting

- The display function screen consists of 2 parts:
+ Settings Section: Allows users to monitor the list of configured items and item groups for inspection.
+ Add, Edit, Delete, Reorder Section: Allows users to add, edit, delete, or save changes to the position of items and item groups in the list.
Settings section: includes the following information
+ Group Name: The name of the group of items, freely entered by the user.
+ Item Name: The names of the items to be monitored and inspected, freely entered by the user.
+ Inspection Standard: Allows the user to enter the standard inspection details for each item.
Add section: Allows users to add new items to monitor and check

+ Press the Save button to add new content to the report, or press the Cancel button to discard the operation.
Edit, Delete section: allows users to edit or delete existing content by right-clicking on the content to be edited or

Save Sequence section: allows users to change and arrange the position of items to make it easier to track and check.

+ Click and hold the icon  to move it to the change location and release the mouse.
+ Select Save Sequence to save the new sort list, select Cancel to cancel the sort operations
+ Select the icon to print the report
+ Select the icon to download the report as excel
+ Select the icon to Custom Field, Plate number field settings, Print signature settings
Driving Authority
I. Purpose
- Support users in generating statistics on vehicle fuel consumption for a trip when the driver uses the Check in/out feature on the Edriver app to start and end a trip.
II. Implementation conditions
- Users are authorized to use VN88B option
III. Implementation instructions
1. Driving Authority:
- To use the Check in/out feature, drivers need to be authorized to clock in: Driving Management»Driving Authority
- Select open System functions panel

- The system function panel is divided into 2 parts
+ System function section: select Timekeeping to enable the timekeeping feature for drivers
+ Displayed Cars section: select the list of vehicles that the driver is assigned to

2. App Edriver: Check in/out
- Drivers log in on the Edriver app to use the Check in/out feature.

- The driver selects the vehicle they are driving to perform attendance tracking.
- At the start of the trip, the driver presses the Checkin button.
- Upon completion of the trip, the driver presses the Chekout button.

3. Fuel Management»Fuel Statistics

- The display function screen consists of 2 parts:
+ Fleet Queries section: the user selects the following information:
-
From: The user enters the first day to create the report;
-
To: The user selects the last day to create the report;
-
Select the icon
 to select the Team;
 -
Click Search button to display the report in the Report Details section.
+ Report details section: Display detailed results of driver's journey information according to the search information
-
Driver;
-
Plate number;
-
Start time: is the time the driver presses the start button on the Edriver app
-
End time: is the time the driver presses the end button on the Edriver app
-
Start address: is the current address of the vehicle when the driver presses to start working
-
End address: is the current address of the vehicle when the driver presses to end working
-
Total mileage(km): the number of kilometers traveled in a journey
-
Driving time: the time the vehicle is operating
-
Idling time: Time of stopping the vehicle without turning off the engine
-
Fuel consumption when driving(l): fuel consumed while the vehicle is operating
-
Fuel consumption when idling (l)
-
Fuel consumed: Total fuel consumed while the vehicle is operating and stopping the vehicle without turning off the engine
-
Fuel norms(L/100Km): is the fuel consumed by the vehicle on the journey calculated according to the standard lit/100km (set in Settings / Basic Info / Vehicle Info)
+ Select the icon to print the report
+ Select the icon to download the report as excel
+ Select the icon to Custom Field, Plate number field settings, Print signature settings
+ Select the icon  to filter search results

Báo cáo vận chuyển hàng
1. Mục đích
- Hỗ trợ NSD thống kê danh sách các chuyến hàng đã vận chuyển.
2. Điều kiện thực hiện
- Người sử dụng được phân quyền option VN88D.
3. Thao tác
- NSD thực hiện chấm chuyến vận chuyển trên app lái xe . Xem hướng dẫn sử dụng app Edriver (https://eup-wiki.gps247.vn/node/215)
- Vào menu Thống kê lái xe » Báo cáo vận chuyển hàng

- Màn hình chức năng gồm 2 phần:
- Phần Thông tin đội xe cho phép NSD điền các thông tin thời gian, đội xe, lái xe cần lập báo cáo;
- Phần Báo cáo vận chuyển hàng của lái xe;

+ Phần Thông tin đội xe bao gồm các thông tin:
-
Từ ngày: NSD nhập ngày bắt đầu báo cáo;
-
Đến ngày: NSD nhập ngày cuối cùng báo cáo;
-
Toàn đội xe: NSD có thể ấn nút
 để chọn đội xe theo yêu cầu báo cáo;
 -
Tất cả các lái xe: NSD có thể ấn nút
để chọn báo cáo theo tên lái xe; -
Loại tìm kiếm: Bình thường/Truy vấn chi tiết;
-
Ấn nút Tìm kiếm để hiển thị kết quả.
+ Phần Báo cáo vận chuyển hàng: Hiển thị kết quả với loại tìm kiếm Bình thường, bao gồm các thông tin sau:
-
Thời gian;
-
Tên lái xe;
-
Biển số xe;
-
Khối: số lương chuyến vận chuyển là Khối;
-
Chuyến: số lượng chuyến vận chuyển là Chuyến;
-
Tổng: tổng số chuyến vận chuyển;

+ Phần Báo cáo vận chuyển hàng: Hiển thị kết quả với loại tìm kiếm Truy vấn chi tiết, bao gồm các thông tin sau:
-
Tên lái xe;
-
Biển số xe;
-
Thời gian bắt đầu: thời gian bắt đầu chuyến vận chuyển;
-
Thời gian kết thúc: thời gian kết thúc chuyến vận chuyển;
-
Địa điểm bắt đầu: địa điểm bắt đầu chuyến vận chuyển;
-
Địa điểm kết thúc: địa điểm kết thúc chuyến vận chuyển;
-
Vật liệu: Loại vật liệu lái xe vận chuyển của chuyến;
-
Khối/Chuyến;
-
Cự li: Cự li của từng chuyến vận chuyển;
-
Phạm vi: thông tin phạm vi do lái xe nhập khi thực hiện chuyến vận chuyển;
-
Km: số km thực tế xe đi của một chuyến vận chuyển;
+ Phần Cài đặt vận chuyển: cho phép NSD thêm sửa xóa các dữ liệu. Vật liệu vận chuyển, Khối, Chuyến. để lái xe chọn trên app Edriver khi thực hiện một chuyến vận chuyển

+ Chọn biểu tượng để in báo cáo
+ Chọn biểu tượng để tải báo cáo dưới dạng excel
+ Chọn biểu tượng để tùy chỉnh cột hiển thị, tùy chỉnh biển số xe trên báo cáo và cài đặt chữ ký in ấn
+ Chọn biểu tượng để lọc kết quả cần tìm kiếm
Kiểm tra quên chuyến vận chuyển
1. Mục đích
- Hỗ trợ NSD thống kê các chuyến vận chuyển lái xe quên chấm công
2. Điều kiện thực hiện
- Người sử dụng được phân quyền option VN88D.
3. Thao tác
- Vào menu Thống kê lái xe » Kiểm tra quên chuyến vận chuyển

- Màn hình chức năng gồm 2 phần:
- Phần Thông tin đội xe;
- Phần Kiểm tra quên chuyến vận chuyển của lái xe;
+ Phần Thông tin đội xe bao gồm các thông tin:
-
Từ ngày: NSD nhập ngày bắt đầu báo cáo;
-
Đến ngày: NSD nhập ngày cuối cùng báo cáo;
-
Ấn nút Tìm kiếm để hiển thị kết quả.
-
Nút Phê duyệt tất cả cho phép NSD phê duyệt tất cả các chuyến đang phê duyệt
-
Phần lọc theo trạng thái của các chuyến: Tất cả, Chưa xem, Bị từ chối, Đã phê duyệt
+ Phần danh sách Kiểm tra quên chuyến vận chuyển: Hiển thị kết quả chi tiết các chuyến hàng quên chấm công:
-
Trạng thái;
-
Tên lái xe;
-
Biển số xe;
-
Thời gian bắt đầu: Thời gian lái xe bắt đầu chuyến vận chuyển;
-
Thời gian kết thúc: Thời gian lái xe bắt đầu kết thúc chuyến vận chuyển;
-
Địa điểm bắt đầu: Địa điểm lái xe bắt đầu khởi hành;
-
Địa điểm kết thúc: Địa điểm lái xe kết thúc chuyến đi;
-
Vật liệu: các loại vật liệu vận chuyển;
-
Khối/Chuyến: Quy định cho loại vật liệu vận chuyển;
-
Cự li: cự li mỗi chuyến vận chuyển;
-
Phạm vi: lái xe có thể ghi chú thêm thông tin;
-
Lý do: Lái xe ghi rõ lý do quên chấm chuyến để được phê duyệt;
-
Kiểm tra: NSD kiểm tra và duyệt cho đơn chấm chuyến

+ Chọn biểu tượng để in báo cáo
+ Chọn biểu tượng để tải báo cáo dưới dạng excel
+ Chọn biểu tượng để tùy chỉnh cột hiển thị, tùy chỉnh biển số xe trên báo cáo và cài đặt chữ ký in ấn
+ Chọn biểu tượng để lọc kết quả cần tìm kiếm