Monitor center
- Log in to post comments
- Tiếng Việt
- 繁體中文
Map
1. Purpose
- Support users to check vehicle operating status on the map and detailed information of each vehicle updated at the current time.
2. Implementation conditions
- Users are given a journey monitoring system account.
3. Implementation instructions
- Step 1: Go to menu Monitor center/Map
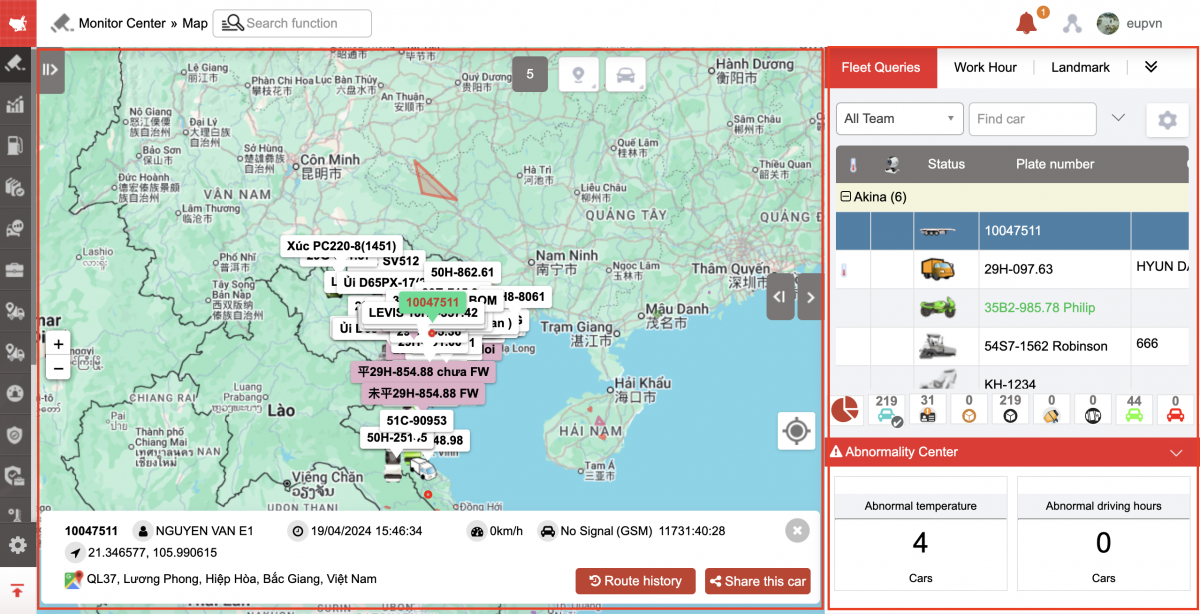
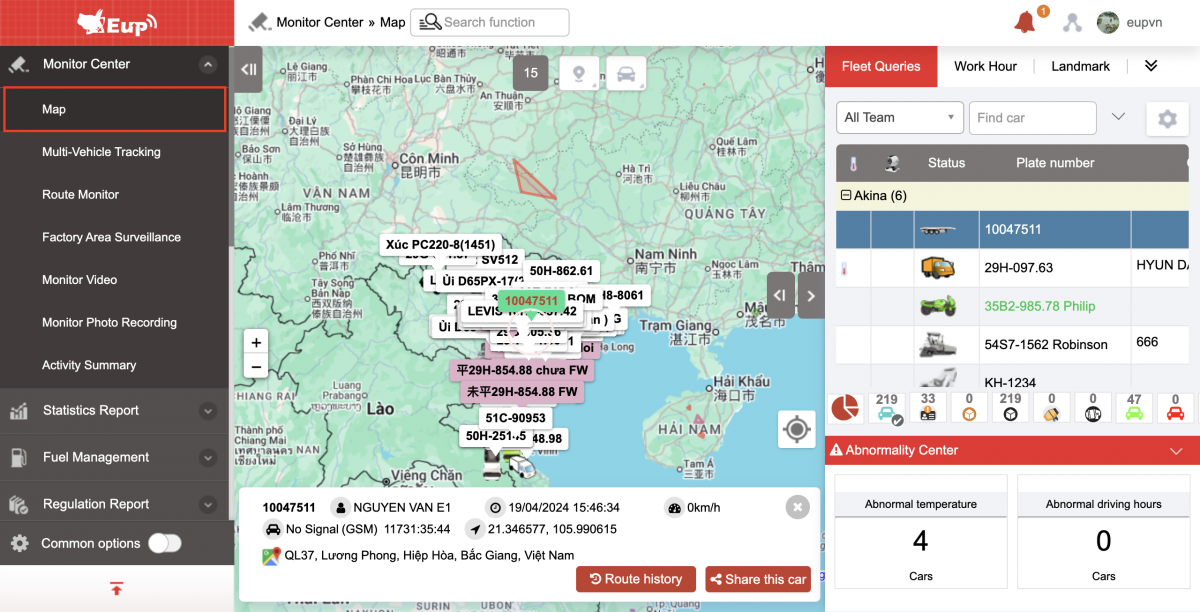 - Step 2: The function display screen consists of 2 parts:
+ Fleet queries: displays information about the fleet, nearby vehicles, landmarks and restricted areas;
+ The map displays the selected vehicle on the map so that users have a visual view of the current vehicle operating status.
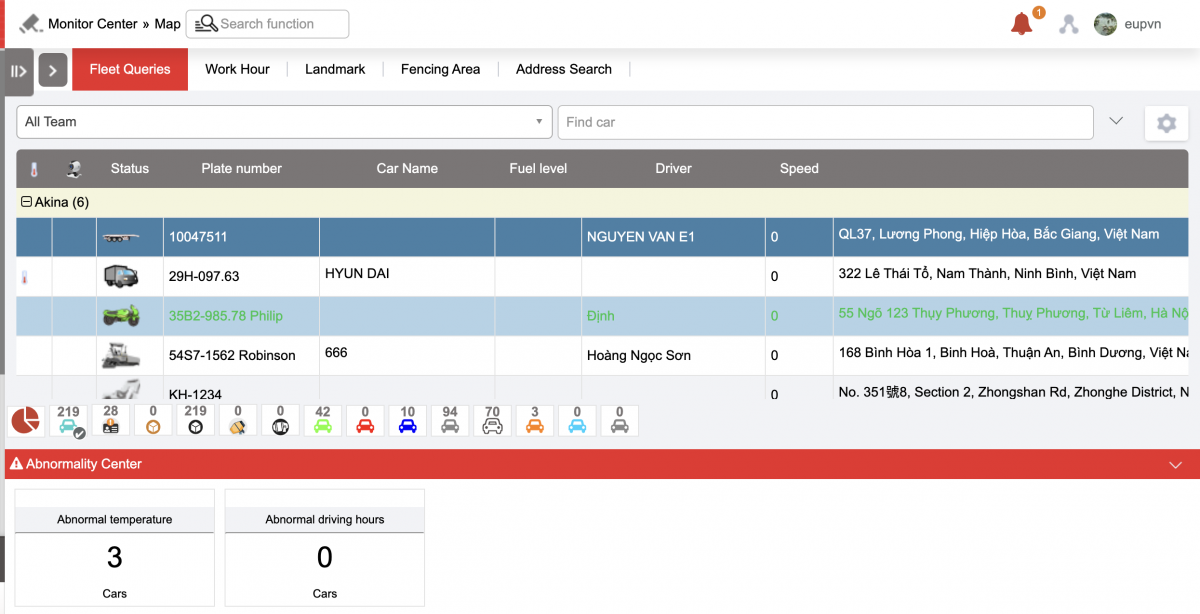
- Fleet queries part: displays information: Fleet Information, Landmarks, Restricted Areas, Address Search
+ Fleet information: Allows you to choose to view information of all fleets or each fleet. Fleet information includes the following information:
-
Filter includes:
-
Choose to view by fleet or view all (Fleet is set in Settings/Permissions)
-
Enter the license plate number you want to view
-
Choose to view by vehicle group or view all (Vehicle groups are set in the Vehicle Group Settings tab on the Settings/Vehicle Groups and Sharing page)
-
Select to view by vehicle type (Vehicle type is set in the Vehicle Icon section in Settings/Basic Information Settings/Vehicle Information
-
-
Report current vehicle status:
-
Status: Display vehicles by color;
-
Speed: Updates the current speed of the vehicle;
-
Plate number;
-
Fuel Level: Update the remaining oil level of each vehicle;
-
Driver: Driver name;
-
Address: Location where the speed update is taking place/ Landmark
-
Reporting time;
-
Phone" Driver's contact phone number.
-
Driving time: Total time in the Running and Stopped states without turning off the engine at the last start (Stopped Vehicle resets the time = 0)
-
-
The support toolbar displays the total number of vehicles according to each status :

-
 : Total
 -
 : Carrying goods (With sensor installed)
 -
 : No cargo (With sensor installed)
 -
 : Mixing (With sensor installed)
 -
 : Discharge (With sensor installed)
 -
 Green: Vehicle is running
 -
 Red: Over speed
 -
 Dark green: Stop the car without turning off the engine
 -
 Gray: Stop
 -
 White: Signal lost
 -
 Purple: Active (Sensor installed)
 -
 Orange: Abnormal temperature (Sensor installed)
 -
 Blue: Abnormal barriers (Set in Settings/Self-build restricted area)
 -
 Gray: Container removal (Container with GPS device installed)
-
-
Abnormality Center : Displays the corresponding abnormal status of each selected vehicle (Abnormalities are set at Settings/Alert settings );
-
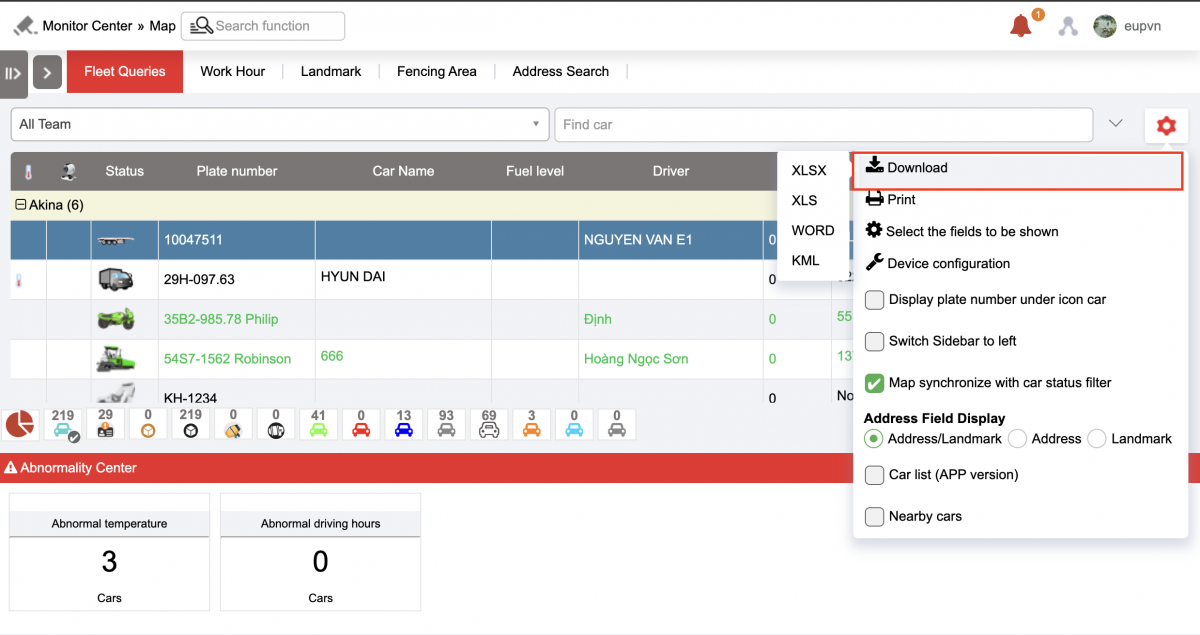
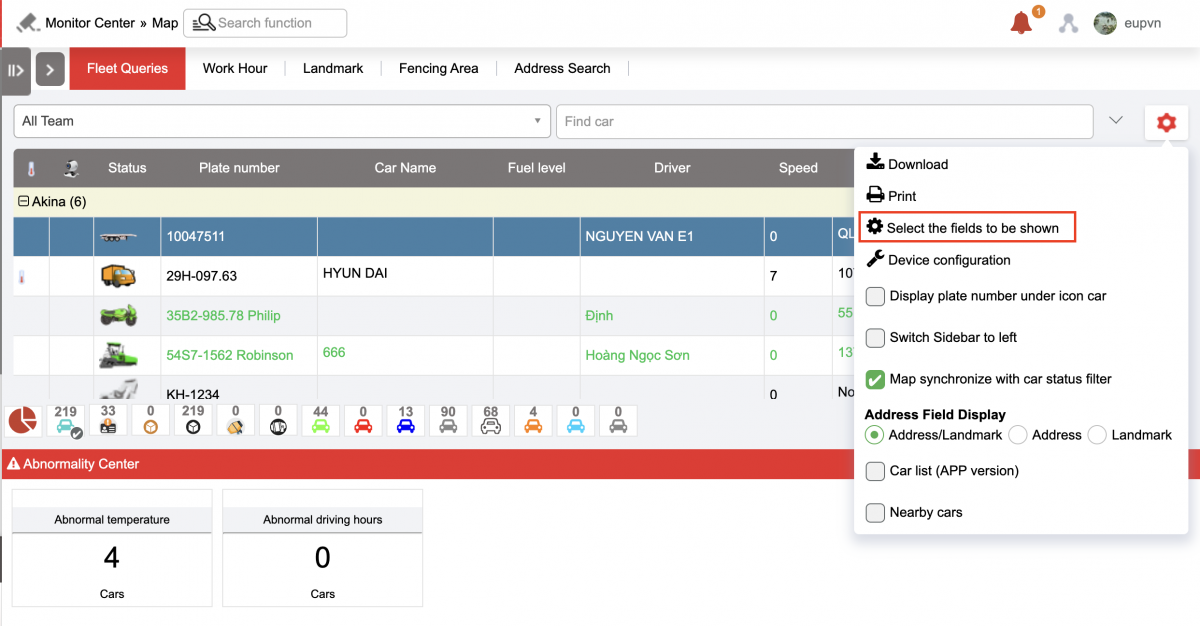
Click Download to download a summary report of the entire fleet's vehicle status during the report download period: Download in XLSX/ XLS/ Word format
-
Click Print to print the current status report;

-
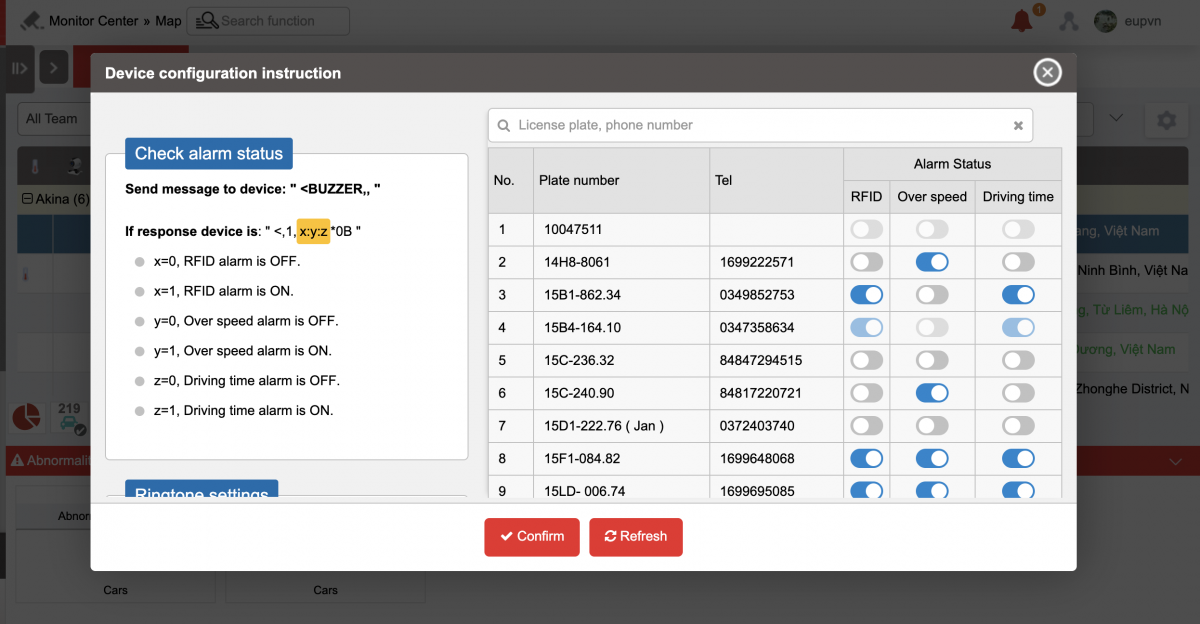
Device configuration instruction: Set on/off the card swipe/ Overspeed/ Driving time bell status
-
Slide to left (Gray display button): Turn off the bell
-
Swipe right (Blue display button): Turn on the bell
-
-
Click Select fields to display to be shown to set the fields of the current status report to show or hide;
-
When checking Nearby cars: Display vehicles within the map range in the Fleet queries

-
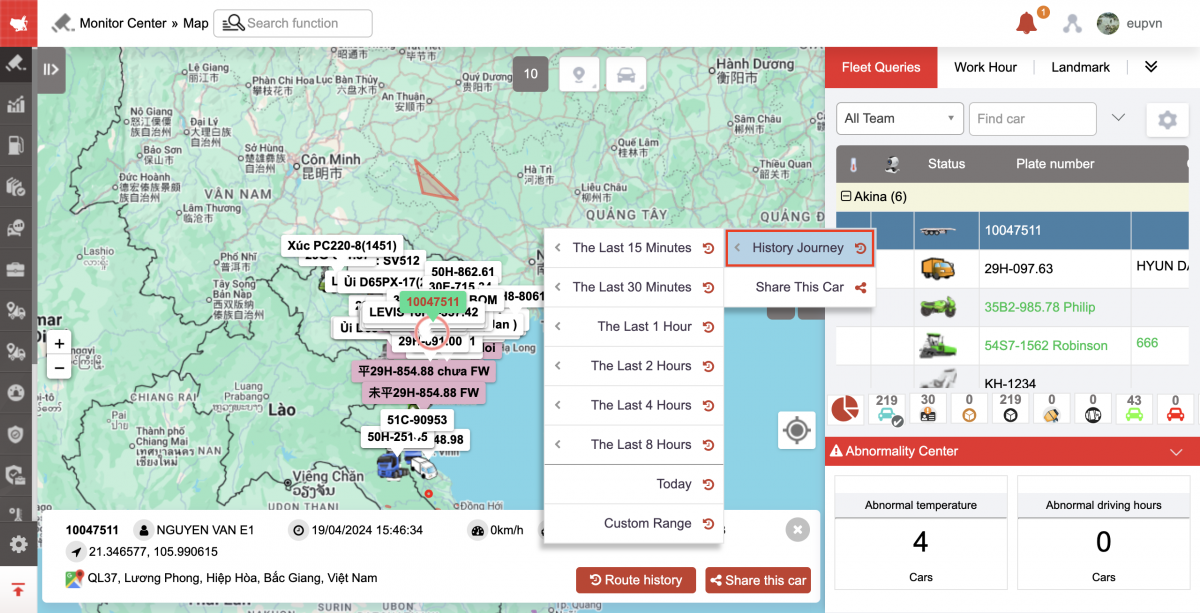
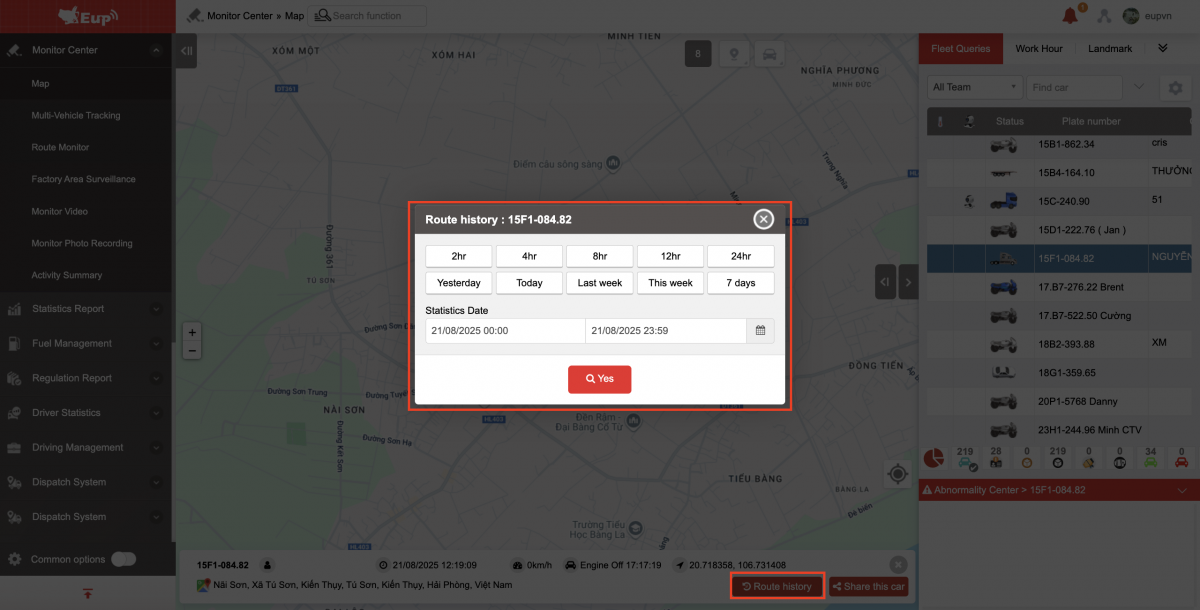
Select vehicle/ Right click: Quickly view history journey by recent 15 minute/30 minute/1 hour/2 hour intervals..., During the day, Optional.
-
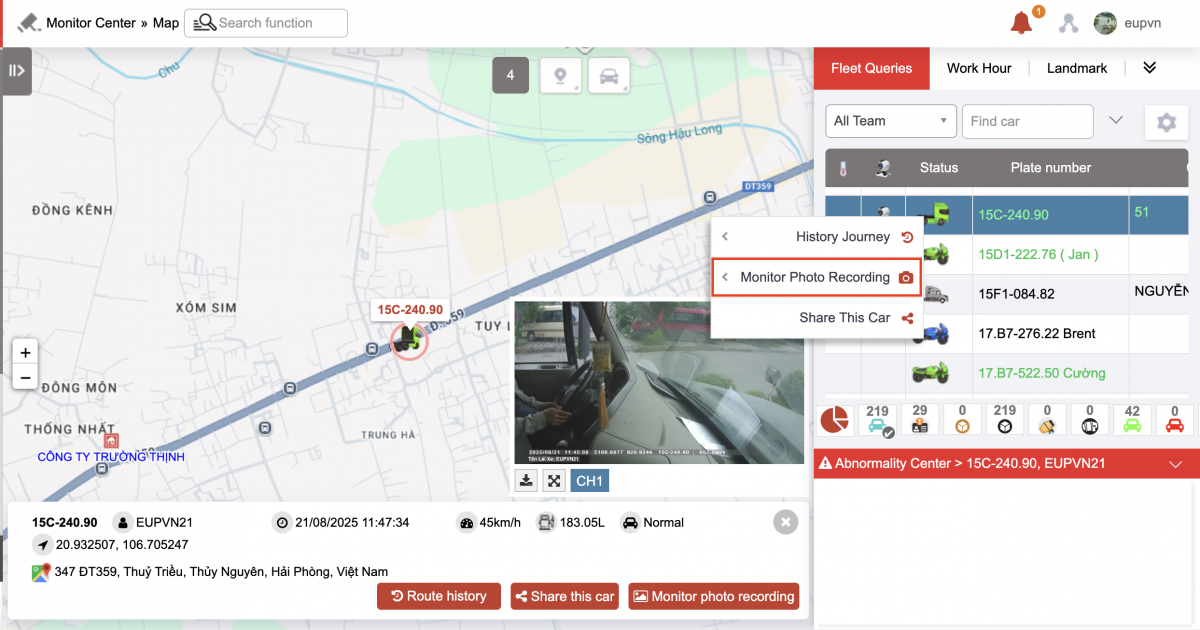
Monitor photo recording: Quick view of camera images 1,2
-
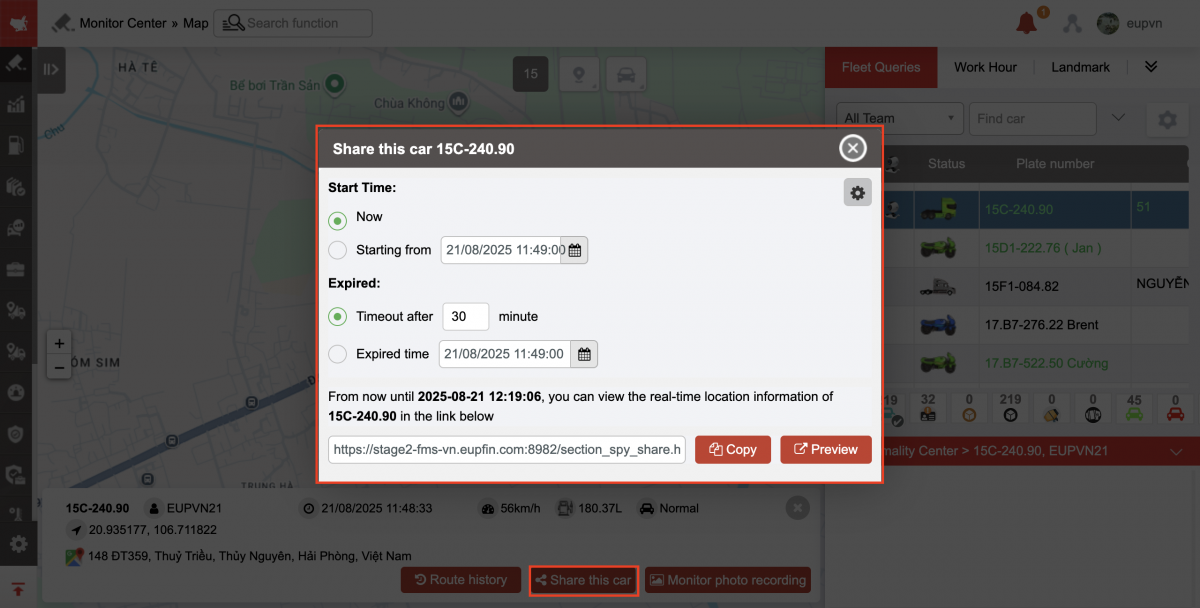
Share this car: share the location of the selected car
-
Step 1: Right click on the car, then click share car on the map (Or select the car to share, select the Share car button at the bottom of the map)
-
Step 2: Display the car sharing board with the following information:
-
Timeout after: Number of minutes the link expires
-
Expired time: Share link expiration time
-
Show/hide landmarks: Allow sharing of landmarks or not
-
Select the button
 to customize on/off the information fields you want to share and save.
 -
At the car sharing link: select copy or preview
-
-
Step 3: Send car sharing link
-
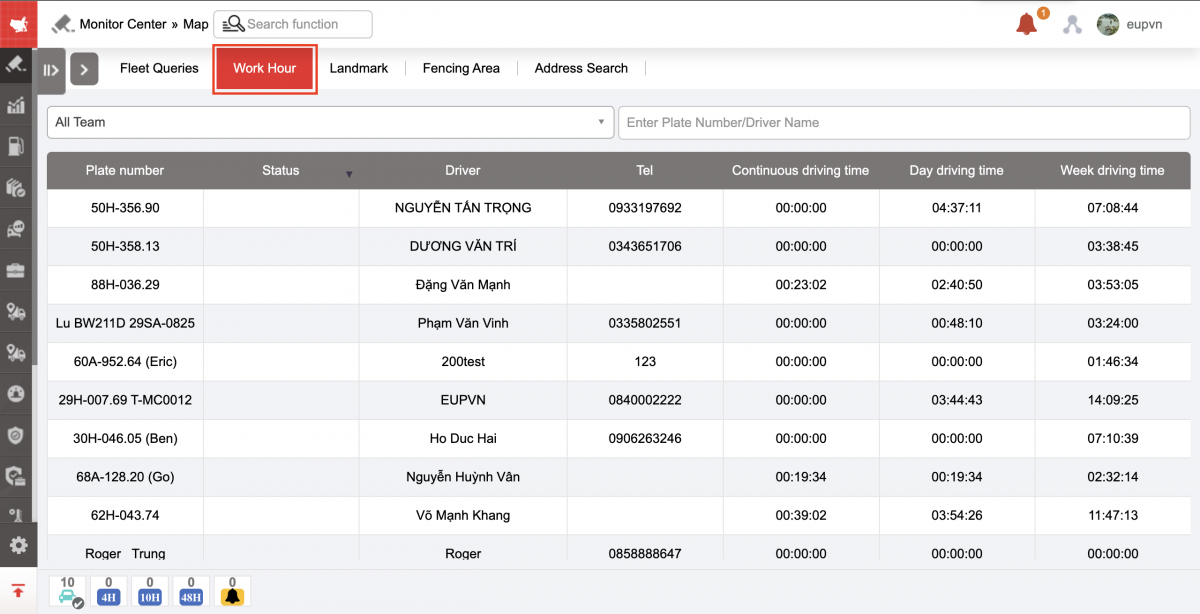
+ Work hour:
-
Plate number:
-
Status: Current status of the vehicle
-
Driver: Driver swiping card
-
: Driver's phone number
-
Continuous driving time: Total continuous driving time 4 hours (According to QCVN)
-
Day driving: Total driving time per day 10 hours/day (According to QCVN)
-
Week driving time: Total driving time per week 48 hours/week (According to QCVN)
-
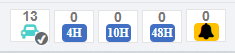
Vehicle Icon: Show total vehicles
-
Violation icon 4h, 10h, 48h: Displays the number of vehicles with drivers violating driving time
-
Bell icon: Displays warning of violating drivers

-
If the driver is about to violate the driving time, it will be colored yellow, if he has violated, it will be colored red.
+ Landmark : Display pre-set milestones for fleets to track fixed counting points that vehicles are set to pass through;
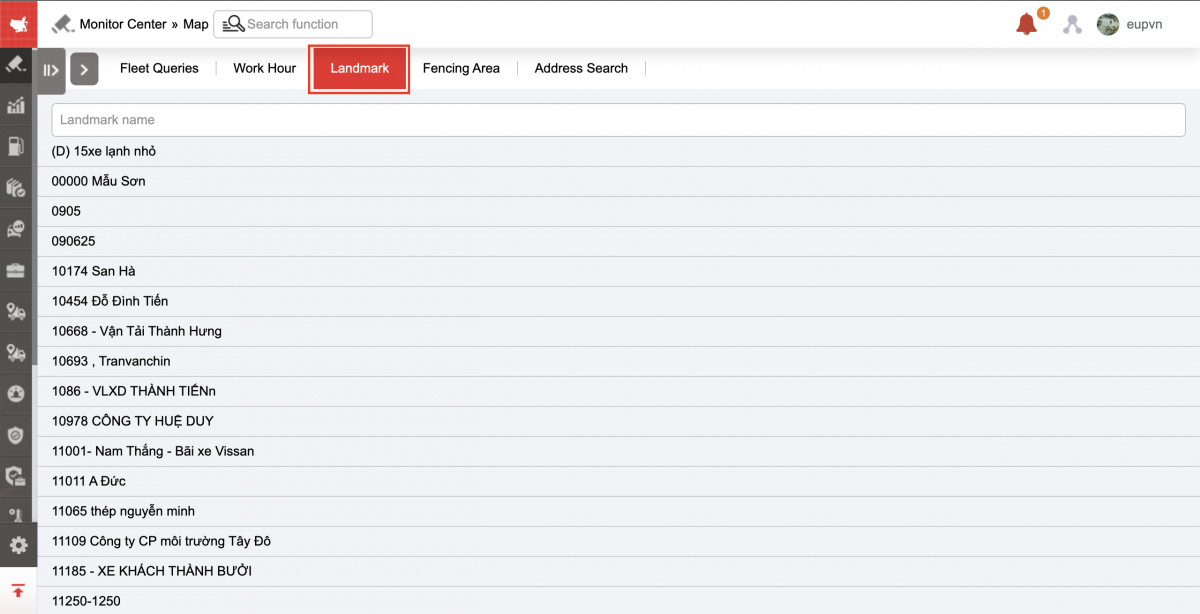
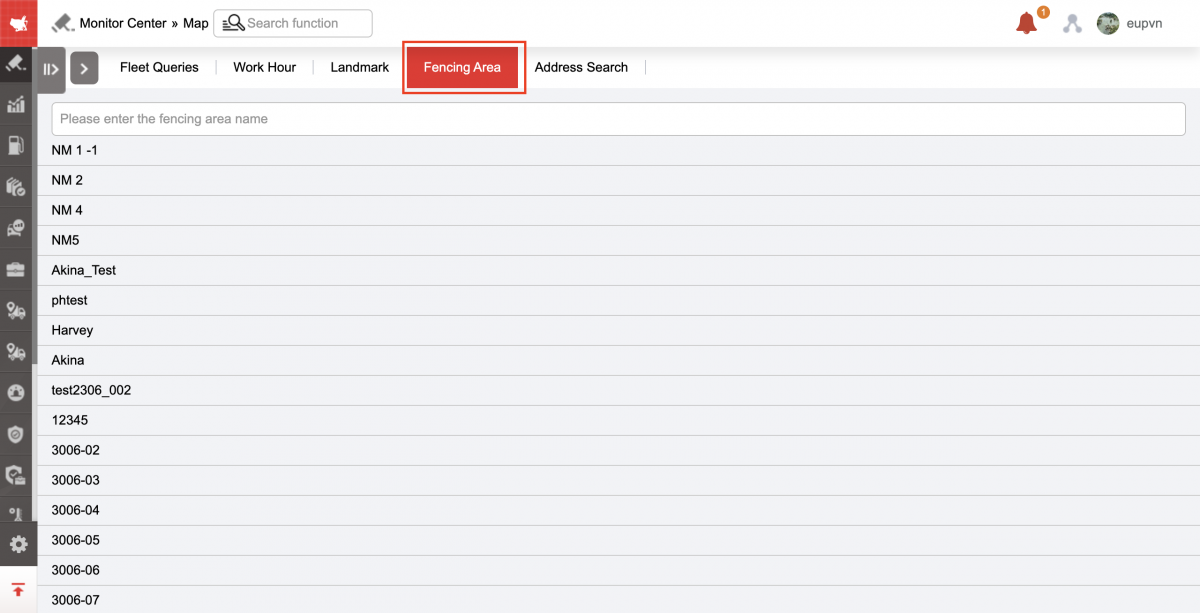
+ Fencing area : Displays pre-set restricted areas for each vehicle, to monitor vehicles that are only allowed to run within the restricted area.
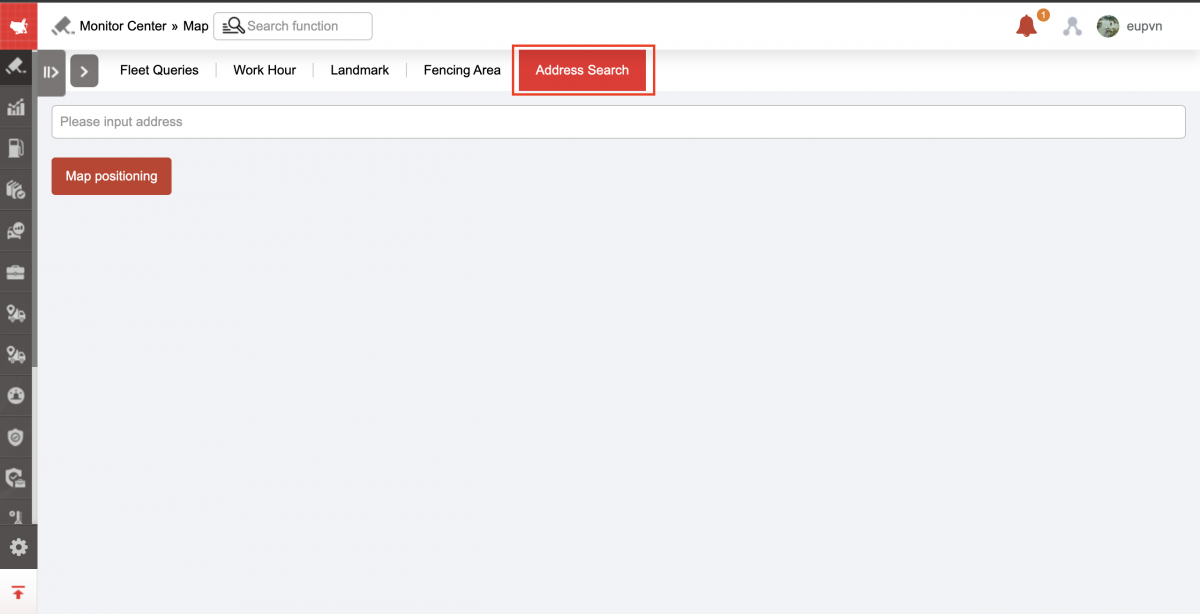
+ Address search
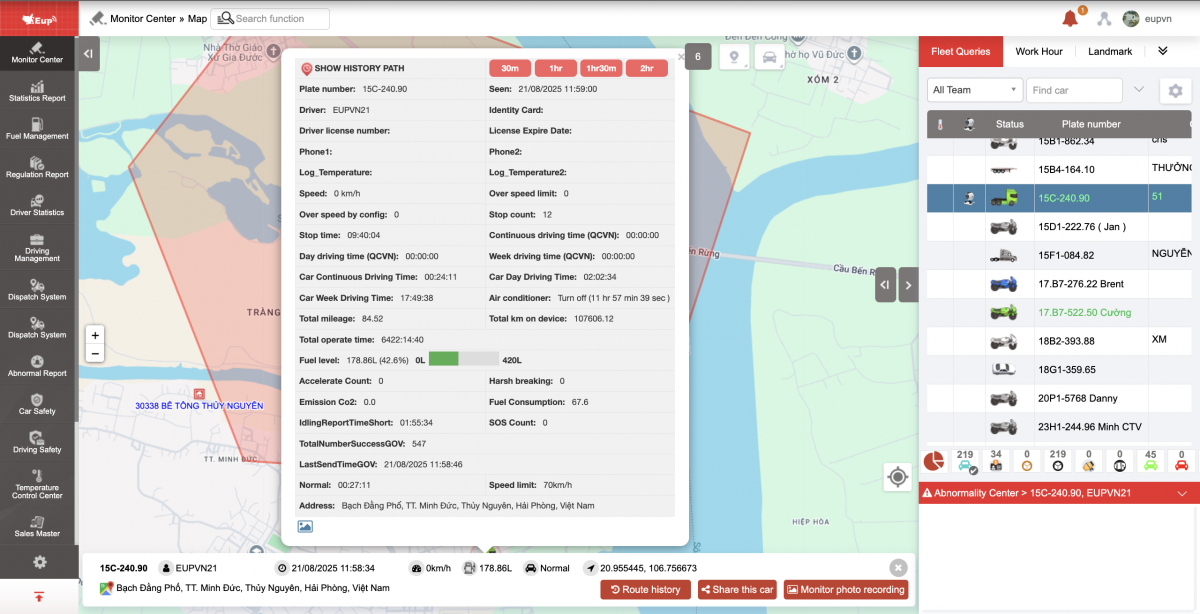
- Map section : Displays the vehicle's location on the map and the current vehicle status. Users can point the mouse at the vehicle to view detailed information. In addition, users can right-click to quickly create landmarks or restricted areas.
-
Over speed by : Number of times exceeding the speed limit per day (Speed limit is set in Over speed in Settings/Warning settings/Vehicle status)
-
Stop count : Number of times the vehicle was stopped without turning off the engine and parked during the day
-
Stop time: Accumulated parking time during the day (total parking time with engine off + parking time without engine off during the day);
-
Car Continuous Driving Time: : The time the vehicle is in continuous driving state at the most recent time (statistics by vehicle)
-
Car Day Driving Time: Total time the vehicle is in running condition during the day (Statistics by vehicle)
-
Total mileage : Total km the vehicle travels during the day
-
Maximum Load (Tons): Displays the maximum load set at Settings/Basic Information/Vehicle Information
-
Custom: Displays the content entered in Settings/Basic information/Vehicle information. The content is the vehicle's hotline phone number or any information the user wants to display on the vehicle information board.
-
Total km on device: Total km from installation to present time
-
Total operate time:
-
Accelerate Count:
-
Decelerate Count::
-
CO2 emissions (grCo2):
-
Fuel level (liters):
-
DXKTM time: Time of stopping the vehicle without turning off the engine during the day
-
SOS count: Number of SOS button presses per day
-
Total Number Success GOV:: Number of messages transmitted to TCDB during the day
-
Last Send Time GOV: Displays the time of data transmission to TCDB
-
Speed limit: is the speed limit according to the route, according to option VN08 and must setVehicle Type (Toll station/Maximum speed management) in Settings/Basic information/Vehicle information
-
Air conditioner:: Displays the status and total time in the corresponding state of IO2 up to now
-
Car Day Driving Time: Total time of drivers running per day.
For example : Driver A drives for 4 hours, driver B drives for 3 hours, then the driving time in a day is 7 hours.
-
Current state : Accumulated time of discharge/mixing operating states, total time of maintaining the current state of the vehicle. For example: Discharge/mixing:00:01:00, Vehicle running : Accumulated time of discharge/mixing operating states, accumulated time of the current state of the vehicle (parking, stopping without turning off the engine, running vehicle)
-
Address: Shows the current location of the vehicle
+ Right click on the online map:
-
Navigate in Google Map: Go to Google Map search current location to click location on map
-
View point in Google Map: View click location on map directly on Google Map
-
Direct: Search from Click location on map to another location
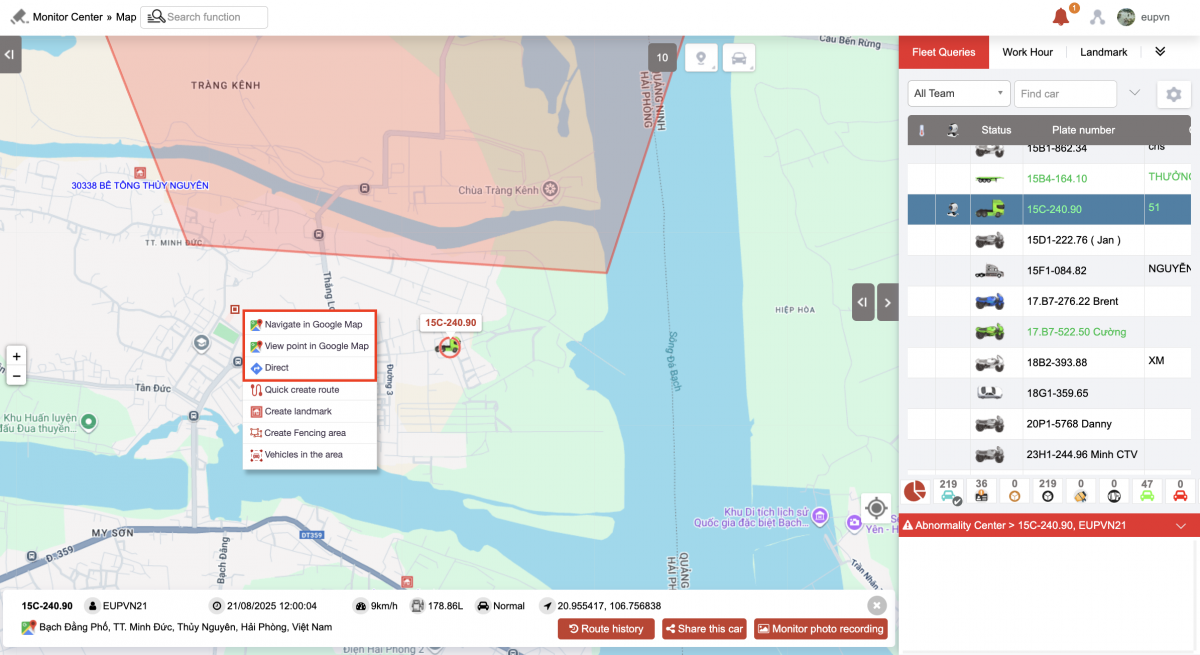
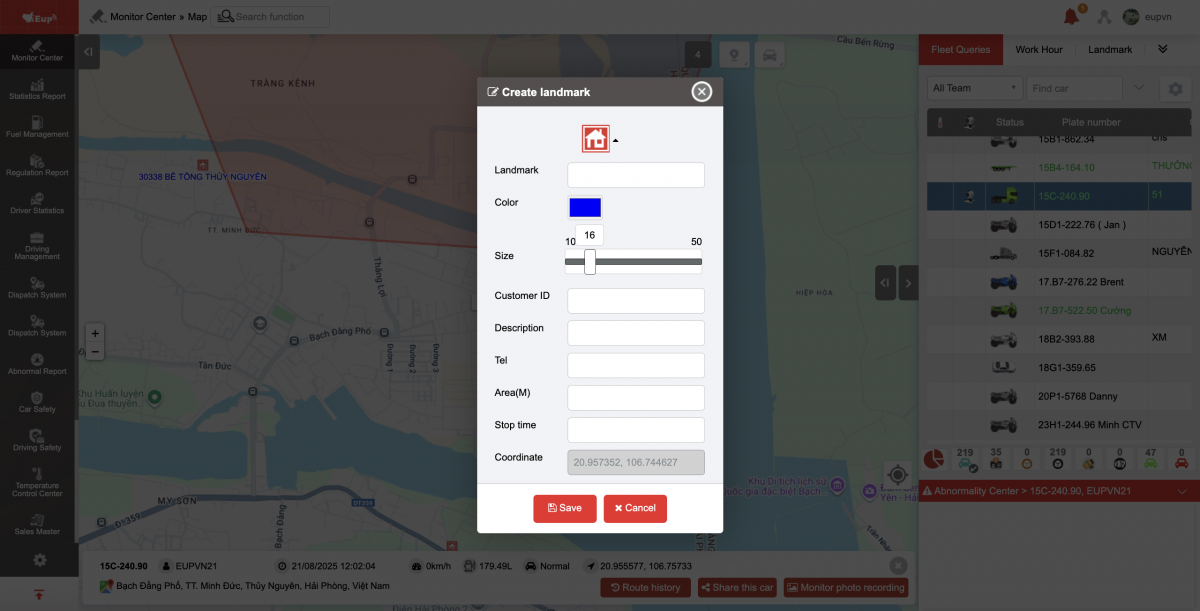
+ Create a landmark by right-clicking on the map: Name, color: select the landmark text color (default color is blue), size: select the landmark size (default size is 16), customer ID, Description, Tel, Area (M): Landmark radius, Stop time: Settings for the Journey Management function, Coordinate: Display the coordinates of that milestone when adding and editing, Subsidiary branch: whether to share with authorized accounts or not
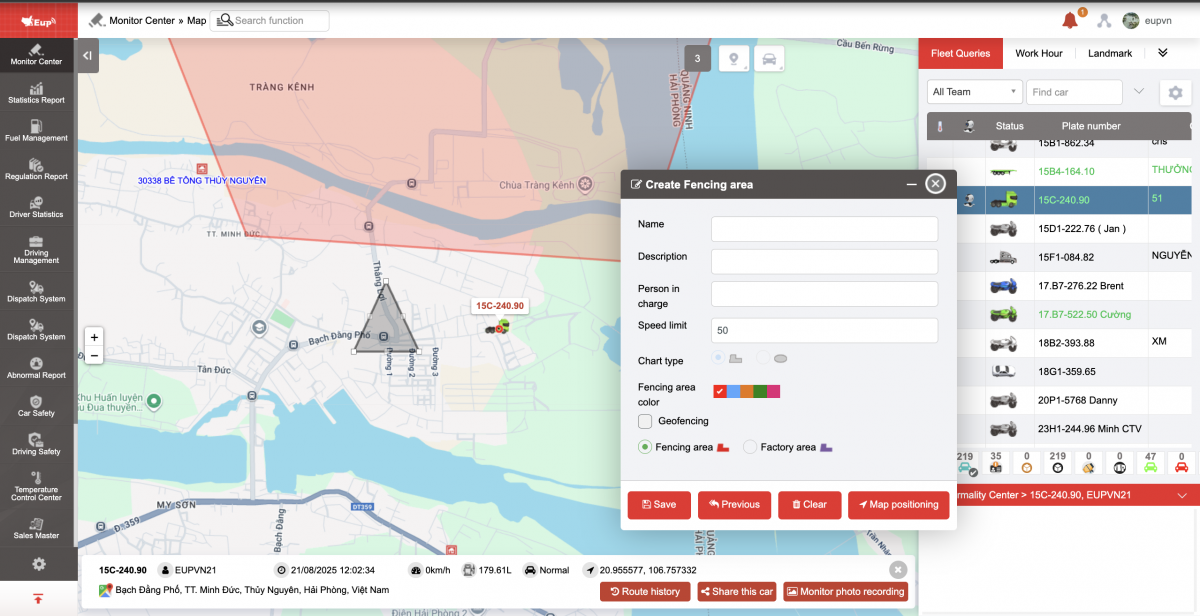
+ Create a fencing area by right-clicking on the map/ Fill in the information: Name, Description, Person in charge, Speed limit, Chart type ![]()
![]() , Fencing area color, Turn on/off geofencing
, Fencing area color, Turn on/off geofencing
-
Fencing area: Zoned
-
Factory area: Create workshop in Online Monitoring/Workshop Monitoring
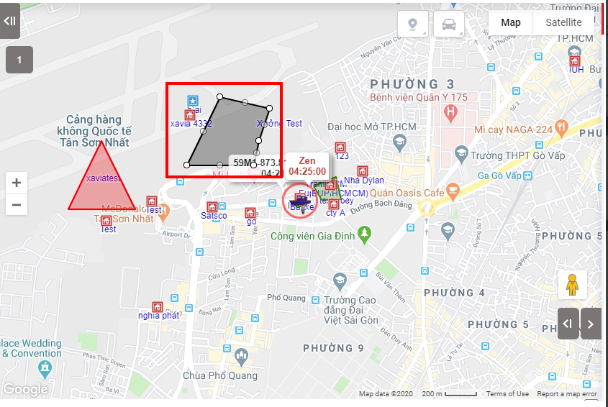
+ Vehicles in the area: The purpose is for users to draw an area and view a list of vehicles in that area. To use this feature, users perform the following operations:
Step 1: Right click on the screen
Step 2: Select Vehicle in the area
Step 3: Right click on the screen to create an area
Step 4: Point the mouse at the destination when the hand icon changes to a finger pointing icon, then drag and drop the mouse to select the area to create.
After creating the area, a list of vehicles in the created area will be displayed. Users can export the file
Note: User needs to be authorized to use option VN82 on CRM

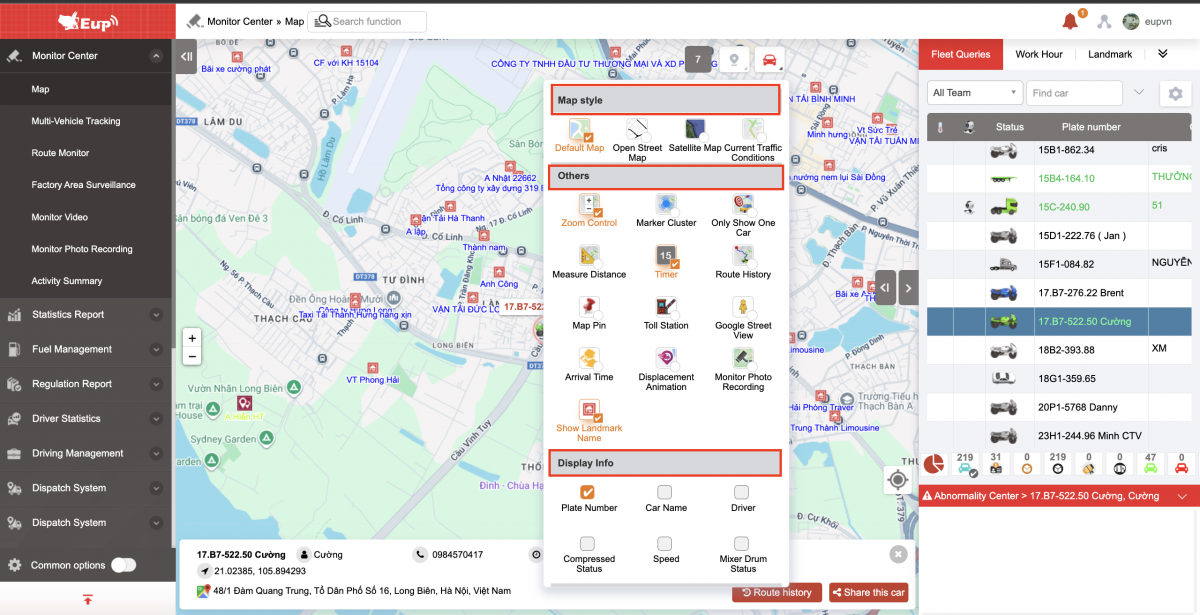
+ Car icon: Map style, Others, Display, Advance
-
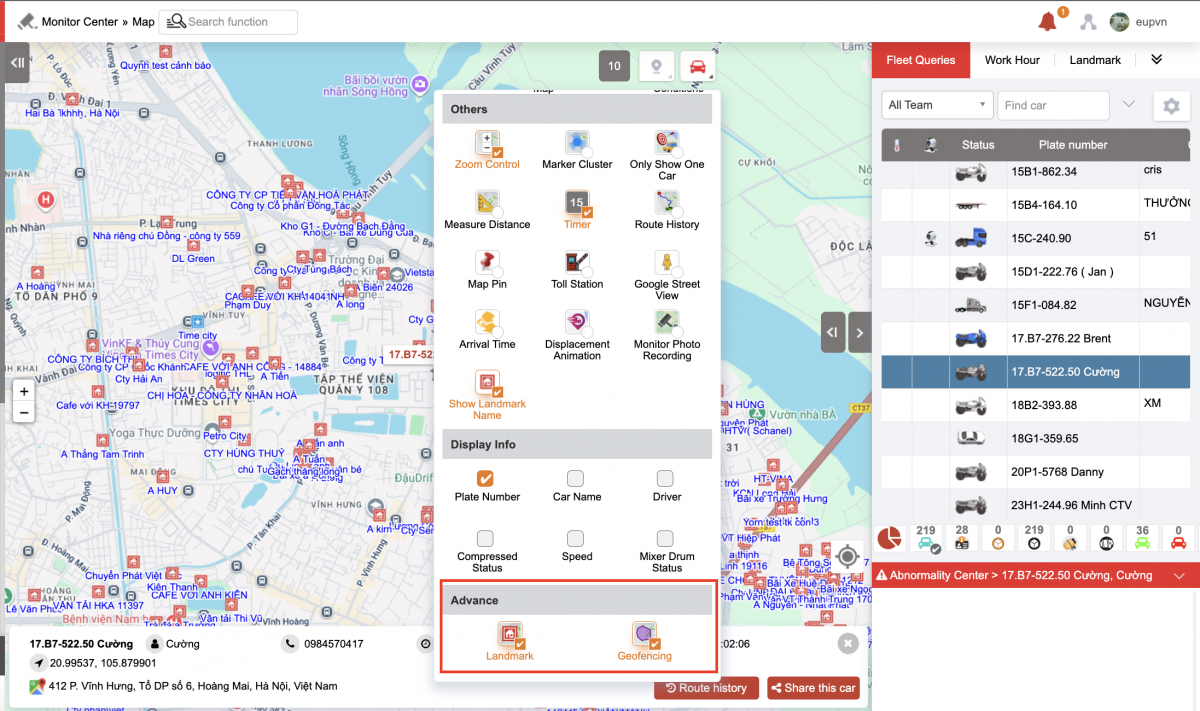
Advance checkbox: Landmark checkbox, Geofencing checkbox to enable/disable Landmark and Geofencing on the online monitoring page (Applies to both parent and child accounts)
+ Route history: Select by hour/day/week/option
- Log in to post comments
- Tiếng Việt
- 繁體中文

Multi-Vehicle Tracking
1. Purpose
- Support users to monitor multiple vehicles at the same time.
2. Implementation conditions
- Users are assigned functional authority on the CRM system.
3. Implementation instructions
- Go to menu Monitor Center/Multi-Vehicle Tracking
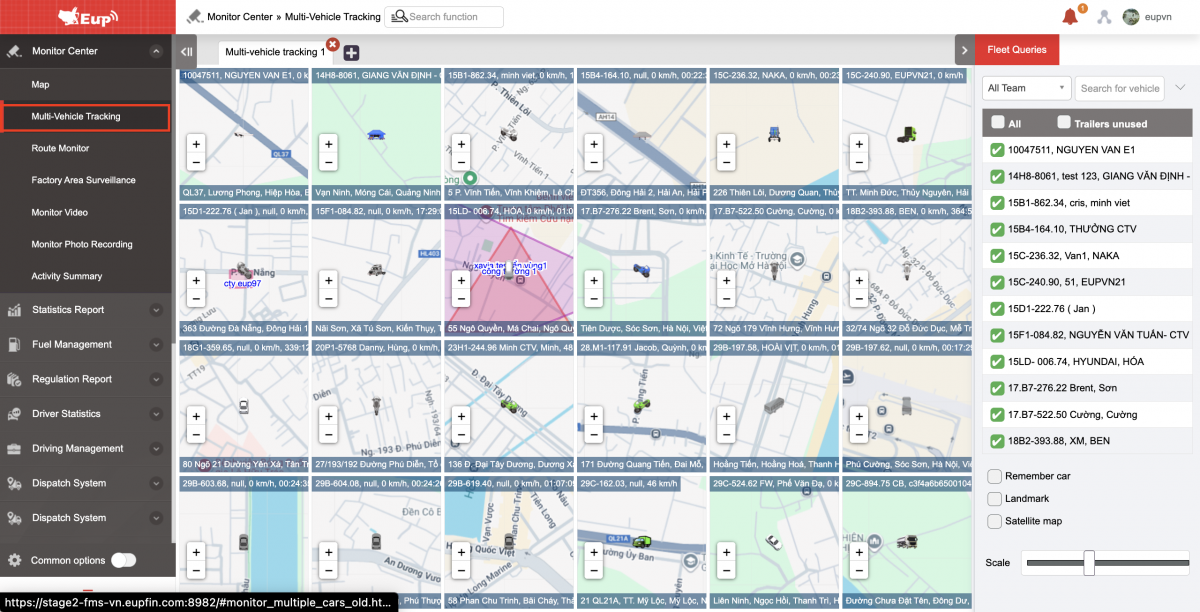
- The function display screen consists of 2 parts:
+ The Fleet Queries section allows displaying the entire list of fleets or a list of vehicles by team;
+ The Map section displays the monitoring map of each vehicle.
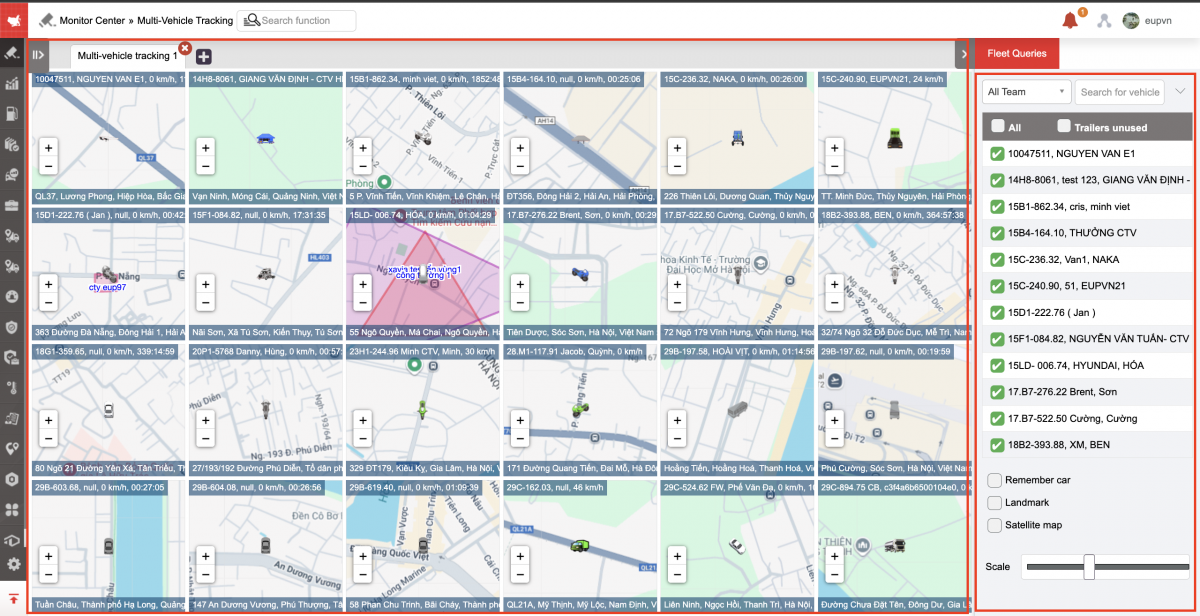
+ Fleet Queries section : Displays a list of fleets according to filter conditions. Allows users to select multiple vehicles to monitor at the same time. Maximum 24 vehicles on the screen and when users select more than 24 vehicles, the system supports displaying on multiple pages.
To show more pages: Check the plus sign 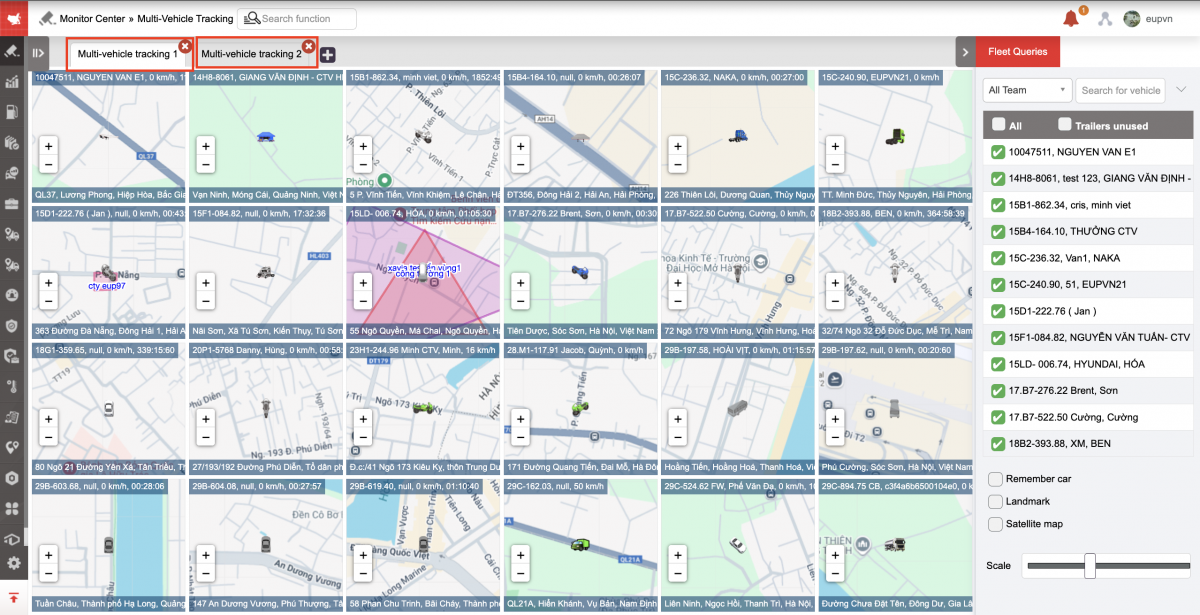
+ Map section : Displays the monitoring map for each vehicle, the vehicle is displayed according to the status color and when the vehicle icon is checked, the system supports displaying the monitoring map according to the function when the user clicks on the map of the vehicle that needs to be monitored online.
-
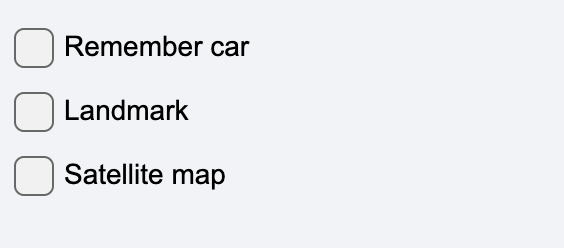
Check Remember car to save the created fleet
-
Show/hide landmarks : Show created landmarks on the map
-
Satellite Map : View Satellite Map
-
Drag the light bar left/right to adjust the map scale
- Log in to post comments
- Tiếng Việt
- 繁體中文
Factory area surveillance
1. Purpose
- Function to support users to monitor the operation and status of vehicles at the factory and construction site (used for concrete mixer trucks).
2. Implementation conditions
- Users are authorized to Option 94 and 20 on the CRM system.
3. Implementation instructions
- Goto menu Monitor center/Factory area surveillance
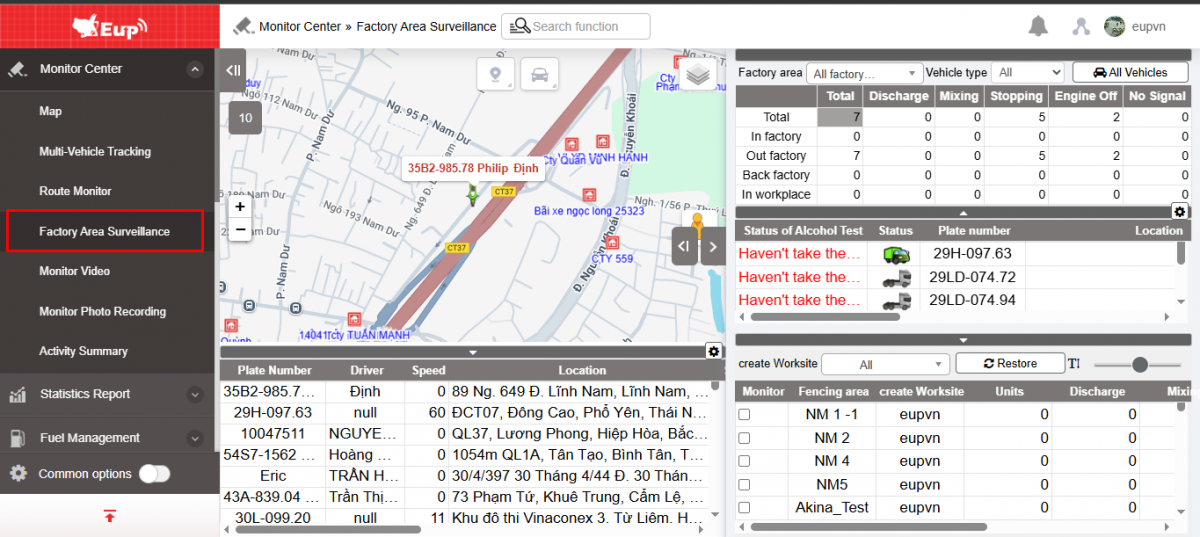
- The function display screen consists of 4 parts:
+ The Monitoring Map section and the current vehicle status update panel display the vehicle's monitoring map;
+ Quick Statistics section allows to view quick reports;
+ Summary and detailed table of vehicle operations in the factory and construction site;
+ The Site Supervision section allows users to select one or more sites (up to 6 sites to monitor).

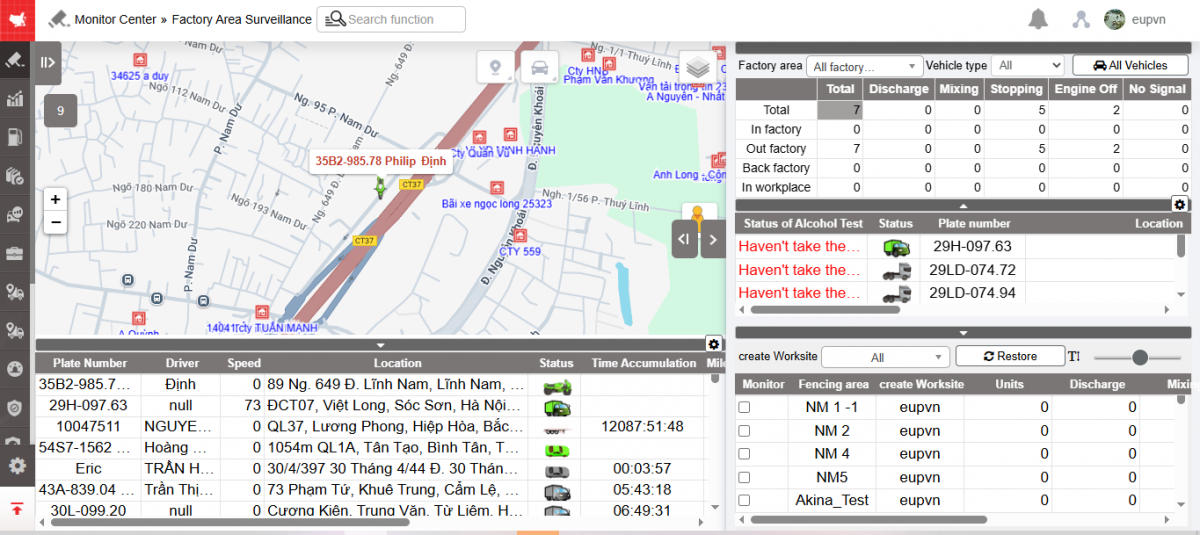
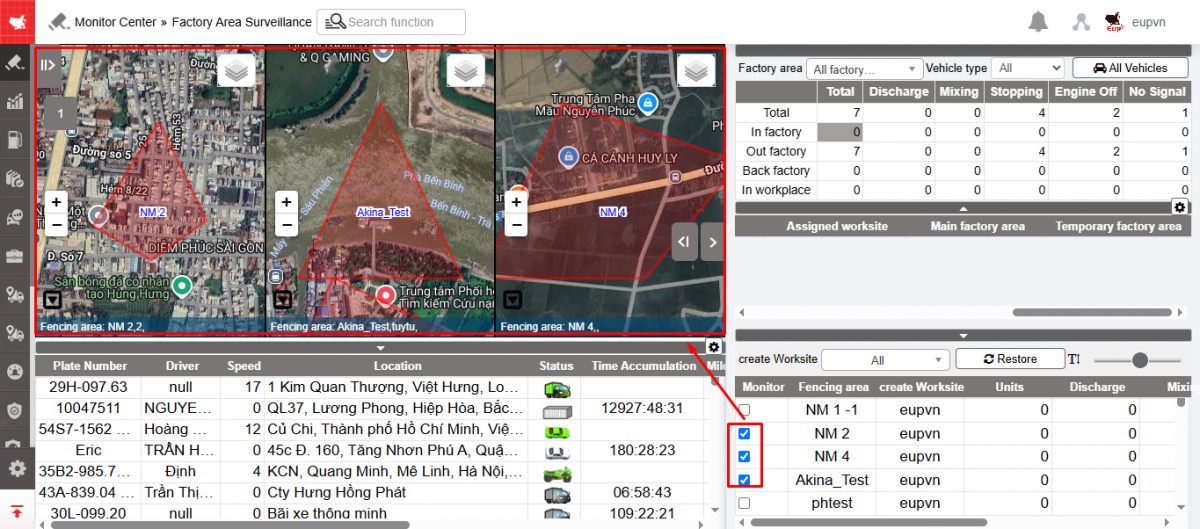
+ The Monitoring Map section and the current vehicle status update panel: The upper part displays the corresponding monitoring map of the vehicle, or the construction site selected for monitoring; the lower part is a table showing the vehicle's operating status and information such as speed, current location of the vehicle, and the workshop area the vehicle belongs to.
-
The information displayed in the current statistics table includes:
-
Plate number;
-
Drive;
-
Speed: Current vehicle speed;
-
Location: Current location of the vehicle;
-
Status: Displayed by color;
-
Time Accumulation: Total time the vehicle has been in its current state;
-
Mileage accumulation: Total Km the vehicle has traveled;
-
Main factory area: The workshop area that the user has set up for each vehicle in the Settings/Vehicle Information function .
-
Temporary factory area: When a vehicle is in the main workshop, but another workshop needs a vehicle, the vehicle can be transferred to that workshop. A workshop that is not directly affiliated but is transferred is called a temporary workshop.
-
Reporting time: Current vehicle signal update time;
-
-
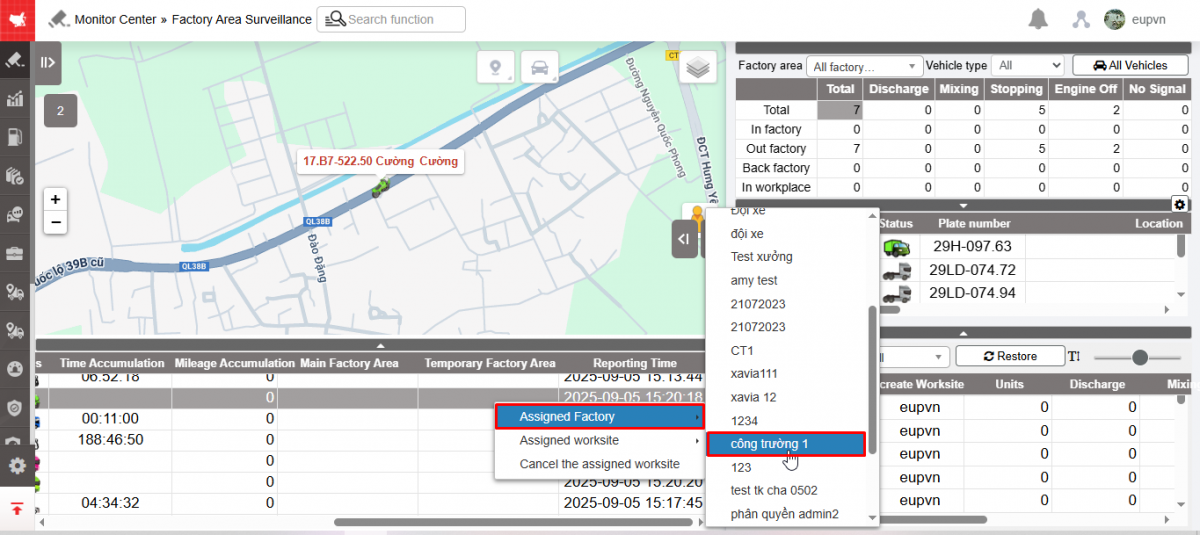
To transfer a vehicle to a temporary workshop, the user selects the row containing the vehicle to be transferred, right-clicks and selects Assigned factory;
-
To transfer the vehicle back to the main workshop, the user selects the line containing the vehicle to be transferred, right-clicks, selects Assigned factory, and selects the name of the vehicle's main workshop.
-
Note:
-
When choosing to transfer the vehicle's workshop, the vehicle number statistics will change according to the workshop transfer: The workshop transferring the vehicle will reduce the total number of vehicles in the workshop and the workshop receiving the vehicle will increase the total number of vehicles in the workshop. The status of leaving the workshop and returning to the workshop will be counted according to the current workshop where the vehicle is assigned;
-
To create a factory or construction site, right-click on the map area and select Create fencing area. The function screen displays;
-
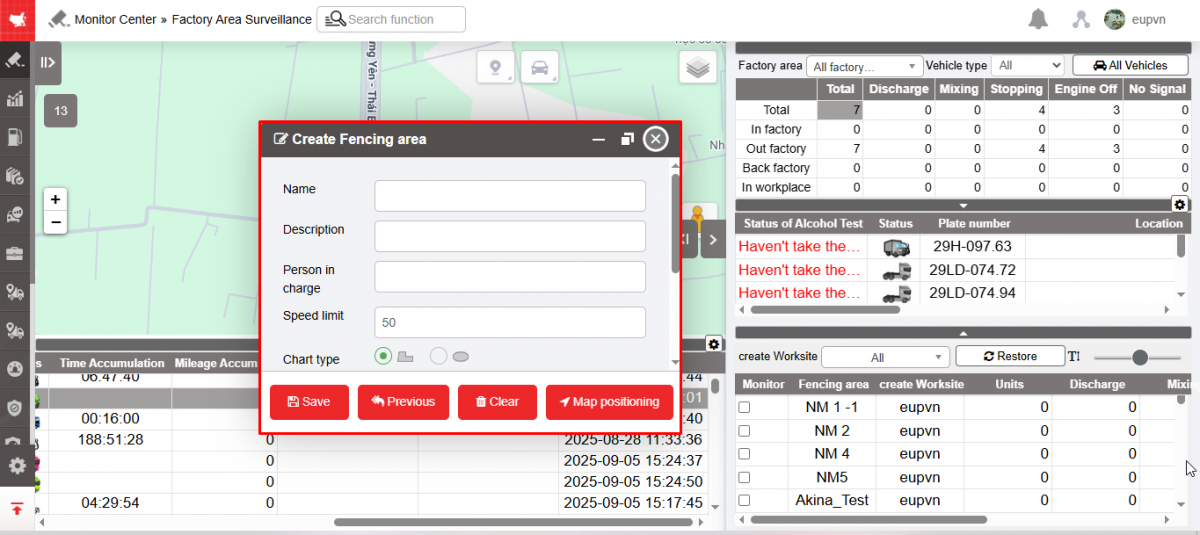
-
User can enter information of Limited Area = factory site then right click on the map to set the limited area then click Save.
+ Quick Statistics section : Click on the function button below to open the quick statistics section;

+ Section Summary and detailed table statistics of the vehiclle
-
Summary table : Allows users to quickly view the following information by workshop, or all workshops:
-
Total: Total number of vehicles in the workshop or all workshops depending on the user's search conditions according to the corresponding statuses such as: Vehicle running, Stopped, Unloading (concrete discharge), disconnected;
-
In factory: Statistics of vehicles in the workshop with corresponding vehicle status;
-
Out factory: Statistics of vehicles from factory to construction site with corresponding vehicle status;
-
Back factory: Statistics of vehicles returning from the construction site to the workshop with corresponding status;
-
In workplace: Statistics of vehicles on site with corresponding vehicle status.
-
-
Detail table : Displays detailed information corresponding to 1 row in the summary table section:
-
Status, Plate number, speed, location, speed: Current vehicle information
-
Stay time at factory: Displays cumulative time.
-
If the vehicle is in the Return to Workshop status, this box will show an estimate of how long it will take to get the vehicle back to the workshop;
-
If the vehicle is in the workshop status, this box will show how long the vehicle has been in the workshop.
-
-
Time back to factory: Displays the hour, minute, second format the vehicle was at the workshop for vehicles in the Return to Workshop status.
-
Adjust column width by clicking on the settings icon:
-

-
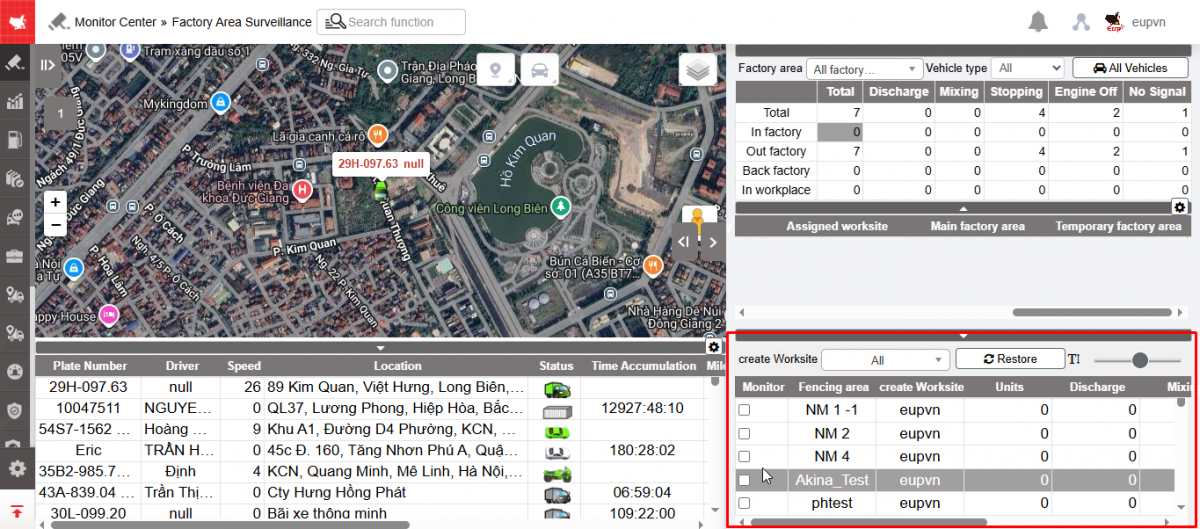
+ Site Supervision section : Allows users to select a site to monitor. The selected site will be displayed on the map. When users check information in other sections and then want to return to the selected site monitoring screen, select Restore.
-
Monitor: Checkox box allows to select construction sites to monitor (up to 6 construction sites)
-
Fencing area: Construction site name
-
Unit: Total number of vehicles in the construction site
-
Discharge (concrete discharge): Vehicles with concrete dumping status
-
Idling: Vehicles with the stop without turning off state
-
Other: Vehicles with other statuses Unloading (discharging concrete) and Stopping without turning off the engine
-
Click
 to quickly select: Factory area, Fencing area, Car to view
- Log in to post comments
- Tiếng Việt
- 繁體中文
Monitor video
1. Purpose
- Support users to monitor vehicle operating status directly via video or review images recorded during the vehicle's route.
2. Implementation conditions
- Users are assigned functional authority on the CRM system.
3. Implementation instructions
- Go to Monitor center/Monitor video
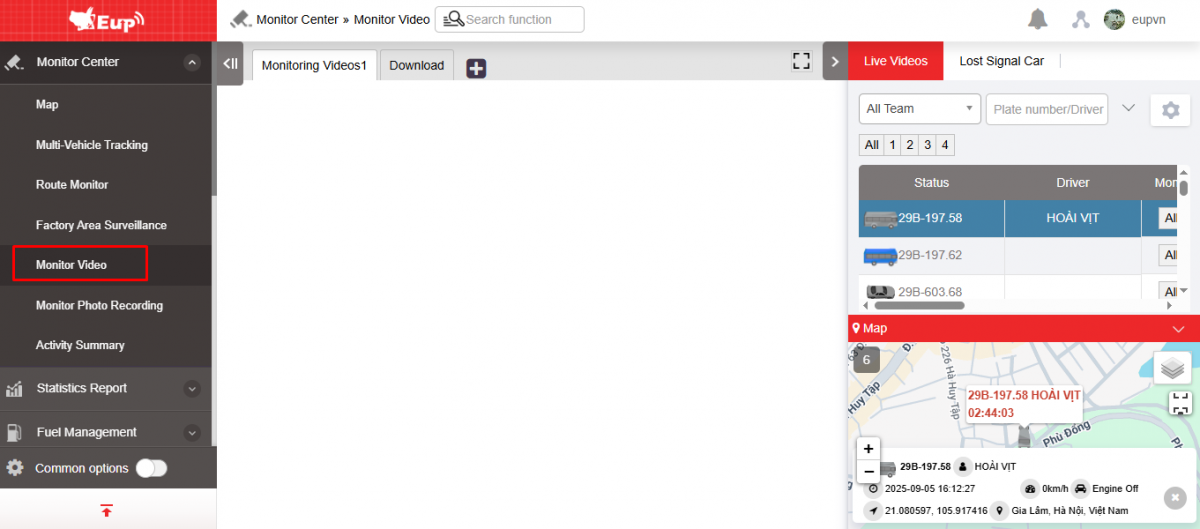
- The function display screen consists of 3 parts:
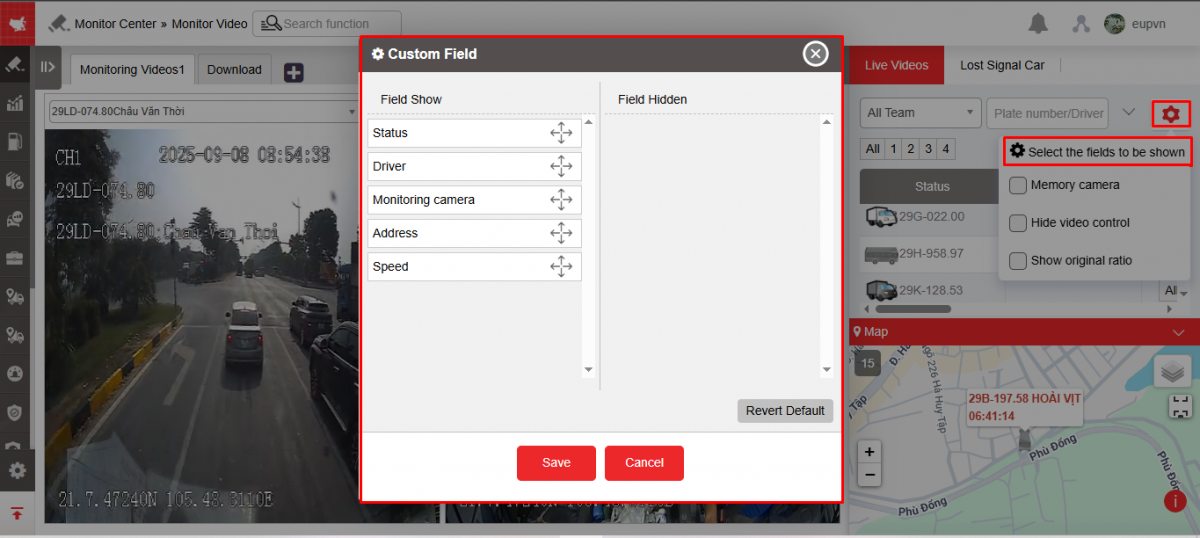
+ Live Videos and Lost signal car section : Select search parameters, vehicle information columns, list of vehicles with cameras installed but losing signal.
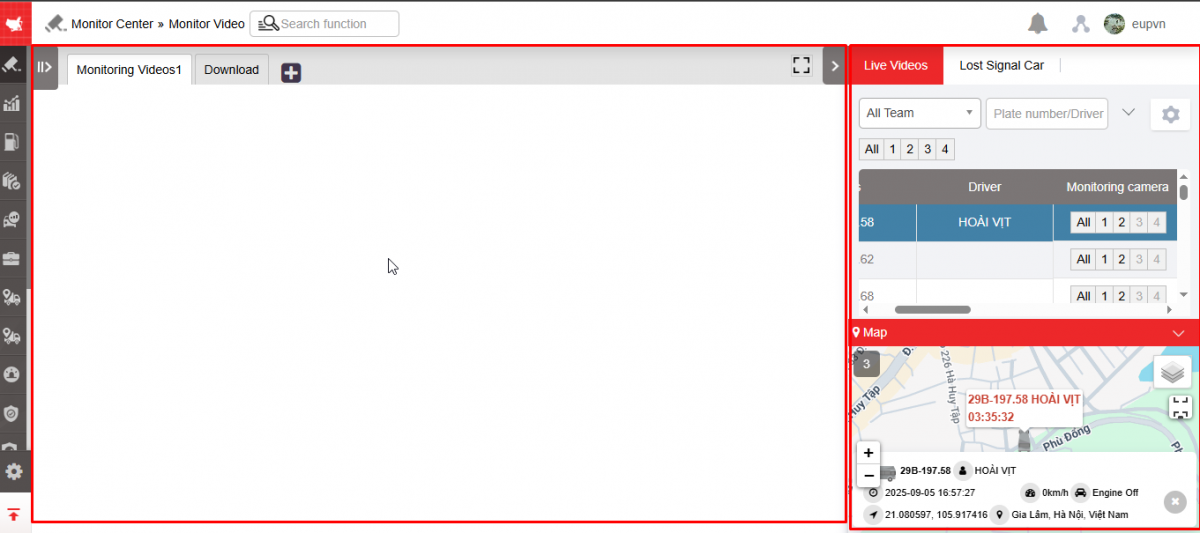
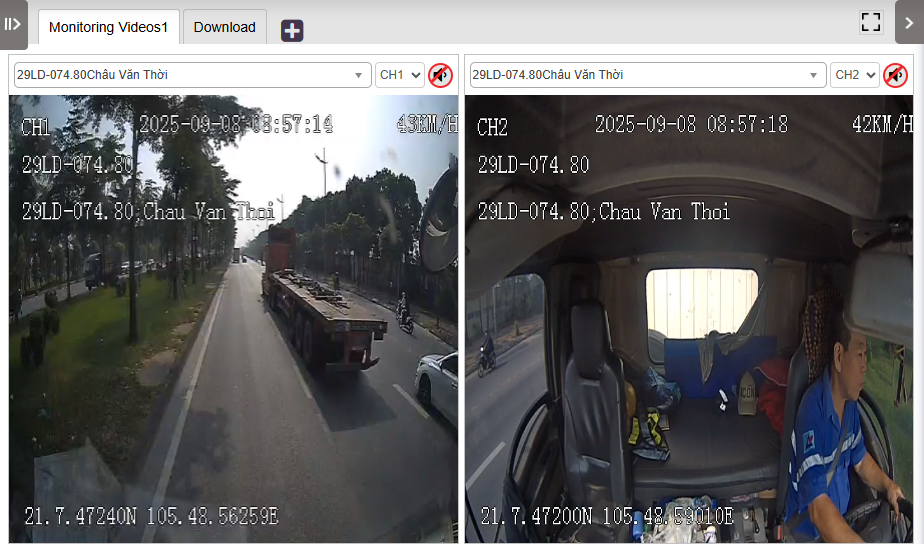
+ Monitoring videos section:
-
Monitoring videos displays live video surveillance of the vehicle;
-
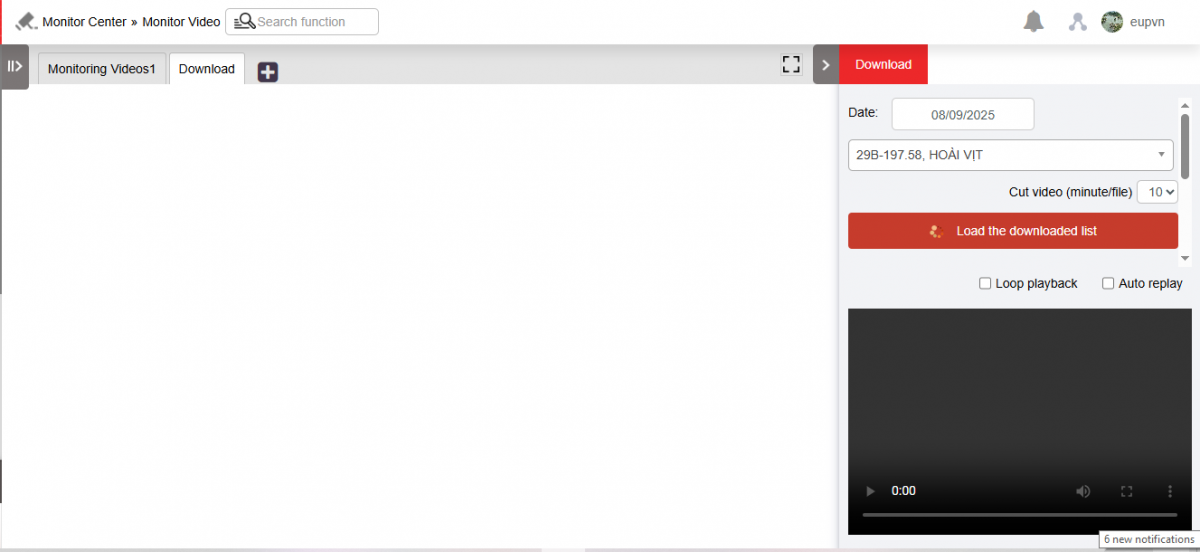
Download supports downloading and reviewing recorded vehicle surveillance videos, 10 minutes/video cycle.
+ Live videos and Lost signal car sections include information:
-
Live videos Tab : Select search parameters:
-
Select All team (Already installed in Settings/Permissions setting) , Select Plate number , Select camera to view
-
Vehicle information columns include:
-
Status: Vehicle running, Stopped without turning off engine, Parked, Lost signal
-
Driver: Driver name according to card swipe or assign name directly at Settings/Basic information/Car information
-
Monitoring camera: Select the camera to view
-
Address: Current location of the vehicle
-
Speed: Current vehicle speed
-
-
-
Lost signal car: Displays a list of vehicles with dash cams assigned but lost connection;
-
The user can select the information to display by selecting the icon
 to select the information to display in the list of vehicles or lost connection.
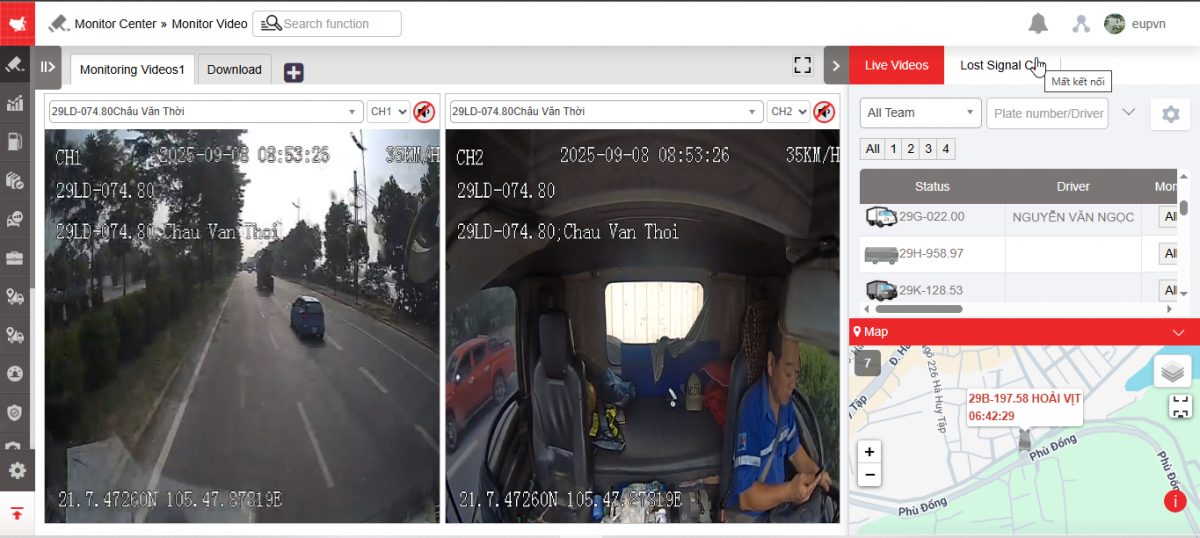
+ Monitoring Section
-
Video monitoring: This part connects directly to the vehicle's dash cam to monitor vehicle operations. Includes information:
-
Live Video : Allows viewing of live video of the vehicle
-
Select the camera you want to view, turn on/off the sound
-
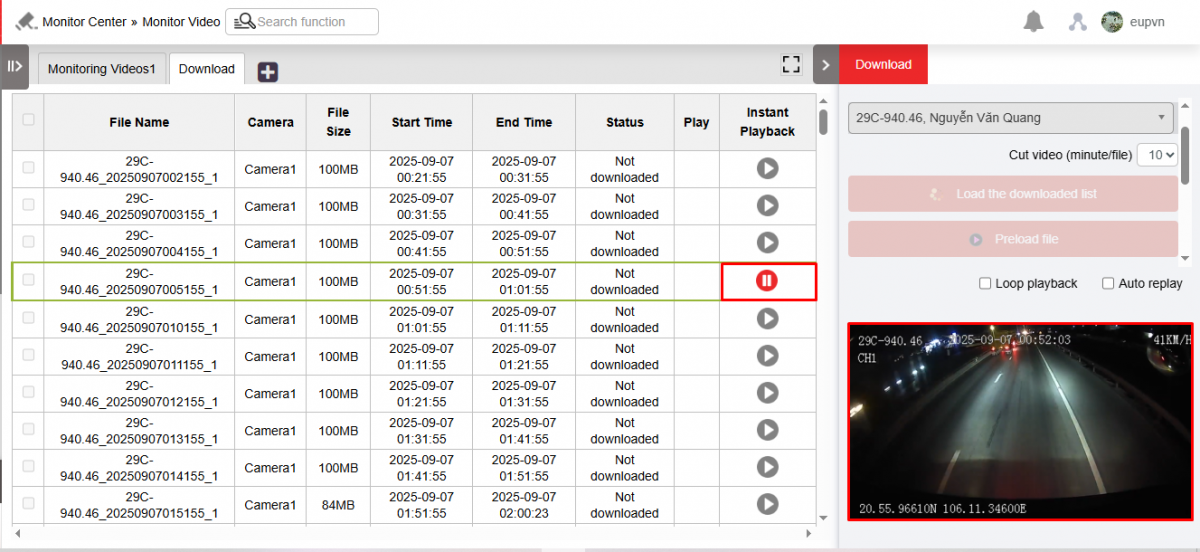
Load Images: Displays a list of videos in time intervals, each 10 minutes apart.
-
To display the list of video clips, the user selects the Read Download List function button ;
-
To review the video, the user selects the checkbox to the video stream they want to watch and selects Download file to download the video;
-

-
Select the video player on the right corner to review the video you just downloaded.
- Log in to post comments
- Tiếng Việt
- 繁體中文
Monitor photo recording
1. Purpose
- Support users to monitor vehicle operating status directly with images or review images recorded during the vehicle's route.
2. Implementation conditions
- Users are assigned functional authority on the CRM system.
3. Implementation instructions
- Go to Monitor center/Monitor photo recording
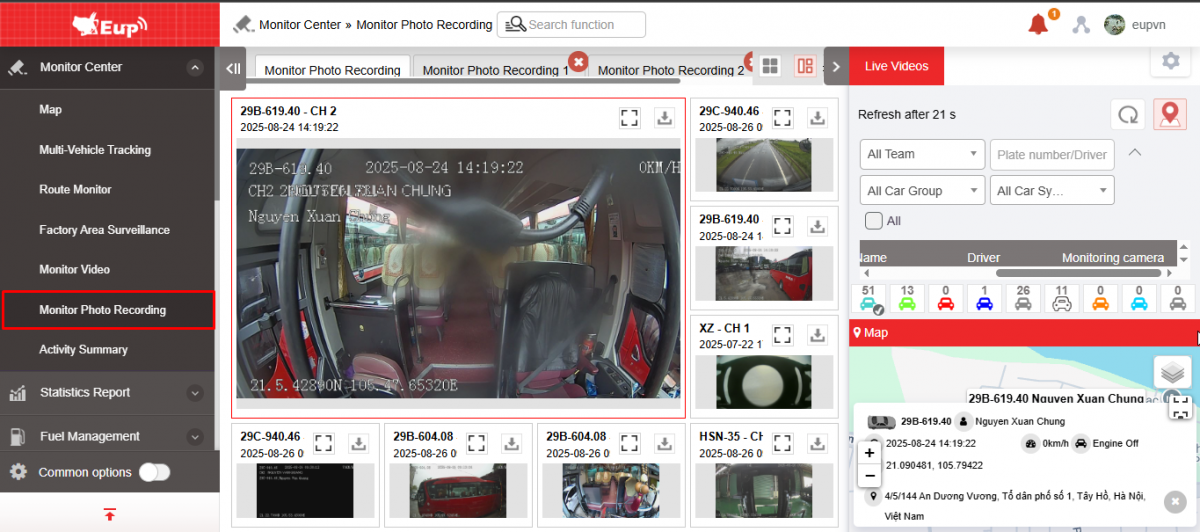
- The function display screen consists of 2 parts:
+ Monitor photo recording section displays live monitoring images of the vehicle;
+ Video lives section displays the vehicle list and number of cameras
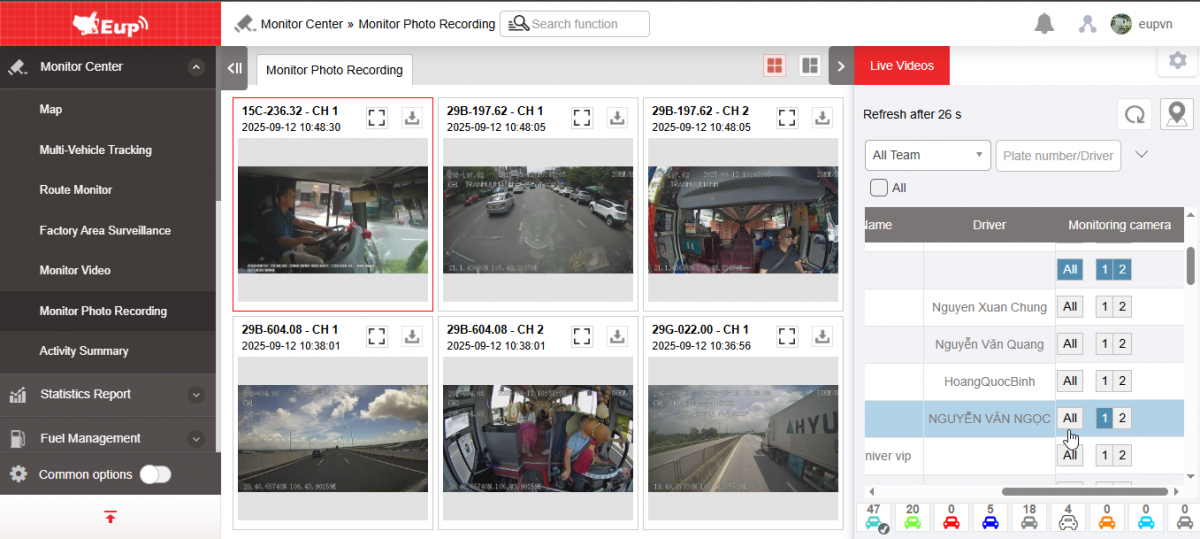
+ Monitor photo recording:
-
Display live images with information including: Plate number, camera name, update time
-
Click
 to expand image
 -
Click
 to download image
 -
Click
 to select photo frame mode
+ Live videos section to select search parameters
-
Select the fleet (Already installed in Settings/Permissions setting), Select the Plate number, Select the camera to view or select the checkbox All
-
Vehicle information columns include:
-
Status: Vehicle running, Stopped without turning off engine, Parked, Lost signal
-
Plate number
-
Car name
-
Driver: according to card swipe or assign name directly at Setting/Basic information/Car information
-
Monitoring camera: Select the camera to view
-
-
List of vehicles by status

-
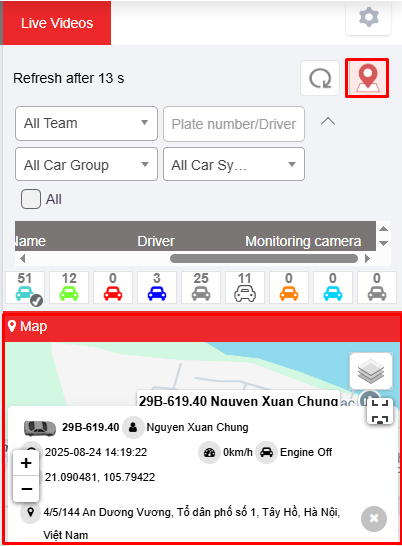
Click
 to update latest image
 -
Click
 to see the car on the map
-
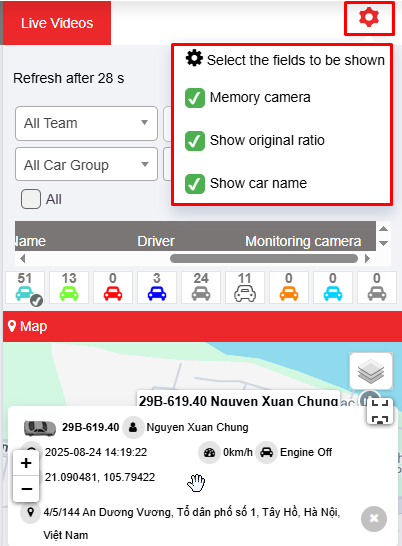
Click
 to set the fields to be shown, select the checkbox Memory camera, Show original ratio, Show car name
Monitor photo recording
1. Purpose
- Support users to monitor images recorded throughout the vehicle's route (3 minutes/1 image)
2. Implementation conditions
- Users are assigned functional rights on the CRM system (Option VN102)
3. Implementation instructions
- Monitort center/monitor photo recording

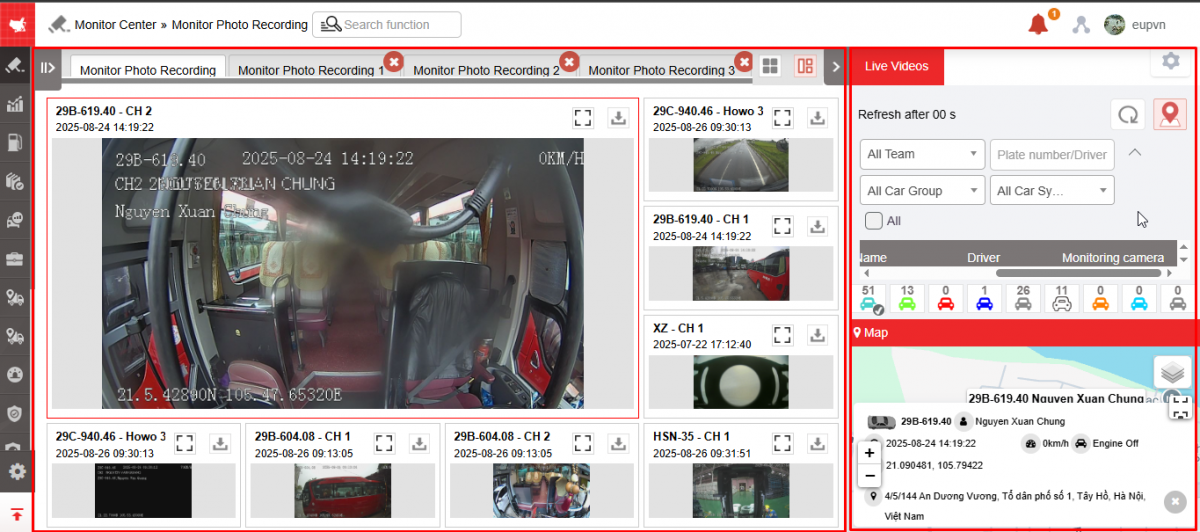
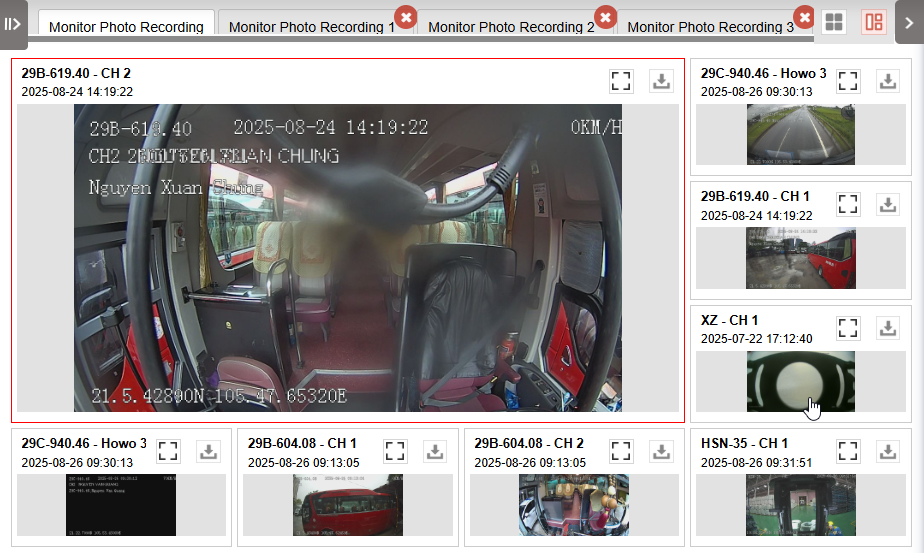
- The function display screen consists of 2 parts:
+ The Monitor photo recording section displays photos of the vehicle: 3 minutes/photo;
+ The Live videos section supports selecting the vehicle you want to view images of.
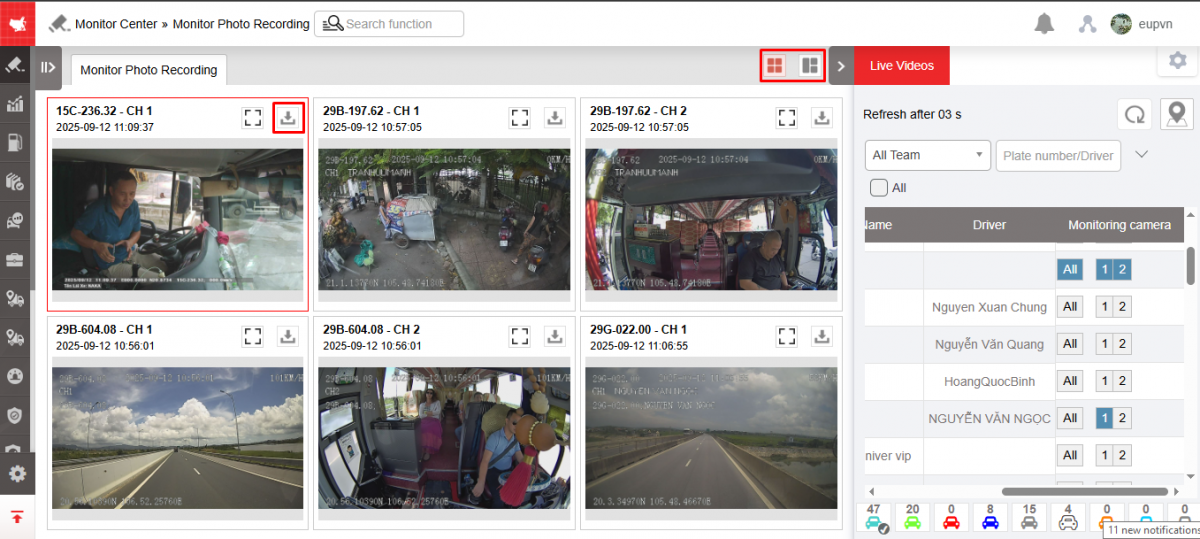
+ Monitor photo recording section : This section connects directly to the vehicle's dash cam to monitor vehicle operations. Includes information:
-
Live image : Allows viewing of live images of the vehicle. Users can select vehicles by each factory or all factories, by each vehicle type or all vehicles; view vehicles like that.
-
View up to 16 images on one screen, after 16 images will go to the next new page
-
Select view layout
-
Click on the download icon to download the current image
-
Select
 to select interface
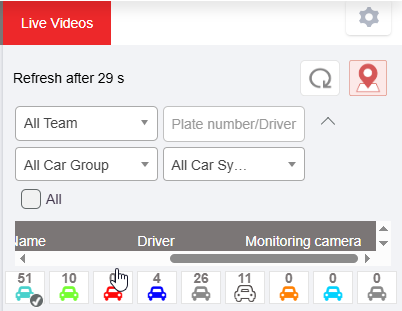
+ Live videos section
-
Select the vehicle to view: Turn on/off the camera
-
Click the map icon to see the vehicle on the map
-
Display the number of vehicles corresponding to each color status

-
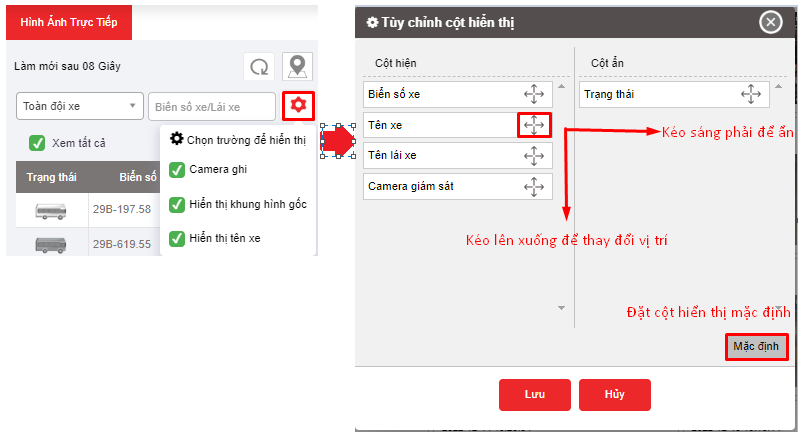
Click the settings icon to customize:
-
Select fields to display : Set Show/hide display columns, drag and adjust the position of the display columns or set Default
-
Checkbox Camera ghi
-
Checkbox Show original frame to see full frame
-
Checkbox Show vehicle name
-
-
Click the icon
 to refresh data
- Log in to post comments
- Tiếng Việt
- 繁體中文
Route monitor
1. Purpose
- Support users to monitor vehicles following the specified route and warn if the vehicle deviates from the route.
2. Implementation conditions
- Users are assigned functional authority on the CRM system.
3. Implementation instructions
- To create a route, users access the menu Monitor center/Route monitor
+ Step 1: On the monitoring page, the user right-clicks on the map section and selects Quick create route
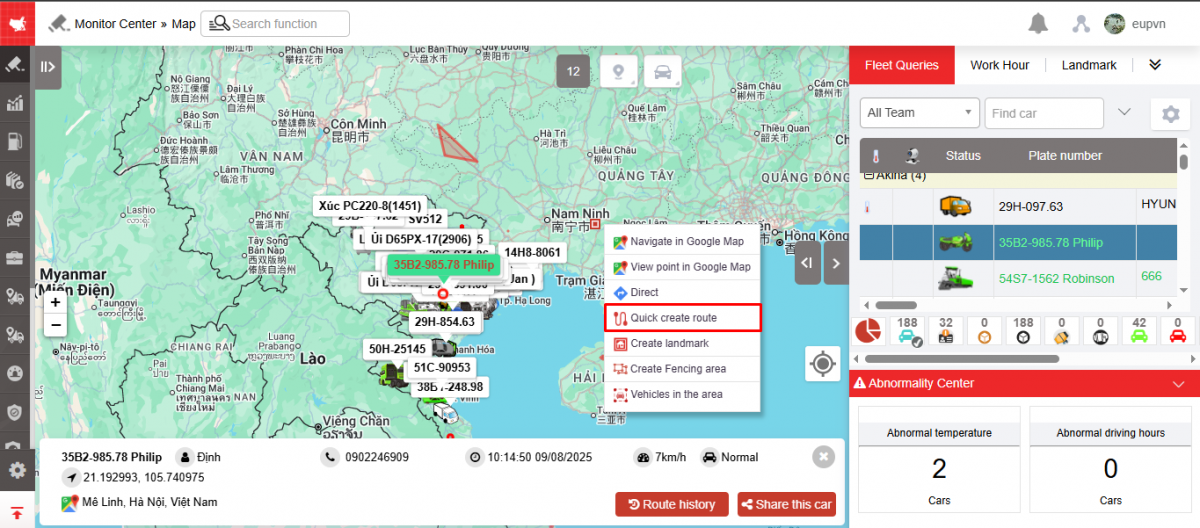
+ Step 2: The route creation popup is displayed for users to create information on the route including:
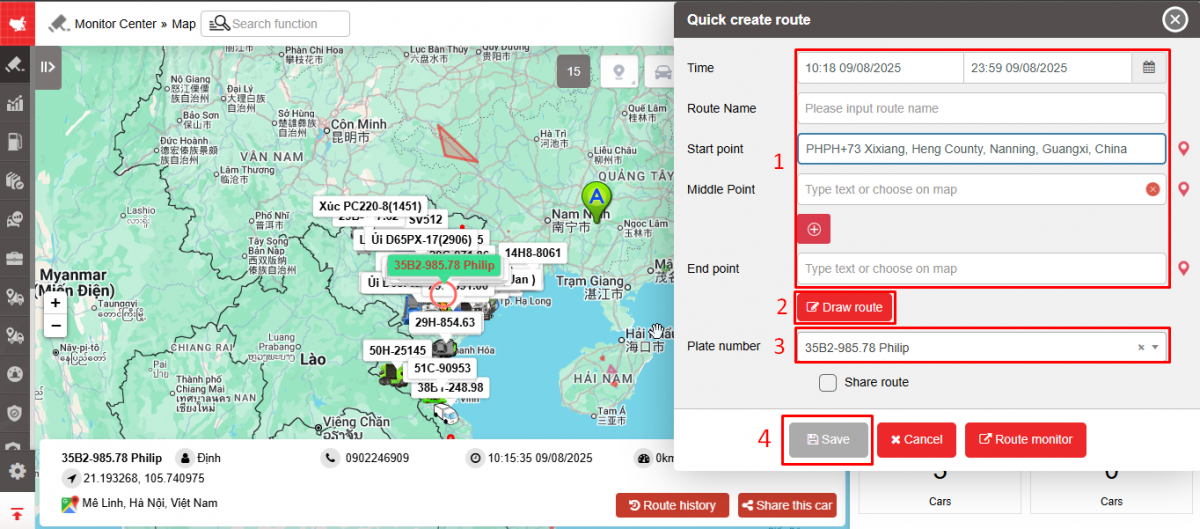
-
Time (hh:mm dd/mm/yyyy - hh:mm dd/mm/yyyy): User fills in start time and end time of route.
When the current time is equal to the start time, the route starts and when the current time is equal to the end time, the route will automatically end. If the user wants to end the route early, press the End Route button.
-
Route name: User creates a new route or selects a route from the suggested list (old routes have been created before). If selecting a route name from the suggested list, the starting - intermediate - ending points will be automatically displayed.
-
Start point
-
Middle point
-
End point
-
Draw route: After choosing the points, click on Draw route
-
Plate number
-
Checkbox Share to child accounts :
-
For the admin account created, if the route is selected to be shared, the child account containing the vehicle participating in the route will be able to see the route that the admin shared without being allowed to end the route.
-
For child accounts when creating a route, the admin account will see and be allowed to end the route created by the child account.
-
-
After saving the information, the system supports displaying the route and estimated travel time from the starting point to the end point according to Google.
-
Once the route creation is complete and the vehicles are executing it, the created route will be displayed in the Route Monitoring tab on the online monitoring page.
- To view the created route, there are 2 ways for users:
1. Access the menu Monitor center/Route monitor
2. After saving the route, click the Route Monitoring button to switch to the Route Monitoring tab .
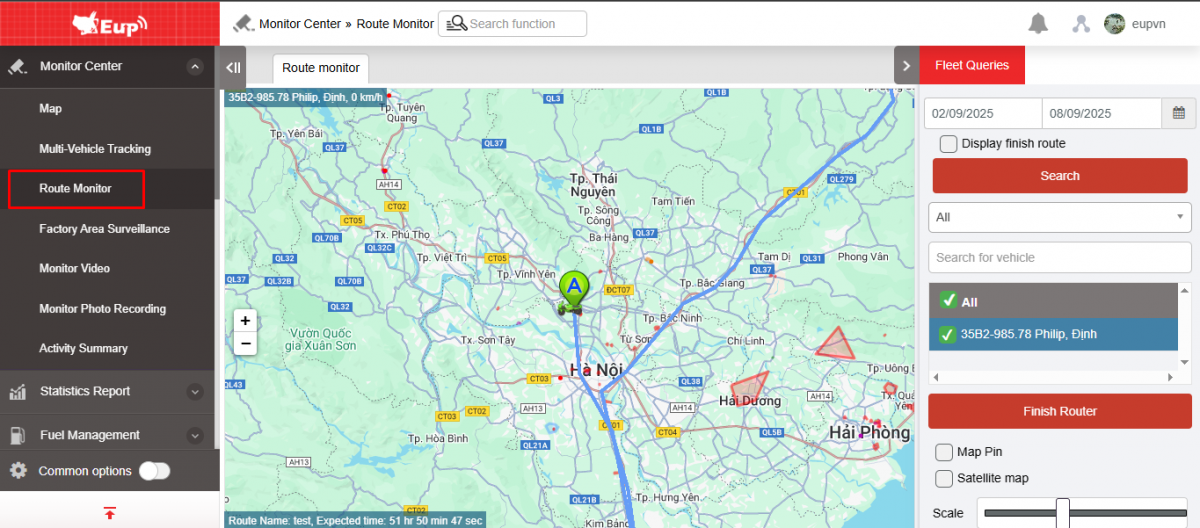
The route monitoring screen displays 2 parts:
+ Fleet Queries section
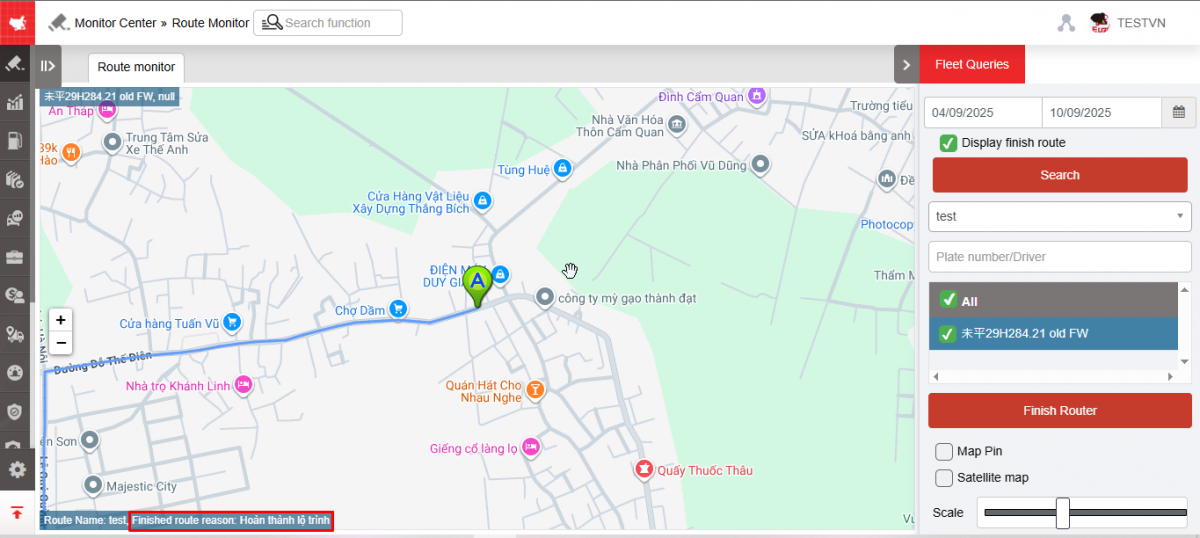
+ Route monitor section includes the following contents:
-
Select search period
-
Show finish router checkbox : Select to show finished routes, unselect to see active routes
-
Search : Click the search button to look up results
-
Route name : User selects one or all routes
-
Plate number/Driver: User selects one or more license plates to monitor
Note: View up to 9 vehicles on the same screen
-
Finish router : Select the route to end, then click the Finish router button and fill in the reason for ending the route. The reason for ending the route will be saved on the route map of the finished routes
-
Checkbox Map pin: Check to pin the map when the vehicle moves
-
Checkbox Satellite Map: Check to see satellite map
-
Scale : Drag to adjust the map scale
+ The Route monitor section displays the following contents:
-
On the route monitoring map displays Plate number, Speed, Route Name, Estimated Time from Point A to Point B
-
Blue route AB: Prescribed route
-
When the vehicle deviates from the prescribed route, the route monitoring screen will display a red line showing the current route the vehicle is taking if that route is incorrect.
- To set up warnings on the system, users access Settings /Alert settings , then select Route tracking warning
+ General settings for Alert groups :
-
Notify: Turn notifications on/off
-
General Configuration Settings : General or Custom Configuration Settings
-
Alert on apps: WEB, APP, Email
-
Apply to all devices : Enable/disable applying warning settings on all devices (computers, phones...)
-
Receive alert from vehicles : Select the license plate number to receive warnings
+ Settings for each alert
-
Turn on alert: Enable/disable warning
-
Reminder when anormal:...Times : After how long will the system receive a warning, 1 time = 30s
-
Cycle: Continuous, Repeat, One Time
+ When the vehicle goes off route, warning information will appear on the icon  and will be saved in Event History
+ On the Vietnam FMS app, if the vehicle goes off route, there will be a notification warning the vehicle of going off route with the following content:
Wrong route warning
At: 09:09:00 October 4, 2023, BSX-X1, Route 1 (name of the route the vehicle is taking)
Note : The route is considered to start when the user saves the created route. The route is considered to end when the user clicks the end route button, the route will automatically end after 7 days from the date of successful route creation.
The maximum number of vehicles participating in a route is 30 vehicles; The maximum distance of a route is 500 km.
Settings/Authorization :
Admin account : Has the right to view and end the routes of all routes created by child and grandchild accounts.
Child and grandchild accounts : When creating a route, the Share route option allows/disables sharing the route for all other child and grandchild accounts to view but not end the route.
Activity Summary
1. Purpose
- Support users to search and control vehicle activities by day by calculating total time according to status.
2. Implementation conditions
- The user has an account and successfully logs into the system.
3. Implementation instructions
- Go to menu Monitor center/Activity Summary.
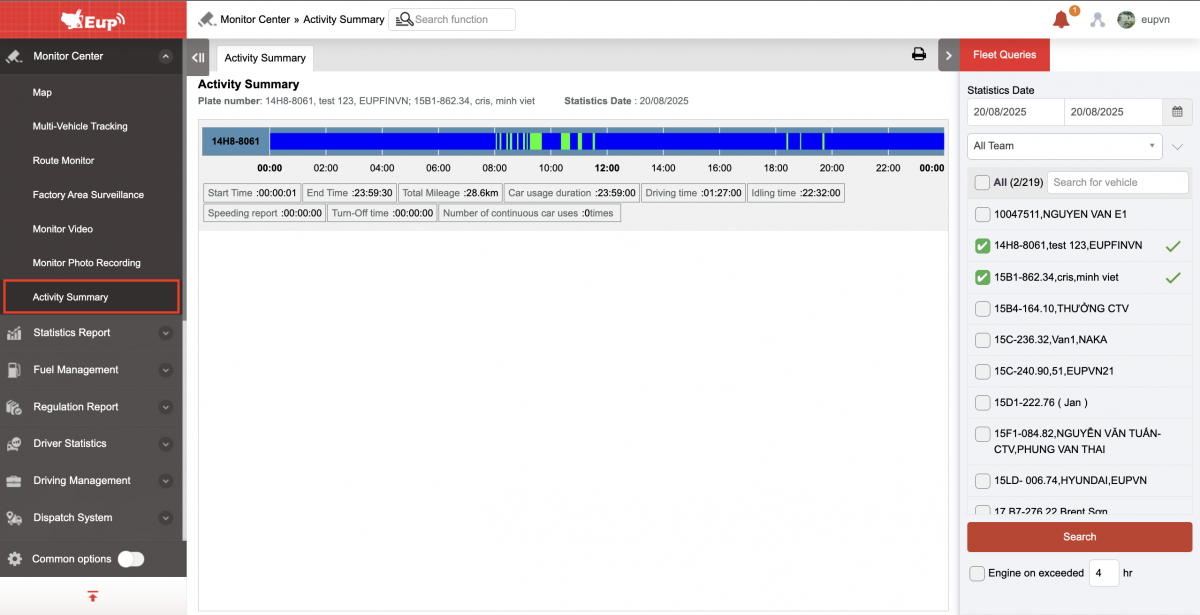
- The function display screen consists of 2 parts:
+ The Fleet Queries section allows searching and displaying vehicle activity charts by search date;
+ The Activity Summary section allows displaying detailed vehicle activity information according to specific statistics.

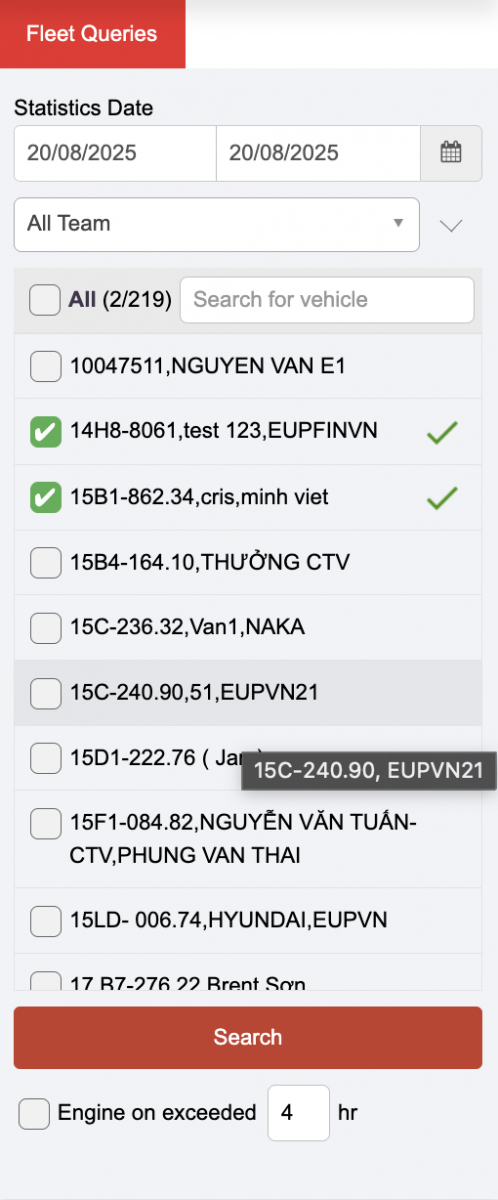
+ Fleet Queries section : User selects the date to view the activities of each fleet or the entire fleet, then presses Search. The system displays a detailed activity chart of each vehicle in the fleet. By clicking on the chart, we can see the detailed start and end time of a vehicle status.
-
Check Engine on exceeded:...hr (custom time): Shows vehicles that have driven continuously for more than the selected time
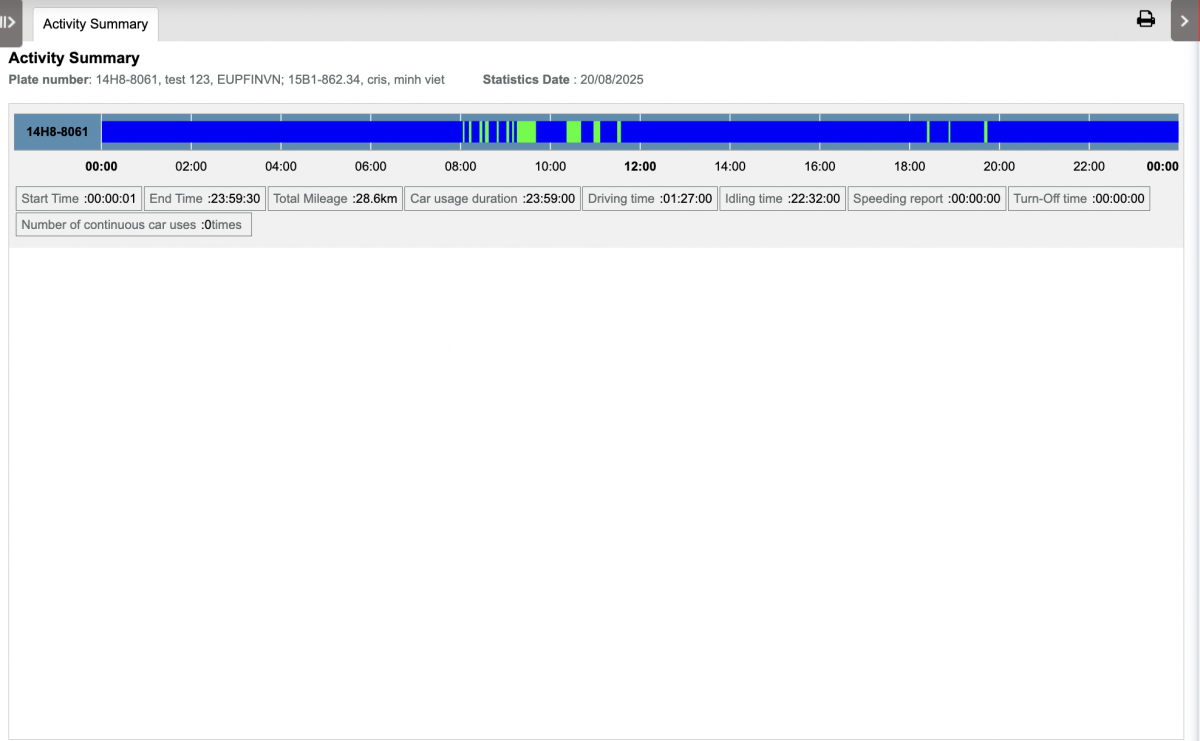
+ The Activity Summary section allows displaying specific statistics of the vehicle's performance, specifically:
-
Plate number and Driver: Display license plate and driver name;
-
Start Time: The first time of day the vehicle starts connecting to the system;
-
End Time: The last time of the day the vehicle started connecting to the system;
-
Total Mileage: Total number of Km the vehicle has traveled;
-
Car usage duration: Total time the driver uses the vehicle during the day;
-
Driving time: Total time the driver drives during the day;
-
Idling : Total time spent stopping without turning off the engine;
-
Speeding report: Total time the vehicle was overspeeding;
-
Turn-Off time: Total time the vehicle was stopped.
+ Select icon  to print
- Log in to post comments
- Tiếng Việt
- 繁體中文